Preparing for Installation
| When you manually install a Windows XP Professional system, you may just think it's a matter of getting your hands on a CD and popping it into a computer. However, when you deploy Windows XP Professional throughout an entire organization, even if you decide to do so manually, you can reduce errors and delays by following a carefully planned deployment. Most projects involve five principal stagesDefine, Design, Develop, Test, and Implement, as shown in Figure 1.1. You should follow them when deploying Windows XP Professional, as well. Although there are many different project methodologies, and some are quite complex, if you boil them down to their essential elements, they fall into these five stages:
Figure 1.1. You can apply the five principal stages of projects to Windows XP installations. Hardware RequirementsThe base hardware requirements for Windows XP Professional are listed in Table 1.1. Although these are the minimum hardware requirements for supporting the operating system, they are not necessarily adequate to support additional applications or for reasonable performance. The Recommended column in Table 1.1 should be your minimum starting point. When designing the hardware requirements for installation, you should allow for extra RAM and hard disk space and probably a faster processor for applications.
If you want to access a network, you should have a network adapter installed that is compatible with the network infrastructure. For Internet access, at a minimum you need a 14.4-Kbps modem or higher to dial up to an Internet service provider (ISP). Video conferencing, voice, fax, and other multimedia applications generally require 56-Kbps modems, microphone, sound card, and speakers or headset. Video conferencing itself requires a video conferencing camera. Hardware CompatibilityMicrosoft makes it easy to check your hardware's compatibility by providing a list of supported hardware. Links to the Windows Catalog and Hardware Compatibility List (HCL) for several Windows operating systems are located at http://www.microsoft.com/whdc/hcl/default.mspx. The Windows Catalog and HCL are not comprehensive. You can check hardware compatibility by contacting the manufacturer of the device if you cannot find it on the Microsoft website. An issue that can interrupt the installation process is the use of incompatible critical device drivers. If a compatible driver is not available, Setup stops until updated drivers are found. Operating system upgrades will not migrate Windows 98 or Windows Me drivers. The only way to ensure a smooth installation is to make certain you have all the drivers available at the start of the installation process. Do not be concerned about unattended installations because there is a folder in which you can place any additional or updated drivers for hardware that is not included in the base Windows XP files. Before you deploy Windows XP Professional on any system, you should ensure that the hardware and BIOS are compatible with the operating system. Older hardware may not have a compatible BIOS even though the devices within the PC itself are all listed in the Windows Catalog or HCL. The original equipment manufacturer (OEM) should have an updated BIOS available that can be downloaded from the OEM's website. If you have an Internet connection, you can use the Dynamic Update feature to connect to the Windows Update website during setup. Windows XP automatically downloads and installs updated drivers during the setup process from the Windows Update website. Software CompatibilityOne of the more difficult parts of the development and testing phase of an operating system deployment project is to handle software compatibility, or rather, software incompatibility. The operating system that you deploy is important because it provides the basic functionality for the computer, but productivity usually depends upon business applications that are installed, which makes applications more important to the organization. If an application is not compatible with the operating system, you have the following options:
Before you are faced with these decisions, your first task in determining software compatibility is to identify all the applications that are used and that will be installed in your deployment project. You should develop a matrix of applications that is organized according to priority of business productivity and by number of users that use the application. For example, if you determine that 100% of all your users use APP A, but that it does not directly contribute to business productivity (such as an antivirus application), you would place it in the high use, low productivity quadrant. If you determine that 10% of your users use APP B, and it contributes highly to business productivity, you would place it in the low use, high productivity quadrant. If 5% of users use APP C and it has no impact on business productivity, you would place that in the low use, low productivity quadrant. The applications in that low use, low productivity quadrant are the ones that you should analyze for potentially retiring. If you find that 90% of all users use APP D and it is considered business-critical, you would put APP D in the high use, high productivity quadrant. All applications in this quadrant should receive priority during the project. You may decide to include additional criteria to your matrix to better pinpoint the applications that will require more of your time during the project. For example, you could identify which applications are developed for Windows XP, and which are developed specifically for older Windows operating systems, and furthermore, which have been developed in-house. Applications that have been developed for Windows 95 or Windows 98 may not run properly on Windows XP. Those applications that were developed for Windows NT, either v3.5 or v4.0, may also be incompatible with Windows XP. Antivirus applications are typically incompatible if they were developed for older Windows versions. After you have an inventory of your current software, you should then build a test lab and test the applications with Windows XP. With each application that has compatibility problems, you should decide whether it is important enough to fix the application. If it is important, you should then determine the fixes you need to undertake to make it compatible. You can then package the fixes using the Compatibility Administrator tool (CompatAdmin), which is part of the Windows Application Compatibility Toolkit. Finally, you should test the deployment and perform a quality assurance check on the test PCs to see whether the applications install and run properly. Note CompatAdmin and Windows Application Compatibility Toolkit locations You can obtain additional information about CompatAdmin at http://www.microsoft.com/technet/prodtechnol/winxppro/maintain/compadmn.mspx. For Windows Application Compatibility Toolkit information, visit http://support.microsoft.com/default.aspx?scid=kb;en-us;294416. Tip If you decide to upgrade computers on your network, you can use the Check Upgrade mode of Windows XP Professional Setup. This process produces a report that flags hardware or application compatibility problems that you may encounter during an actual installation. To use Check Upgrade mode, execute the d:\i386\winnt32.exe /checkupgradeonly command from a command prompt (where d: represents the CD or DVD drive that contains the Windows XP CD). Network RequirementsIn a Windows XP Professional deployment, you must be able to identify which network protocols and network hardware are used on your network. Network protocols affect how you configure the computer, especially if there is some problem with addressing. When you install Windows XP, it will not connect to the network properly if it does not use a compatible protocol or does not have a correct address. The network hardware you use on the network affects the options you have available for deployment. For example, if you have no servers on your network and/or no peers with enough hard disk space to hold the installation files, you will be unable to install Windows XP over the networkattended or unattended. If you have servers but they do not run Windows 2000 or Windows 2003, you will not be able to use RIS. If you do not have sufficient bandwidth, you will not be able to run the installation across the network either. To assess your network, you should collect the following information:
A thorough network assessment includes physical and logical diagrams of all sites, documenting each physical link, its speed, IP address and available bandwidth, and the location of each piece of equipment. The logical portion should show server roles, Domain Name System (DNS) servers, Windows Internet Name Service (WINS) servers, Dynamic Host Configuration Protocol (DHCP) servers, trust relationships, and your domain architecture. When the Windows XP Professional computer is a network client, you need to determine how to connect that client to the network. Keep in mind that large internetworks tend to be hybrids, having a mixture of network media. If one client is intended to connect to a token ring network, whereas another is intended to connect to a wireless network, you need to plan for the appropriate network adapter, drivers, and installation method. The standard network protocol for Windows XP Professional is Transmission Control Protocol/Internet Protocol (TCP/IP). If you intend to connect to a network that has NetWare servers that do not use TCP/IP, you also need to configure the NWLink protocol, which is Microsoft's equivalent to the Internetwork Packet eXchange/Sequenced Packet eXchange (IPX/SPX) protocol. On the other hand, you should not install any additional protocols if they are unnecessary because they will generate additional network traffic. DHCP servers automatically provide IP addresses to each DHCP client on the network from a pool of addresses. When a network device releases its IP address, the address can be reused for another DHCP client. This averts IP address conflicts, as well as helps distribute IP addresses efficiently, along with extended information such as DNS server data. Even if your network uses DHCP services, you should be aware of IP addresses used on each network link. This helps if you have to troubleshoot a problem with connectivity. If your network uses static IP addresses, you need to have an IP address for each network client you install. Domain MembershipWindows XP Professional computers can participate in both Active Directory and Windows NT 4.0 domains by becoming members of the domain. Keep in mind that Windows XP Home Edition cannot participate in a domain as a member, but can access data on a domain server. Domain membership in an Active Directory domain requires the TCP/IP protocol and proper DNS server identification.
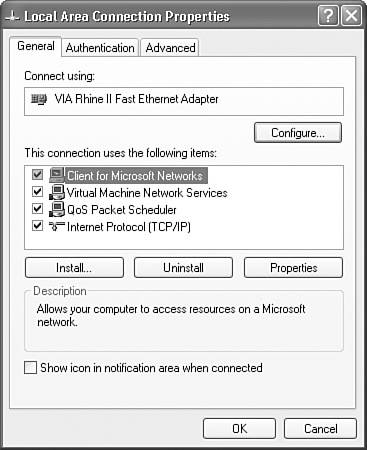
Workgroup MembershipWhen you install a peer-to-peer network of Windows XP Professional and other Windows computers, you need to ensure that each computer is connected and that they are all running the same protocol with correct addressing. The only other thing you need to do is to ensure that each computer within the peer-to-peer network is a member of the same workgroup. Because the Windows XP Professional computer is a peer on the network, it not only needs to access other files and printers, but it needs to share its own files and printers. To do this, you should install File and Printer Sharing if it is not installed already on the computer. To install File and Printer Sharing:
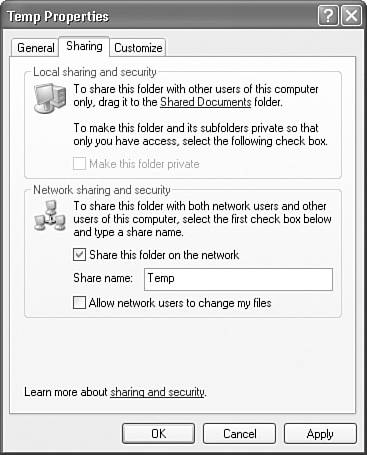
With File and Printer Sharing installed, you still cannot share files and printers until you specify which should be shared. To share a file or printer, follow these steps:
The file-sharing capabilities in Windows XP are simplified such that all users have identical rights to files based on how you originally share the resource. This means that either all users can read the files, or all users can change the files. This is through the ForceGuest behavior inherent in Windows XP Professional, which simply means that when the Windows XP Professional computer is a member of a workgroup, all connections to the computer are forced to use the Guest account, even when a user name and password are provided. This simplifies the peer-to-peer network quite a bit because you do not need to configure user names and passwords that are identical on all the peers. You can disable ForceGuest and change the folder options to not use Simple File Sharing. If you do so, the computer behaves as though it were a Windows 2000 Professional peer. Note Checking the Access Control List If you are using NTFS for the file system, you can check the access control list of a folder with the cacls command. Click Start, Run, and type cmd in the Open text box. Press Enter to open the Command Prompt window. At the prompt type the following: CACLS C:\FOLDER File System ConsiderationsWindows XP Professional supports three file systems:
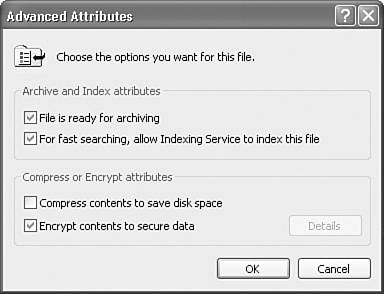
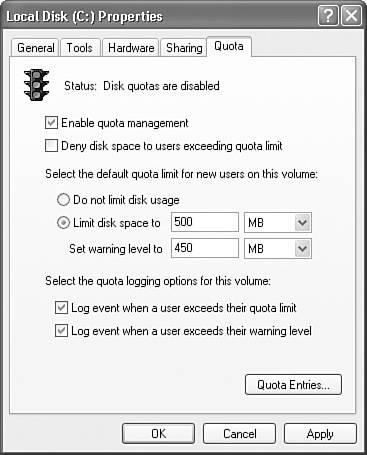
FAT16 is a 16-bit file system, whereas FAT32 is a 32-bit file system, both of which have grown out of the Windows 95/98/Me family. NTFS is the 32-bit file system that has come from Windows NT. In a corporate environment, or in any peer-to-peer network, you should consider NTFS to be the optimum file system to use. It has the basic functionality that FAT16 and FAT32 provide, plus it supports improved security, file encryption, file compression, and larger partitions and files. For scalability, NTFS can ensure your file system will support the larger hard disks and will not degrade in performance. Fault tolerant features are incorporated in NTFS. The file system automatically repairs disk errors without displaying error messages. When Windows XP writes files to the NTFS partition, it saves a copy of the file in memory. It then compares the file on the disk to see whether it is the same as the copy in memory. If the two copies aren't equivalent, Windows XP marks that section of the disk as bad and rewrites the file to another disk location. The security within NTFS allows you to set permissions on folders and individual files. FAT16 and FAT32 do not. Furthermore, to use the Encrypting File System (EFS), you must have NTFS as your file system. EFS allows you to protect your files and folders from unauthorized access on the local hard drive through the use of public key security. In public key security, users are issued digital certificates with a pair of keysone public and one private. EFS uses the keys to automatically expose or hide the files, depending on whether the computer's current user has the matching private key. Even though a user has encrypted a file on the local computer, the user can still access and use the file normally because Windows XP automatically decrypts the file with the user's private key. Other users cannot use the file and see only an Access denied message if they attempt to do any file operations on that file, including copying, moving, renaming, deleting, or opening it. EFS is important for both mobile users and shared computers. Figure 1.4 shows the Advanced Attributes dialog. Remember that you cannot select both encryption and compression; you can select only one or the other. Figure 1.4. Select the Encrypt Contents to Secure Data option in the Advanced Attributes dialog box to encrypt a file or folder. NTFS enables you to set disk quotas. When a computer is used by multiple people, you can control the amount of disk space each person can use on that computer. In Figure 1.5, you can see the Quota tab of the Local Disk Properties dialog box with quotas enabled and configured. Disk quotas are allotted to individual users on a per-volume basis. Users will not see a disk quota message. Instead, when a user looks at the available disk space, it displays only the amount of space available for that user's disk quota. If users attempt to exceed their allotment, they are given the message that the disk is full. Figure 1.5. You can limit the amount of disk space used by all users by setting disk quotas. Native NTFS file compression enables users to select individual files or folders to compress. Because the file system takes care of the compression algorithm, any Windows application can read or write a compressed file without having to manually decompress the file beforehand. File compression is supported only when NTFS has a cluster size of 4KB or smaller. Figure 1.4, earlier in this section, shows the file compression dialog box, which is also includes a file encryption option. Aside from features, your existing file system used on the computer will give you some guidance as to which file system to choose for Windows XP. If you are performing a clean installation of Windows XP, you may select any of the three. Exam Alert Upgrading considerations If you are upgrading an existing Windows system that already uses NTFS, you should keep NTFS. If you are upgrading Windows systems that use FAT16 or FAT32, you can convert the partition to NTFS during the setup process. However, you cannot uninstall Windows XP Professional and revert to the former operating system with this option. If you have a Windows 98 FAT32 volume that has been compressed, you cannot upgrade the computer until that volume is uncompressed, regardless of which file system you select. Dual-boot systems also require you to think through the file system choice. Although you may use both an NTFS and a FAT partition on the same computer, the operating system using the FAT partition cannot access files in the NTFS partition. However, Windows XP can access both partitions. Product ActivationThe highly controversial Windows Product Activation (WPA) was put in place by Microsoft to deter piracy. The premise is that each computer installed should have a unique identifier associated with the software with which it was installed. The WPA addition, however, does cause some planning issues for a large deployment. In a simple installation of a single Windows XP system, WPA is just a matter of contacting Microsoft via the Internet (the easiest method) or phone and obtaining the unique identifier. In a large deployment, WPA is complicated by the fact that generally a network installation uses the same file source for each computer installed. This is why Microsoft does not require WPA for customers who use Microsoft's volume licensing programs and use the volume licensing media for the installation. Luckily, the minimum number of licenses needed to participate in the volume licensing program is five, so almost any organization can use this method and avoid the WPA issue. How WPA works is straightforward: It generates a unique identifier for your computer by combining your hardware ID with the product key. This ID is sent to Microsoft, which then checks to see whether that product key has been used for more than the number of systems that the End User License Agreement (EULA) allows, which is simply one system. If this check passes, your computer receives a confirmation code that activates Windows XP and the issue of WPA goes away. If the check fails, your system is not activated and you cannot log on interactively after the 30-day activation period is over. If you do use media that requires WPA, you can use unattended activation to automate WPA in the unattended answer files. WPA also works with Sysprep to roll back activation for drive imaging. If you have a computer that is not connected to the Internet and does not have a modem available for connection purposes, you are required to manually activate it. To do so, you run through the WPA process when prompted to activate the computer, and you will obtain an installation ID number. Then you call the Microsoft Activation Call Center to obtain a confirmation ID. Finally, you input the confirmation ID number in WPA. When you use WPA, regardless of the method, the information in the ID submitted to Microsoft indicates the following:
|
EAN: 2147483647
Pages: 193


