| Objective: Perform and troubleshoot an attended installation of Windows XP Professional. In an attended installation, someone is required to interact with the computer while it executes the installation process. This is a process that IT professionals should be familiar with, but one the average user will rarely, if ever, need to perform. With OEMs releasing new computers with the operating system pre-installed, and with organizations ensuring that only IT staff installs and configures computers, it's likely that the only non-IT professionals who will run fully attended installations are those people who purchase Windows XP off the shelf and install it on their existing home computers. In that case, it is rather interesting to note that installing Windows XP Professional is doubtless more easy than installing any of the previous Windows versions. As an IT professional, you should run through at least one or two attended installations even if you are planning to deploy only unattended installations of Windows XP Professional throughout your organization. By going through the process, you can see each stage of installation and relate it to sections within the answer files and with the unattended process later on. If you need to troubleshoot an unattended installation, you will be better able to identify the point at which the installation failed if you have already become familiar with the attended installation process. Attended Installation Process You can run an attended installation process for either an upgrade or a clean installation of Windows XP Professional. Upgrading to Windows XP Professional is covered in Chapter 2, so we will be walking through a clean installation process in this section. Before you begin, check to make certain that you have gathered all the information you need and are prepared to install. You should have the following: A computer that meets the minimum hardware requirements and is listed in the Windows Catalog/HCL. Windows XP drivers from the manufacturer for any hardware that does not appear in the Windows Catalog/HCL. It's imperative that you have the hard disk drivers, especially if they are RAID or SCSI devices. Windows XP Professional CD or installation files available across a network. BIOS that meets the minimum requirements for Windows XP compatibility.
Exam Alert BIOS support for ACPI If you have Advanced Configuration and Power Interface (ACPI) capability in the BIOS, you should make certain that Windows XP Professional installs the support for ACPI during setup because it does not always detect it, and you will need to reinstall the operating system to add ACPI support later. Ensuring that you have the latest BIOS available will help with ACPI detection.
Exam Alert Strange product keys The product key 11111-11111-11111-11111-11111 doesn't exist.
If installing across a network, a boot disk that can access network shares and appropriate network adapters. Internet connection for Automatic Updates, and access to updated drivers and WPA. The decision to install either the FAT32 or NTFS file system before you format the drive. A backup of all your existing data and the drivers for the backup device so that you may restore the data.
When you have all the preceding items in hand, you're ready to install Windows XP Professional. Step by Step: 1.1 Manually Installing Windows XP Professional Via CD-ROM Your first step in the installation is to boot up the computer into the setup process. This means that you will boot to the network and run Setup from a network share, boot from the CD, or create a set of Setup startup disks that will boot the computer and find the CD. If your CD-ROM drive is not bootable, consider that to be a red flag that your system may have compatibility problems. (For more information, visit http://www.microsoft.com/windowsxp/using/setup/expert/honeycutt_02october07.mspx. Also, installing across a network is covered in Exercise 1.1 in the "Apply Your Knowledge" section.) For the following, we are using the process for a bootable CD-ROM, rather than for startup disks or a network installation: 1. | Insert the Windows XP installation CD and boot the computer. You should have a message that the CD has been auto-detected and a prompt to Press any key to boot from CD. Press the spacebar or any other key within five seconds or the computer attempts to boot from the hard disk.
| 2. | A message stating that Setup is inspecting your computer's hardware configuration appears. The first screen with a prompt allows you to press F6 for SCSI and RAID controllers. For ACPI, you should press F5, which enables you to select the Hardware Abstraction Layer (HAL) that supports ACPI. It is this screen where you can select another HAL that is appropriate to your computer. (Note: If you select the wrong HAL, you will have to reinstall Windows XP.)
| 3. | The early stages of installation consist mainly of downloading files from the CD to the hard disk. After that is complete, a screen appears asking whether you want to install Windows XP. Press Enter to continue.
| 4. | The EULA screen appears. You must press F8 to accept the licensing agreement as indicated at the bottom of the screen.
| 5. | The next screen shows the available partitions and unpartitioned disk space where you can install Windows XP Professional. Make certain you select a partition that has enough available disk space, preferably 1.5GB but at least 640MB. You can select the unpartitioned space and create a new partition for the operating system at this point, as shown in Figure 1.6. Press Enter.
Figure 1.6. You can use an existing partition for the Windows XP installation or create a new partition from unused space. 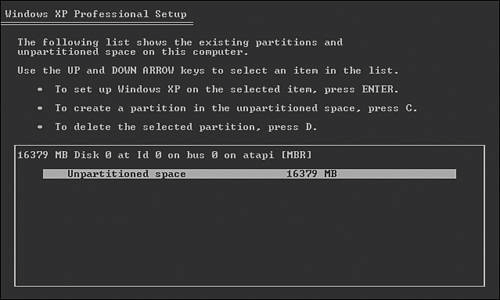
| 6. | After selecting the partition, your next decision is to select the file system that will be used on that partition. The preferred choice is usually NTFS because of its additional security features. Select the file system (see Figure 1.7) and press Enter to begin. It takes some time to format the drive; however, when it is finished the installation continues automatically.
Figure 1.7. You should select NTFS as the file system in most situations. 
| 7. | If you are using a Windows XP Professional Upgrade CD, you are prompted to insert your former Windows version media in the CD-ROM drive. If you are using the full version Windows XP CD, this step is bypassed. Eventually the PC reboots (you can press Enter to shorten the delay, but it reboots by itself anyway). You do not want the computer to boot from the CDinstead, you want it to boot from the newly installed operating system, so don't press any key at the prompt during the boot sequence as you did earlier.
Your computer starts for the first time, using the graphical user interface (GUI). The system continues to copy files.
| 8. | You are prompted to select the regional settings. To adjust these, select the Customize button, and then configure the options.
| 9. | Windows XP prompts you to personalize the computer with your name and your business. You will find that this information pops up at the oddest times when you begin installing other applications, so make certain you type something that will not offend anyone who uses the computer after you, if you decide not to use your own name. For a computer that will have multiple users, you may want to type the name of your organization in both the Name and Organization text boxes.
| 10. | Type the Product key in the next screen. This key is 25 characters (XXXXX-XXXXX-XXXXX-XXXXX-XXXXX) and listed on the Windows XP Professional CD jacket. If you do not type the key correctly, you are prompted to enter it again.
| 11. | On the next screen, provide a password for the Administrator account and approve the name for your computer. Setup bases the computer name on the name of the organization that you entered in Step 9, plus other characters intended to ensure its uniqueness (see Figure 1.8). If you intend to join a domain, enter a computer name that meets your organization's naming conventions and that has a computer account on the domain. The computer name must be unique on the network for both DNS naming and WINS naming.
Figure 1.8. Setup automatically generates a computer name based on the organization name you entered in a previous setup step. You can change the computer name, if necessary. 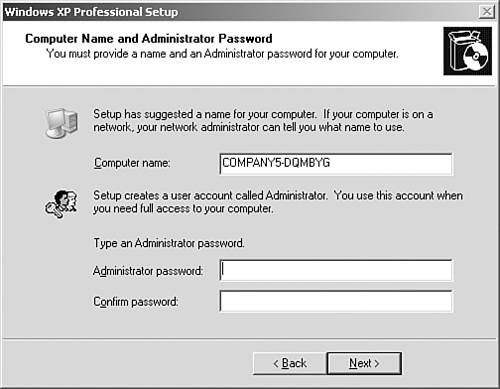
The password for the Administrator account is for a local user account on the computer running Windows XP. You do not need to make this password the same as the one for the domain administrator, and you can leave the password blank. Be careful when assigning different passwords for the Administrator account on different computers during a large deployment because you will have problems if you lose the local Administrator's password.
| 12. | On the next screen, set the current date, time, and time zone. If this computer connects to the Internet, you can simply select the correct time zone and later make certain that Windows XP automatically synchronizes with an Internet time provider. (If you have a local time provider computer, you can also type in that computer's address in the appropriate location.) Figure 1.9 shows the dialog box for customizing time synchronization. You can access this dialog box by double-clicking the time on the right end of the Windows XP taskbar and then clicking the Internet Time tab.
Figure 1.9. You can synchronize your computer time across the Internet. 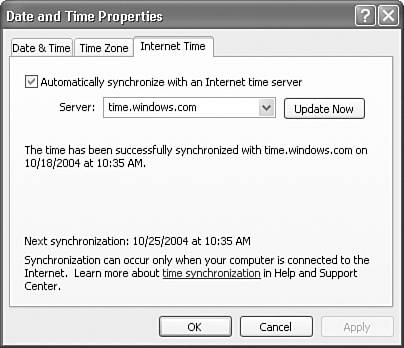
| 13. | If you have a network adapter within the computer and it was detected by Setup, you are prompted to either let Setup configure typical configuration settings or customize the configuration settings now. If your network requires statically assigned IP addresses or additional network protocols, you should define these settings here.
Setup applies your settings, notifies you that it is finalizing installation, and then reboots the computer.
| 14. | Upon reboot, the computer's screen resolution is configured. The computer attempts to access the Internet to access the Microsoft website to complete the product activation stage. You may delay activation for up to 30 days, although delaying activation causes you to suffer through intermittent activation reminders. You are also asked to register your copy of Windows XP when activating the software; however, registration is purely an option.
| 15. | The Welcome screen appears and then the Windows XP desktop. If you defined more than one user at the time that you assigned the Administrator's password, you are prompted to select a user and to enter the user's password, if one was assigned.
|
|
Exam Alert Activation period The period of time before you absolutely have to activate Windows is 30 days.
You have just completed a full, manual installation of Windows XP Professional from scratch. In a typical installation, you would next join a workgroup or domain, install additional applications, restore data from backup, and customize the desktop to meet your needs. |