Configuring, Managing, and Troubleshooting Local User and Group Accounts
| Objective: Configure, manage, and troubleshoot local user and group accounts. Every person who logs on to Windows XP Professional must do so with a user account. If the user account has been granted greater rights and permissions, the user can access resources on that computer that otherwise would be inaccessible. Problems arise in productivity when users are not able to access the resources that they need to conduct their jobs. One alternative is to allow users to have unrestricted rights to the computers and resources. However, this can result in an even greater loss of productivity because a user could unintentionally render the computer inoperable in any number of ways. The trick to effective management is to create a balance between rights granted to users and those denied. One of the top concerns regarding user rights is file and folder access, especially the rights configured for shared folders or on computers that are shared by multiple users. Because multiple people potentially can access a file at any time on shared folders and shared computers, a misapplied right can compromise a file containing private data. Best practices dictate that users should never be granted rights individually. Instead, a group should be created to be granted that permission even if only one user needs the access to the resource. This practice makes it easier to duplicate the types of rights and permissions that users require to perform certain functions. For example, if you are managing a workgroup for a tax accounting business, you can expect that seasonally there will be increased work. With extra work, there will be additional tax preparers who will require the same access as a current tax preparer. To make certain that all the additional tax preparers have the same rights to the shared folders, you can add them to the group (or combination of groups) that includes the current tax preparers. This method certainly beats trying to re-create the same rights for each file, folder, and other resources that a user account was granted individually. Exam Alert Rights applied to domain users When you grant rights to domain users, the best practice is to use the AGDLP method. This means that you place Accounts in Global groups. Then you place the Global groups into Domain Local groups, to which you grant (or deny) Permissions. Any person who owns an object can grant or deny permissions to other users or groups. If a permission is not specifically and explicitly granted to a user or the groups to which the user belongs, then the permission is implicitly denied. For example, if you create a group called SALES that has Read privileges to the Sales Literature folder and Full Control privileges to the Sales Database folder and its contents, a user who is not a member of the SALES group (and has not been granted any other rights explicitly or through other group membership) is not allowed to read the files in the Sales Literature folder or access the Sales Database folder contents. Exam Alert Denial wins out When a permission is explicitly denied to a user or group, even if the user is a member of another group where the same permission is explicitly granted, the Deny permission overrides all others and the user will not be allowed access. This is a frequent exam question. Permissions are stored as access control entries (ACE) in a discretionary access control list (DACL). (ACEs can be placed in the object's system access control list [SACL], which determines what will trigger an audit event.) Whenever a user requests authorization to use a prohibited object or resource, the user sees an Access Is Denied message. When a local user account attempts to use a domain-based network resource, the user is disallowed unless the resource has been configured to allow Anonymous access. To enable anonymous access, you can select ANONYMOUS LOGON, which is a built-in special group, from the Select Users or Groups dialog box, which is displayed in Figure 13.1. Figure 13.1. ANONYMOUS LOGON enables any user to have the authorization to use the resource.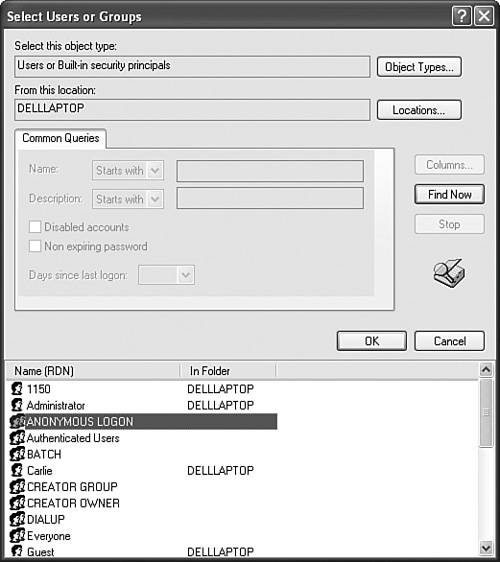
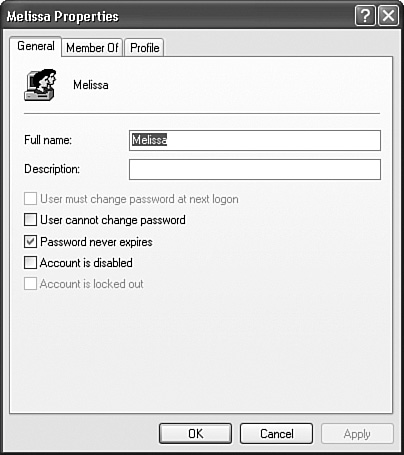
User Accounts in Control Panel, shown in Figure 13.2, can be used to create new local user accounts. Figure 13.2. The User Accounts Control Panel applet enables you to create and configure local user accounts.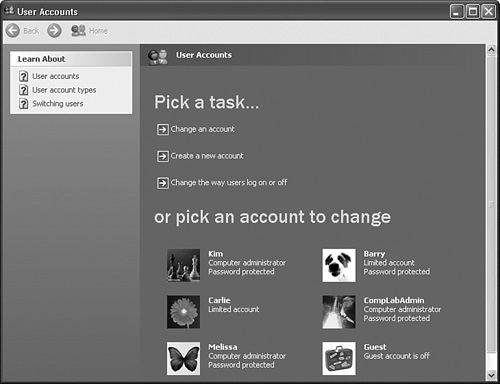 To create and configure both user and group accounts, you should use the Computer Management console, shown in Figure 13.3, which you can open by right-clicking My Computer and selecting Manage from the shortcut menu. Figure 13.3. Computer Management provides administration options for both local user accounts and local groups.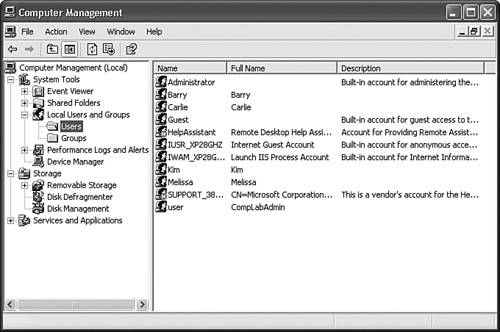 Local users receive their rights to access resources by being explicitly granted permissions or by being members of local groups that have been granted permissions. You cannot add local users to domain global groupsyou can add domain users only to global groups in a domain. However, you can always add a domain global group as a member of a local group if Windows XP Professional is a member of the domain. Note Password never expires When you create or edit a user account, you are provided with an option to configure for Password Never Expires. This setting overrides any password settings in Group Policy or Local Security Policy. You should use this option only for user accounts that are used for applications that must interact as a user with the operating system. Note Using whoami to troubleshoot user rights You can troubleshoot user rights using whoami, a command-line utility that is available on the Windows XP Professional installation CD in the Support\Tools directory. To see the rights that the current user has, type whoami at the command prompt. You can see everything in verbose mode by typing whoami /all. This utility displays all groups, even the built-in groups that do not appear under Member Of property sheets, which you can use to track down a misconfigured right. Configuring and Managing Local GroupsA number of default local groups are provided in Windows XP Professional. Table 13.1 lists the default local groups. Note that the IUSR_machine account is the name given to an Internet Guest account and represents users who have connected to the IIS website with anonymous access. The Authenticated Users and Interactive groups are special built-in groups described in Table 13.2. Their inclusion in the Users group allows any user who has submitted correct credentials to be considered a member of the Users group. Removing the Authenticated Users and Interactive groups from the Users group will cause problems and potentially prevent access to the computer from applications such as Remote Assistance.
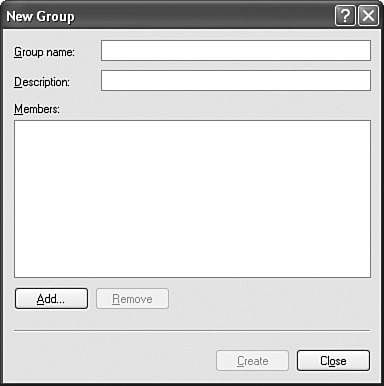
Exam Alert Improving compatibility for the Users group The Users group has the most security restrictions of any group. This may cause a compatibility problem for legacy Windows NT 4.0 applications. To relax these restrictions, you can apply the compatws.inf security template to each affected computer. Best practices state that you should never change the default rights and members of a default local group or built-in group. Instead, you should create your own specific groups, provide them with explanatory names and descriptions, and then grant or deny those groups the necessary rights. To create a group, open the Local Users and Groups console (by accessing it in Computer Management, or typing lusrmgr.msc in the Run dialog box and pressing Enter, or adding the Local Users and Groups snap-in in the MMC console). Right-click Groups and select New Group from the shortcut menu. The New Group dialog box opens, as shown in Figure 13.4. Figure 13.4. The New Group dialog box enables you to name, describe, and add members to a group. When you name the group, you will be restricted from using special characters (\ / " [ ] : | < > + = ; , ? * @), the same as you would when creating a new user. To add new members to the group after it is created, you can right-click the group and select Add to Group from the shortcut menu. When you delete a local group, you delete the group and its permissions, but not any users who are members of the group. You are not allowed to modify the built-in system groups directly in the Local Users and Groups console because their membership is not based on who the user is, but on how the user was able to access the computer. A user is dynamically included in these groups after satisfying the authentication required by the group. You are able to add or deny rights and permissions to built-in special groups. To prevent severe problems when granting rights, never deny nor increase rights to these groupscreate your own special group and deny or grant the rights to that group and then add the users to whom these rights should be given. Table 13.2 discusses built-in special groups. Configuring, Managing, and Troubleshooting AuditingObjective: Configure, manage, and troubleshoot local user and group accounts.
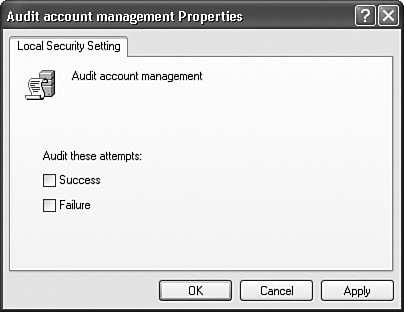
You can audit user access to files, folders, and printers by configuring the Audit policy for the local computer. If you need to audit computers that are members of a domain, you can configure the Group Policy in the organizational unit (OU) that contains these computers. Otherwise, you can configure the Local Security Policy (found in Administrative Tools in Control Panel) under the Audit Policy node, which is under Local Policies, as shown in Figure 13.5. Figure 13.5. Auditing is enabled in the Local Policies found within the Local Security Settings console.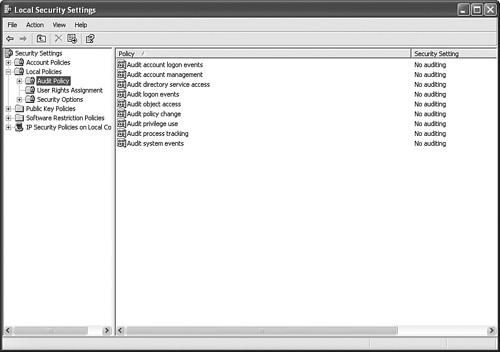 Using the Audit policy settings, you can identify undesirable activities on the computer. For example, if you had a computer whose local user and group configuration was inexplicably changed, you can enable the Audit Account Management policy and select Success to determine who has made these changes. This policy configuration is depicted in Figure 13.6. Other types of activity that apply to a Windows XP Professional computer are
Figure 13.6. You can enable auditing to trigger an event log entry when an action has completed successfully, or has failed, or both. There is an additional policy that is more applicable to domain controllers than it is for Windows XP Professional, that is, the Audit Account Logon Events. This, although similar to Audit Logon Events, triggers an event log entry only when a user logs on to a computer but has been authenticated by another computer. You might want to use this and the Audit Logon Event policies together on your domain controllers to get an idea of how your Active Directory site configuration is affecting your logon traffic, but it does not give you much to go on for a Windows XP Professional computer. Exam Alert Watch out for Audit policy questions that embed the FAT32-formatted disk into the question FAT file systems do not support auditing. You can audit only an NTFS-formatted volume.
Configuring, Managing, and Troubleshooting Account SettingsObjective: Configure, manage, and troubleshoot local user and group accounts.
You can add, change, and delete local user accounts on a Windows XP Professional computer in three places:
When the computer is a member of a domain, the User Accounts interface shows domain user information; when configured as a standalone computer, the User Accounts interface shows local user information. The Local User and Groups console displays only local user information. Each user account includes three tabs:
The Home folder is used in network computing to provide a private location on the network for holding a user's profile, documents, and files. The standard setting for a Home folder would be \\server\share\%username%. When Windows XP Professional is in a workgroup, you need to specify the Home folder as a local or network location on each computer in the workgroup for each local user account. In the User Accounts applet in Control Panel, displayed in Figure 13.8, you are given several tasks that you can perform. These are:
Figure 13.8. The Control Panel User Accounts applet displays three tasks.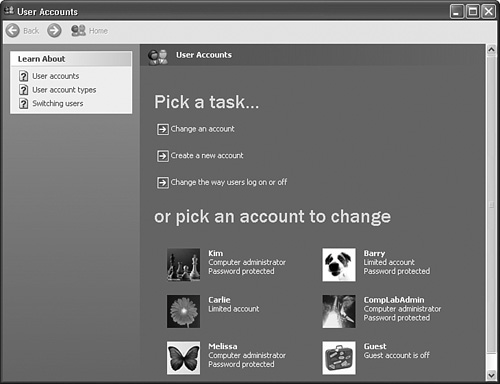 Note Fast user switching restrictions You cannot select Fast User Switching when your computer is a member of a domain or if you have enabled Offline Files. There are two built-in local user accounts to be aware of: the Administrator and the Guest account. The built-in local Administrator account is automatically enabled and cannot be deleted. You can easily enable other user accounts to have the same level of administrative access by adding the user accounts to the local Administrators group. The built-in Guest account is disabled by default, made a member of the Guests group, and not granted any rights. You should not enable the Guest account unless absolutely necessary. Exam Alert .NET Passport Don't be surprised if you receive a question regarding .NET Passports and local user accounts. You can add a .NET Passport only in the Control Panel User Accounts applet. Configuring, Managing, and Troubleshooting Account PolicyObjective: Configure, manage, and troubleshoot local user and group accounts.
Group Policy settings apply to Windows XP Professional computers, whether they are members of an Active Directory domain or configured as stand-alone members of a workgroup. The main difference is that when you have an Active Directory domain, you can apply multiple layers of Group Policy settings so that each user and computer receives unique settings based on that user or computer's location in the Active Directory. Group Policy settings for a domain member begin with the group policies that are configured locally, also known as Local Computer Policy. This is a logical arrangement because the computer configuration settings are applied at startup, which begins right around the time that the computer contacts the Active Directory to pull the applicable group policies. User configuration settings are applied after the user logs on. The order of Group Policy application begins with system policies, if any, and then the Local Computer Policy, and finally the group policies for the site, then those applied to the domain, and finally the OU group policies as they flow down the domain OU tree. Exam Alert Dealing with policy conflicts If a policy conflicts with a user right (by virtue of the user being a member of a group), the policy setting wins. To refresh policy settings for a computer, you may use the command GPUPDATE /target:computer. To refresh policy settings for a user, you may use the command GPUPDATE /target:user. Otherwise, when the GPUPDATE command is used, both the User and Computer policy settings are refreshed. You configure local group policies in the Group Policy Editor, which is shown in Figure 13.9. Exercise 13.1 in the "Apply Your Knowledge" section at the end of the chapter allows you to practice configuring specific policies. Figure 13.9. The Group Policy Editor displays the local group policies and allows you to configure them.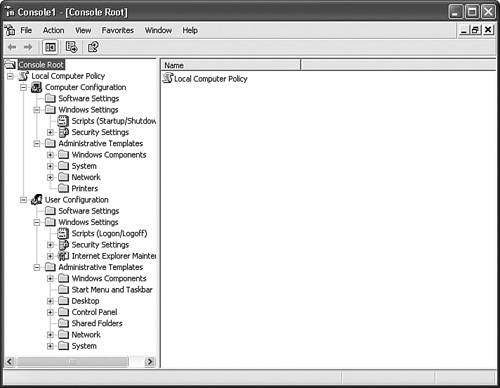 Group policies control Windows XP operating system options, components, features, and programs. The various types of settings you can control using Group Policy include the following:
Caution Overly restrictive local computer policy restrictions may render a computer useless A domain user and a local user receive the Local Computer Policy settings under all circumstances. If these settings are too restrictive, you may render the computer nearly inoperable, or at least not flexible enough to change. A best practice is to configure only the minimum group policies necessary for the local computer, and deliver the more restrictive policies from an Active Directory Group Policy setting. Another best practice is to test all Group Policy settings from an OU created only for testing purposes before applying those settings in production OUs, domains, or sites, or on the Local Computer Policy. Configuring, Managing, and Troubleshooting User and Group RightsObjective: Configure, manage, and troubleshoot local user and group accounts.
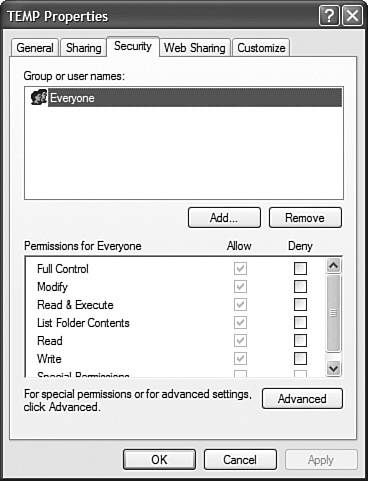
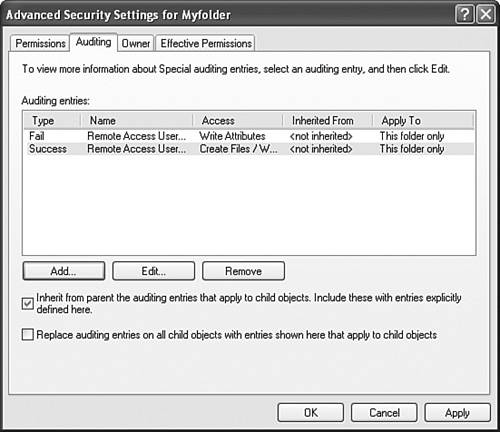
To grant or deny rights to use an object for a user or group, you must access the object first. For example, when granting rights to use a folder named C:\TEMP, open My Computer or Windows Explorer and navigate to C:\TEMP. Then right-click the folder and select Properties and click the Security tab, which is shown in Figure 13.10. Figure 13.10. An object's Security tab typically allows you to grant rights to use that object, such as those selected on the Security tab on this folder's Properties sheet. After accessing the Security property sheet, click the Add button to select a user or group. When your computer is a stand-alone workgroup computer, you can select only groups and accounts from the local computer. If your computer is a member of a domain, you can grant rights directly to domain users and domain global accounts. Remember that you should never select the domain global groups or domain accountsalways make the domain users members of a domain global group, which you then make a member of a local group. Always apply the rights to a local group. You can also click a user or group and then click the Remove button to delete the user or group, which functionally deletes the permissions that have been granted or denied to that user or group. After you have added the group (or user), you must then check the boxes for the rights that you want to grant or deny. If you want to grant or deny a particular right that does not appear in the dialog box, you can click the Advanced button. The Advanced Security properties for an object provides four tabs:
The rights in the Permission Entry dialog box are more granular than the rights listed on the Security tab. You can compare the two in Figure 13.12. Figure 13.12. Rights in the Permission Entries dialog box are more granular than the rights listed on the Security tab for an object.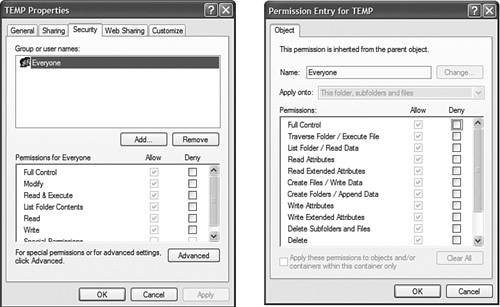 Troubleshooting Cached CredentialsObjective: Troubleshoot cache credentials. Cached credentials are used to ensure a single sign-on for users. When a user logs on to a system, Windows XP stores the credentials and the next time that system requests credentials, Windows XP transmits the credentials that it is holding in its cache. This prevents a user from being requested for any logon information aside from the Windows XP Professional logon; except for when a system is being accessed for the first time. There are two parts of the authentication process:
Credentials are essentially like a driver's licensethey assert a person's identity. You display a driver's license to a clerk at the store to prove that you are old enough to buy things like lottery tickets or beer. Validation is the process of verifying that the credentials and the person match. Using the driver's license analogy, this is the point where the store clerk looks over the license and compares the picture to you. If the picture is not a good likeness (you lost weight or dyed your hair), the clerk may even ask to have you sign a piece of paper to compare the signatures. In Windows XP Professional, credentials are the user's account and password (plus additional credentials in the form of Smart Cards or certificates). Validation is performed by the Local Security Authority (LSA), which looks to see where the user account was generated, and if locally, LSA looks at the security accounts manager (SAM) database to compare the account with the information contained there. If it's a domain account, LSA contacts the domain and asks it to verify that the account is active and that your credentials match. Windows XP Professional caches credentials for two purposes:
Problems that are experienced by cached credentials are typically that changes that have been configured for user accounts (especially those incorporated in Active Directorydelivered group policies) are not applied immediately at logon to Windows XP workstations and their users. Instead, a change is marked and the next logon, or even the one following, incorporates the change. Many changes are fairly benign, although it can be frustrating for the user or administrator to have a change take its time before applying to a computer. However, password changes to a cached credential can result in a user's account being denied access to the resource. Another problem can be a user account's continued access to a resource that should no longer be allowed. This is not a desirable result, and can become a serious threat to the network's security. You have a few ways that you can fix it: Force the computer to contact the network at logon, disable credential caching, or use the Credential manager to update the user's credentials. To process logons without using cached credentials, you can configure the Group Policy setting to enable the Computer Configuration\Administrative Templates\System\Logon\Always Wait for the Network at Computer Startup and Logon policy. To disable cached credentials, you can configure the Group Policy setting at Computer Configuration\Windows Settings\Security Settings\Local Policies\Security Options\Interactive Logon: Number of Previous Logons to Cache (In Case Domain Controller Is Not Available) to 0 logons instead of 10. You can also enable the Interactive Logon: Require Domain Controller Authentication to Unlock Workstation setting to require a workstation to contact a domain controller even when the password is being typed in at the screensaver. Cached credentials are stored in each user's profile at %systemdrive%\Documents and Settings\%username%\Application Data\Microsoft\Credentials. To change a user's credentials for a network resource, you can use the Credential Manager in the User Accounts applet in Control Panel, shown in Figure 13.13. The task pane provides a Manage My Network Passwords option. Click this task to display the cached credentials for network resources. You can click any item in this dialog box and edit its properties. You can also add or delete credentials. Figure 13.13. User Accounts enables you to manage credentials.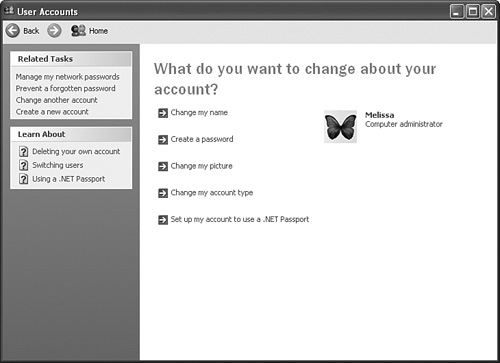 Not only can you manage the network resource credentials, but User Accounts also enables you to configure a .NET Passport for a user, which is a subject that tends to pop up at least once in the exam. To begin setting the .NET Passport, in the details pane of User Accounts, click the option for Set Up My Account to Use a .NET Passport. The wizard begins. Click Next to bypass the first screen. You need to either create a .NET Passport or link an existing one. .NET passports use email addresses as the passport identification, along with a password. Follow the wizard until you have created or linked your .Net Passport to the user account. Internet Explorer is also capable of caching credentials, but you cannot manage them in the User Accounts applet. When an invalid user ID or password is presented to a website from the cache, the access denial returns to Internet Explorer, which then displays the User ID and Password dialog box, so that you can enter new credentials or resubmit the ones already presented. |
EAN: 2147483647
Pages: 193
