| When you want to send the same information to all the people on a listfor example, all your customers, or all the members of a club or your familyyou don't have to print letters and physically mail them. Instead, you can use mail merge to create a message that can be sent to a list of e-mail addresses. As with a form letter that will be printed, you can either use the Mail Merge wizard or use the buttons on the Mailings tab to insert merge fields into the document containing the text of the message, which we call the form message. These merge fields will be replaced with information from a data source such as a table or contacts list. If you are using the wizard, be sure to select the E-Mail Messages option in Step 1. If you are not using the wizard, you can specify the list of e-mail addresses you want to send the message to by clicking the Select Recipients button in the Start Mail Merge group on the Mailings tab. You then have three options: Type an entirely new list of recipients. Use an existing list of recipients. Select recipients from an Outlook contacts list.
You can quickly add merge fields to a form message by using the buttons in the Write & Insert Fields group. Many e-mail messages need only a greeting line. Because e-mail messages tend to be less formal than printed letters, you might want to start the messages with something other than the predefined options (Dear and To:) by typing a custom greeting. In this exercise, you will open an existing form message, use the buttons on the Mailings tab to create a short mailing list, add a custom greeting line merge field, and then complete the merge. USE the 05_E-mail document. This practice file is located in the Chapter09 subfolder under SBS_Word2007. OPEN the 05_E-mail document.
1. | On the Mailings tab, in the Start Mail Merge group, click the Select Recipients button, and then in the list, click Type New List.
 The New Address List dialog box opens.
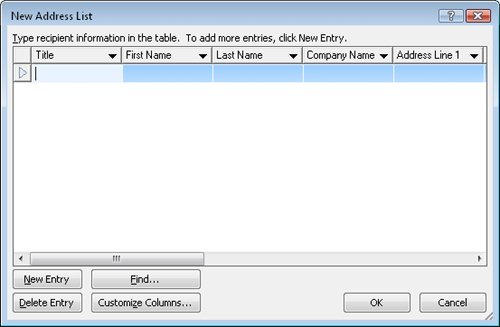 | 2. | Skipping over the Title field, type Andrea in the First Name field, type Dunker in the Last Name field, press the  key until you reach the E-mail Address field (the last field in the table), and then type andrea@consolidatedmessenger.com. key until you reach the E-mail Address field (the last field in the table), and then type andrea@consolidatedmessenger.com.
| 3. | Click New Entry, and then add Judy Lew, whose e-mail address is judy@lucernepublishing.com.
Tip If you have several e-mail addresses to add to the list, you can press Tab in the last field of the last entry, instead of clicking New Entry each time. | 4. | Repeat Step 3 to add Ben Miller, whose e-mail address is ben@wingtiptoys.com, and then click OK.
The Save Address List dialog box opens, with the contents of your My Data Sources folder displayed. This dialog box is very similar to the Save As dialog box.
| 5. | In the Favorite Links list, click Documents, navigate to the MSP\SBS_Word2007\Chapter09 subfolder, type My E-Mail Data Source in the File name box, and then click Save.
Word saves the data source in the specified location as an Access database.
Tip If you look in the Chapter09 folder at this point in the exercise, you will see two like-named database files. The smaller one is locking the database because Word is accessing it as the data source for this exercise. The locking file will disappear when you close the form message. | 6. | With the insertion point at the beginning of the document, press  twice, and then press the twice, and then press the  key twice. key twice.
| 7. | On the Mailings tab, in the Write & Insert Fields group, click the Greeting Line button.
 The Insert Greeting Line dialog box opens.
| 8. | In the first box under Greeting line format, replace Dear with Hello followed by a space. Then click the arrow to the right of the second box, and in the list, click Joshua.
| 9. | In the Preview area, click the Next button twice to preview the greetings as they will appear in the e-mail messages.
| 10. | Click the First button to return to the first record, and then click OK.
Word inserts the «GreetingLine» merge field at the top of the form message.
 | 11. | On the Mailings tab, in the Preview Results group, click the Preview Results button.
 Word shows a preview of the first message. You can click the Next Record button in the Preview Results group to preview the messages for other recipients. Clicking the Preview Results button again turns off the preview.
| 12. | In the Write & Insert Fields group, click the Highlight Merge Fields button.
 Word indicates the merge field with a gray highlight.
| 13. | In the Finish group, click the Finish & Merge button, and then in the list, click Send E-mail Messages.
 The Merge To E-Mail dialog box opens.
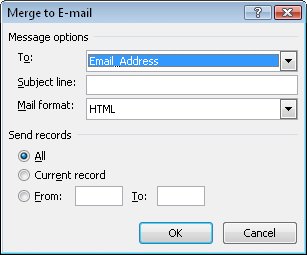 | 14. | Under Message options, verify that Email_Address is selected in the To box, type Welcome to Wide World Importers! in the Subject line box, and verify that HTML is selected in the Mail format box.
| 15. | With the All option selected under Send records, click OK.
Word converts the form message to an e-mail message and sends the message to each of the selected addresses in the data source.
Tip A copy of each sent message appears in your Outlook Sent Items folder. If you plan on doing a large mailing, you might want to turn off the saving of sent messages. |
CLOSE the 05_E-mail document without saving your changes.
|