| When you need your document to clearly illustrate a concept such as a process, cycle, hierarchy, or relationship, you can create a dynamic, visually appealing diagram by using SmartArt graphics, a powerful new tool available in Microsoft Office Word 2007, Microsoft Office PowerPoint 2007, and Microsoft Office Outlook 2007. By using predefined sets of sophisticated formatting, you can almost effortlessly put together any of the following diagrams: List diagrams. These diagrams visually represent lists of related or independent informationfor example, a list of items needed to complete a task, including pictures of the items. Process diagrams. These diagrams visually describe the ordered set of steps required to complete a taskfor example, the steps you take to process an order. Cycle diagrams. These diagrams represent a circular sequence of steps, tasks, or events; or the relationship of a set of steps, tasks, or events to a central, core elementfor example, the importance of introducing the basic elements of a story in order to build up to an exciting ending. Hierarchy diagrams. These diagrams illustrate the structure of an organization or entityfor example, the top-level management structure of a company. Relationship diagrams. These diagrams show convergent, divergent, overlapping, merging, or containment elementsfor example, how using similar methods to organize your e-mail, calendar, and contacts can improve your productivity. Matrix diagrams. These diagrams show the relationship of components to a wholefor example, the product teams in a department. Pyramid diagrams. These diagrams illustrate proportional or interconnected relationshipsfor example, the amount of time that should ideally be spent on different phases of a project.
The categories are not mutually exclusive, meaning that some diagrams appear in more than one category. You create a diagram by clicking the SmartArt button in the Illustrations group on the Insert tab. Then you select the type of diagram you want to create and insert it into the document. You add text to the diagram either directly or from its text pane. In this exercise, you will add a diagram to a document, add text to the diagram, and then specify the position of the diagram in relation to the document text and page margins. USE the 01_Diagram document. This practice file is located in the Chapter07 subfolder under SBS_Word2007. BE SURE TO start Word before beginning this exercise. OPEN the 01_Diagram document.
1. | Click at the end of the third bulleted item under Rationale, press  , and then on the Insert tab, in the Illustrations group, click the SmartArt button. , and then on the Insert tab, in the Illustrations group, click the SmartArt button.
 The Choose A SmartArt Graphic dialog box opens, displaying all the available graphics.
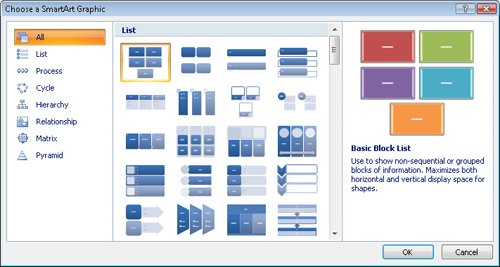 | 2. | In the left pane, click each diagram category in turn to display only the available layouts of that type in the center pane.
| 3. | In the left pane, click Process. Then in the center pane, click each process diagram layout in turn to view an example, along with a description of what the diagram best conveys, in the right pane.
| 4. | When you finish exploring, click the first thumbnail in the fourth row (Vertical Process), and then click OK.
The process diagram is inserted at the insertion point. Text placeholders appear in the diagram shapes and in the adjacent text pane, where they are formatted as a bulleted list. The Design and Format contextual tabs appear on the Ribbon.
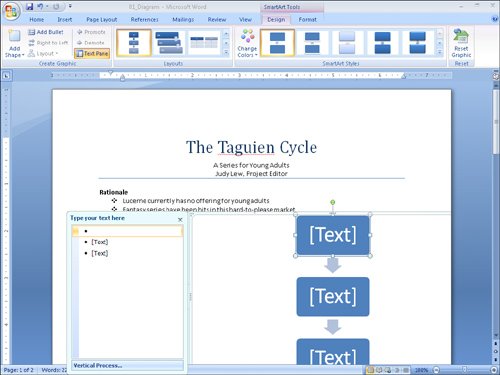 Troubleshooting If the text pane is not visible, click the tab on the left side of the diagram's frame. You can also display the text pane by clicking the Text Pane button in the Create Graphic group on the Design contextual tab. | 5. | With the first bullet selected in the text pane, type The Journey, and then press the  key to move the insertion point to the next placeholder. key to move the insertion point to the next placeholder.
As you type in the text pane, the words also appear in the shapes of the diagram.
| 6. | Repeat Step 5 for the remaining two placeholders, entering The Battle and The Twist.
| 7. | With the insertion point at the end of the third bulleted item in the text pane, press to extend the bulleted list and add a new box to the chart. Then type The Climax.
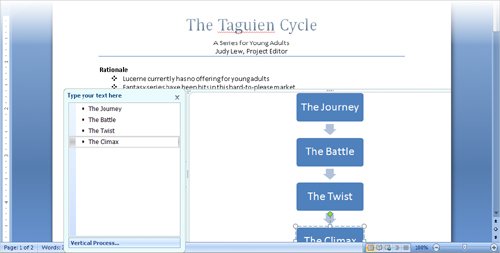 | 8. | In the text pane, click the Close button.
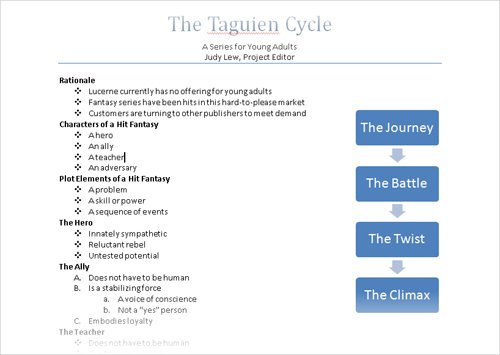
close  | 9. | Drag the left center sizing handle of the diagram pane to the right until the pane is approximately as wide as the shapes within the diagram.
Troubleshooting Be sure to point to the set of dots (the sizing handle) on the diagram's frame, not to a blank part of the frame. You can ignore the diagram while you drag. When you release the mouse button, the diagram pane moves to the left margin of the document, with the diagram centered within it.
Tip You can precisely resize the diagram pane by clicking the Size button on the Format contextual tab and then adjusting the Shape Height or Shape Width setting. | 10. | On the Format contextual tab, in the Arrange group, click the Text Wrapping button, and then in the list, click More Layout Options.
 Troubleshooting Depending on your window size and screen resolution, you might need to click the Arrange button to display the Arrange group. The Advanced Layout dialog box opens, with the Text Wrapping tab active.
See Also For more information about text wrapping, see "Changing the Relationship of Elements on the Page" in Chapter 6, "Working with Graphics, Symbols, and Equations." | 11. | Under Wrapping style, click Tight, and under Wrap text, select the Both sides option.
| 12. | Click the Picture Position tab.
On this tab are options for controlling where the diagram appears relative to other elements of the document.
| 13. | Under Horizontal, select the Alignment option.
| 14. | Click the Alignment arrow, and then in the list, click Right.
| 15. | Click the relative to arrow, and then in the list, click Margin.
| 16. | Under Vertical, with the Absolute position option selected, click the below arrow, and then in the list, click Page.
| 17. | Click OK. Then click a blank area of the document to see the results of your changes.
Instead of sitting at the left margin with text before and after it, the diagram now sits to the right of the text, without interrupting its flow.
 |
CLOSE the 01_Diagram document without saving your changes.
|