| When a document is complete and ready for distribution, you typically perform several final tasks. These might include inspecting the document for any remaining private or inappropriate information, restricting access, or adding a digital signature. Many documents go through several revisions, and some are scrutinized by multiple reviewers. During this development process, documents can accumulate information that you might not want in the final version, such as the names of people who worked on the document, comments that reviewers have added to the file, or hidden text about status and assumptions. This extraneous information is not a concern if the final version is to be delivered as a printout. However, these days more and more files are delivered electronically, making this information available to anyone who wants to read it. Word 2007 includes a tool called the Document Inspector, which finds and removes all extraneous and potentially confidential information. You can instruct the Document Inspector to look for comments, revisions, and annotations; for any personal information saved with the document; and for hidden text. The Document Inspector displays a summary of its findings and gives you the option of removing anything it finds. Word also includes another finalizing tool called the Compatibility Checker, which checks for the use of features not supported in previous versions of Word. After you have handled extraneous information and compatibility issues, you can mark a document as final and make its file read-only, so that other people know that they should not make changes to this released document. In this exercise, you will inspect a document for inappropriate information and mark it as final. USE the 07_Finalizing document. This practice file is located in the Chapter02 subfolder under SBS_Word2007. OPEN the 07_Finalizing document.
1. | Click the Microsoft Office Button, point to Prepare, and then click Properties.
Microsoft Office Button  The Document Information Panel opens above the document, showing that identifying information has been saved with the file. Some of the information, including the name of the author, was attached to the file by Word. Other information was added by a user.
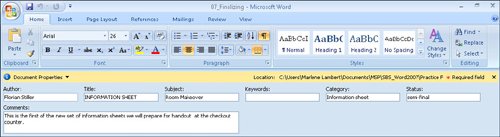 | 2. | In the upper-left corner of the Document Information Panel, click the Document Properties arrow, and then in the list, click Advanced Properties.
The Properties dialog box opens.
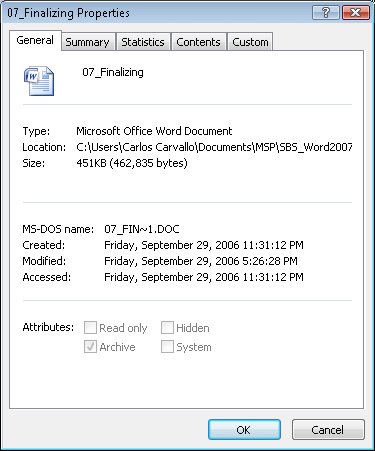 | 3. | In turn, click the Summary and Statistics tabs, noticing that additional identifying information is displayed there.
| 4. | Click Cancel to close the Properties dialog box, and then in the upper-right corner of the Document Information Panel, click the Close button.
Close  | 5. | Save the document in the Chapter02 subfolder with the name My Information Sheet.
| 6. | Click the Microsoft Office Button, point to Prepare, and then click Inspect Document.
The Document Inspector dialog box opens, listing the items that will be checked.
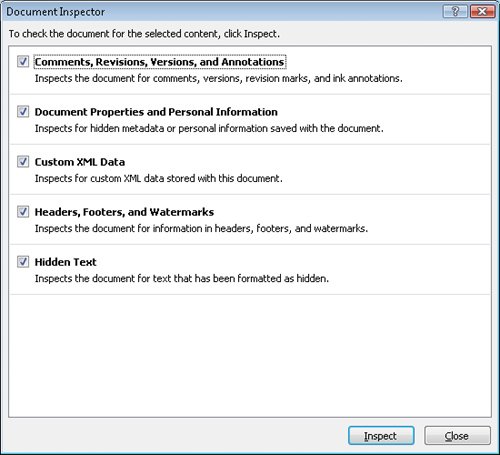 | 7. | Without changing the default selections in the Document Inspector dialog box, click Inspect.
The Document Inspector reports the presence of the document properties and personal information that you viewed earlier in this exercise, as well as some custom XML data.
| 8. | To the right of Document Properties and Personal Information, click Remove All.
Word removes the document properties and personal information.
| 9. | To the right of Custom XML Data, click Remove All.
See Also For information about XML, see "Creating an XML Document" in Chapter 11, "Creating Documents for Use Outside of Word." | 10. | In the Document Inspector dialog box, click Close.
| 11. | Click the Microsoft Office Button, point to Prepare, and then click Mark As Final.
A message tells you that the document will be marked as final and then saved.
| 12. | Click OK to complete the process.
A message tells you that the document has been marked as final and that typing, editing commands, and proofing marks are turned off.
| 13. | Click OK to close the message, and then click the Insert tab.
Most of the buttons are inactive, indicating that you cannot make changes.
|
CLOSE the My Information Sheet document, and if you are not continuing directly on to the next chapter, quit Word.
Adding a Digital Signature When you create a document that will be circulated to other people via e-mail or the Web, you might want to attach a digital signature, which is an electronic stamp of authentication. The digital signature confirms the origin of the document and indicates that no one has tampered with the document since it was signed. To add a digital signature to a Word document, you must first obtain a digital ID. Certified digital IDs can be obtained from companies such as IntelliSafe Technologies and Comodo Inc. You can obtain the ID and attach it to a document by clicking the Microsoft Office Button, pointing to Finish, clicking Add a Digital Signature, and then following the instructions. |
|