| When you are ready to print a document, you can click the Microsoft Office Button, point to Print, and then click Quick Print. Word then uses your computer's default printer and the settings specified in the Print dialog box. To use a different printer or change the print settings, you click the Microsoft Office Button, and then click Print to open the Print dialog box. You can then specify which printer to use, what to print, and how many copies, and you can make other changes to the settings. Before you print a document, you almost always want to check how it will look on paper by previewing it. Previewing is essential for multi-page documents but is helpful even for one-page documents. To preview a document, you click the Microsoft Office Button, point to Print, and then click Print Preview. This view shows exactly how each page of the document will look when printed. Word displays a Print Preview tab on the Ribbon to provide tools for checking each page and making adjustments if you don't like what you see. By using the buttons in the Page Setup group on the Print Preview tab, you can make the following changes: Change the margins of the document to fit more or less information on a page or to control where the information appears. You define the size of the top, bottom, left, and right margins by clicking the Margins button and making a selection from the Margins gallery, or by clicking Custom Margins and specifying settings on the Margins tab of the Page Setup dialog box. Switch the orientation (the direction in which a page is laid out on the paper). The default orientation is portrait, in which the page is taller than it is wide. You can set the orientation to landscape, in which the page is wider than it is tall, by clicking the Orientation button and selecting that option. Tip The pages of a document all have the same margins and are oriented the same way unless you divide your document into sections. Then each section can have independent margin and orientation settings.
See Also For more information about sections, see "Controlling What Appears on Each Page" in Chapter 4, "Changing the Look of a Document."
Select the paper size you want to use by clicking the Size button and making a selection in the Paper Size gallery.
You can click buttons in other groups to change the printer options, change the view of the document, and change the mouse pointer so that you can edit the text. In this exercise, you will preview a document, adjust the margins, change the orientation, and select a new printer before sending the document to be printed. USE the 05_Printing document. This practice file is located in the Chapter01 subfolder under SBS_Word2007. BE SURE TO install a printer and turn it on before starting this exercise. OPEN the 05_Printing document.
1. | Click the Microsoft Office Button, point to the Print arrow, and then click Print Preview.
The window's title bar now indicates that you are viewing a preview of the document, and the Print Preview tab appears on the Ribbon.
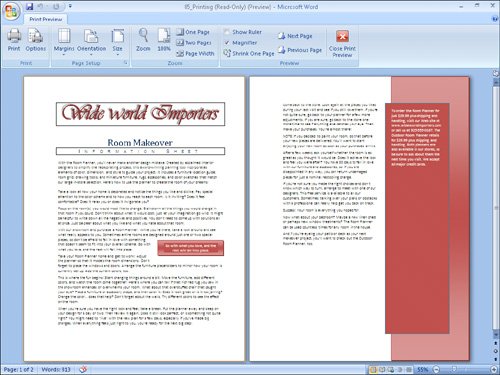
Microsoft Office Button  | 2. | On the Print Preview tab, in the Zoom group, click the Two Pages button.
Two Pages  Word displays the two pages of the document side by side.
 | 3. | In the Page Setup group, click the Margins button.
 The Margins gallery appears.
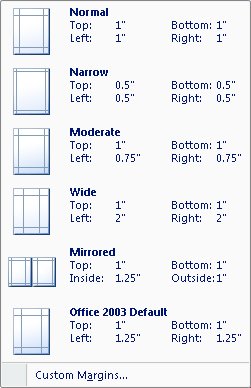 | 4. | In the gallery, click Wide.
The text rewraps within the new margins, and the left end of the status bar indicates that the document now has 3 pages.
| 5. | In the Preview group, click the Next Page button to see the last page of the document.
 | 6. | Click the Page Setup Dialog Box Launcher.
Dialog Box Launcher  The Page Setup dialog box opens, displaying the Margins tab.
| 7. | Under Margins, replace the value in the Left box by typing 1". Then replace the value in the Right box with 1", and click OK.
The width of the margins decreases, and the text rewraps to fill 2 pages.
| 8. | In the Page Setup group, click the Orientation button, and then click Landscape.
 The pages of the document are now wider than they are tall.
| 9. | Point to the top of the first page of the document so that the pointer becomes a magnifying glass, and then click.
The first page is magnified. Notice that the Zoom box at the right end of the status bar now displays 100%.
| 10. | Click near the top of the document.
The Zoom percentage changes, and you now see both pages at the same time.
| 11. | In the Preview group, click the Close Print Preview button.
Close Print Preview  You don't have to be in Print Preview to change the orientation of a document. You can do it in Print Layout view.
| 12. | On the Page Layout tab, in the Page Setup group, click the Orientation button, and then click Portrait.
 | 13. | Click the Microsoft Office Button, and then click Print.
Tip You can click the Microsoft Office Button, point to Print, and then click Quick Print to print the document without first viewing the settings. The Print dialog box opens.
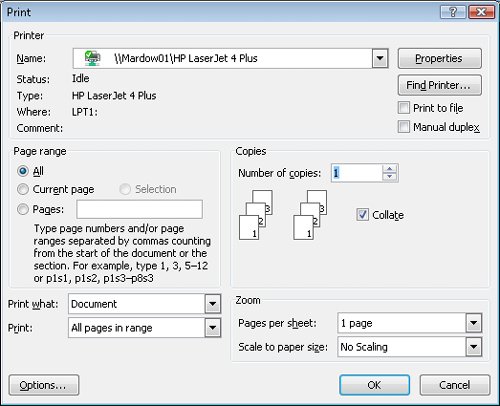 | 14. | If you have more than one printer available and you want to switch printers, click the Name arrow, and in the list, click the printer you want.
| 15. | Under Page Range, click the Current Page option.
| 16. | Under Copies, change the Number of copies setting to 2, and then click OK.
Word prints two copies of the first page on the designated printer.
|
CLOSE the 05_Printing document without saving your changes, and if you are not continuing directly on to the next chapter, quit Word.
|