Sending Calendar Information in an E-Mail Message
You might frequently find it necessary to share information about your schedule with colleagues, friends, or family members. With Outlook 2007, you can easily embed selected calendar information as a static image in an e-mail message that you can send to any person who uses an HTML-capable e-mail program (not only people who use Outlook). You can choose the period of time for which you want to share information (Today, Tomorrow, Next 7 Days, Next 30 Days, or Whole Calendar, or you can specify a custom date range) and the level of detail you want to share:
-
Availability only. Includes only your availability (Free, Busy, Tentative, or Out Of Office) during scheduled time periods.
-
Limited details. Includes only your availability and the subjects of calendar items.
-
Full details. Includes your availability and the full details of calendar items.
The details of calendar items marked as Private will not be shown unless you specifically choose to do so.
See Also For information about private appointments, see “Scheduling and Changing Appointments” in Chapter 20, “Managing Appointments, Events, and Meetings.”
In this exercise, you will embed information about your schedule in an e-mail message. There are no practice files for this exercise.
Be Sure To display your calendar before beginning this exercise.
1. In the Navigation Pane, click Send a Calendar via E-mail.
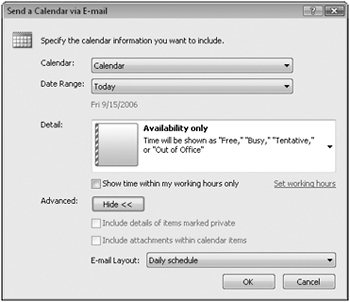
Outlook opens a new message window and the Send A Calendar Via E-mail dialog box .
2. In the Advanced area, click Show to display all the options.

If you have multiple calendar folders in Outlook, you can choose which calendar you want to send information from.
3. Click the Date Range arrow, and then in the list, click Next 7 days.
4. Click the Detail arrow, and then in the list, click Full details.
You can choose whether to include private appointment details and attachments, and whether to present schedule information as a daily schedule or only a list of events.
5. With Daily schedule selected in the E-mail Layout list, click OK.
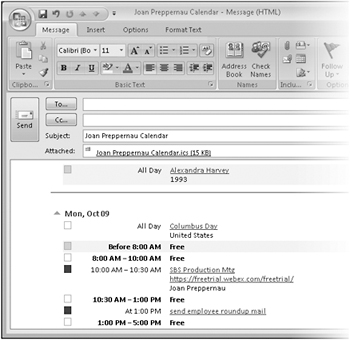
Outlook embeds the selected calendar information in the e-mail message window and also attaches the same information as an .ics file. You can send the e-mail message to any recipient. A recipient using an e-mail program that supports .ics files can add your calendar information to his or her calendar list.

6. Scroll the e-mail to view its contents. Then experiment with other time periods, details, and layout options on your own.
Close or send the e-mail message.
You can share your schedule with co-workers by publishing it as a Web page on an intranet site, or with a larger group of people by publishing it as a Web page on an Internet site. Outlook provides a simple method of saving selected calendar information as a static HTML page.
To save calendar information as a Web page:
-
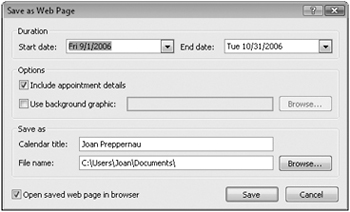
Display your calendar. Then on the File menu, click Save as Web Page.
The Save As Web Page dialog box opens.

-
Enter the start and end dates for which you want to publish your calendar information.
-
In the Options area, select whether to include appointment details or a background graphic.
-
In the Save as area, append a file name (the extension is unnecessary) at the end of the path shown in the File name box. You can change the title that will be displayed on the Web page, and change the location where Outlook saves it. By default, Outlook saves calendar Web pages in your Documents folder.
-
With the Open saved web page in browser check box selected, click Save.
-
If Outlook displays a security notice asking you to confirm that you trust the link to the Web page you just created, click Yes.
-
If Outlook displays a message box asking you whether to open or save the Web page, click Open.
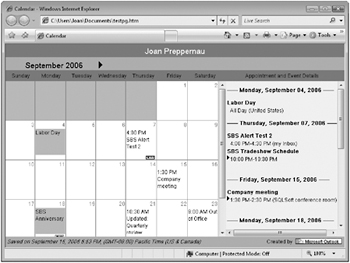
The page opens in your default Web browser. (The browser loads the file from your computer, not from the Internet-you haven’t yet published the schedule to the Internet.)
-
Review the calendar. If an Information Bar appears at the top of the window, click it, click Allow Blocked Content, and then in the Security Warning message box, click Yes to allow Windows to run a Microsoft ActiveX control in order to display nicely formatted content.

You can publish the calendar Web page to any intranet or Internet site that you have authoring permissions on.
EAN: 2147483647
Pages: 231