Preparing Speaker Notes and Handouts
If you will be delivering your presentation before a live audience, you will probably need some speaker notes to guide you. Each slide in a PowerPoint presentation has a corresponding notes page. As you create each slide, you can enter notes that relate to the slide’s content by simply clicking the Notes pane and typing. If you want to include something other than text in your speaker notes, you must switch to Notes Page view by clicking the Notes Page button in the Presentation Views group on the View tab. When your notes are complete, you can print them so that they are readily available to guide the presentation.
As a courtesy for your audience, you might want to supply handouts showing the presentation’s slides so that people can take notes. You don’t need to do anything special to create handouts. Printing them requires a few simple decisions, such as how many slides you want to appear on each page.
Notes and handouts have their own masters, and you can customize them by using the same techniques you use to customize slide masters. Usually, you will find that the default masters are more than adequate, but if you want to make changes, you click Notes Master or Handout Master in the Presentation Views group on the View tab to display the respective masters.
In this exercise, you will enter speaker notes for a couple of slides in the Notes pane. You will then switch to Notes Page view, insert a graphic in one note and a table in another, customize the Notes master, and then print speaker notes and handouts.
Use the 03_NotesHandouts presentation and the 03_YinYang graphic. These practice files are located in the Chapter16 subfolder under SBS_Offi ce2007.
Open the 03_NotesHandouts presentation.
1. With Slide 1 selected, in the Notes pane, click the Click to add notes placeholder, type Welcome and introductions, and then press ![]() .
.
2. Type Logistics, press ![]() , and then type Establish knowledge level.
, and then type Establish knowledge level.
3. Display Slide 2, and in the Notes pane, type Talk about the main concepts.
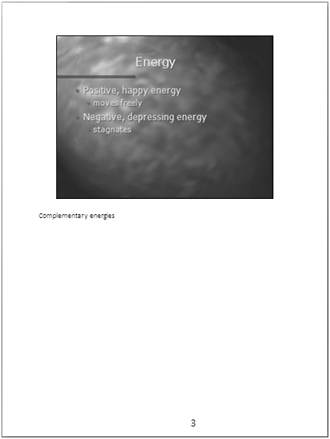
4. Display Slide 3, and in the Notes pane, type Complementary energies, and then press ![]() twice.
twice.
5. On the View tab, in the Presentation Views group, click the Notes Page button. 
Slide 3 is displayed in Notes Page view, with the view percentage set so that the entire page will fit in the window.

| Tip | If you have trouble seeing the notes at this view percentage, click the Zoom button in the Zoom group on the View tab. Then when the Zoom dialog box opens, select or type a larger percentage, and click OK. |
6. On the Insert tab, in the Illustrations group, click the Picture button.
7. In the Insert Picture dialog box, navigate to your Documents\MSP\SBS_Office2007\ Chapter16 folder, and then double-click the 03_YinYang graphic.
8. Drag the image down below the note you typed in Step 4.
The picture is visible in Notes Page view .
9. At the bottom of the scroll bar, click the Next Slide button to move to Slide 4. ![]()
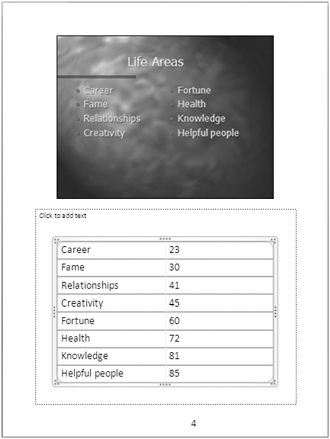
10. On the Insert tab, in the Tables group, click the Table button, and then drag to create a table that is two columns wide and eight rows high. 
11. Drag the table by its border down into the notes placeholder, and then on the Design contextual tab in the Table Style Options group, clear the Header Row and Banded Rows check boxes.
12. Enter the following information, pressing ![]() to move from cell to cell and from row to row:
to move from cell to cell and from row to row:
| Career | 23 |
| Fame | 30 |
| Relationships | 41 |
| Creativity | 45 |
| Fortune | 60 |
| Health | 72 |
| Knowledge | 81 |
| Helpful people | 85 |
The speaker notes now include the page numbers in a reference work where you can find additional information if required during the presentation.

13. On the View tab, in the Presentation Views group, click the Normal button, and then drag the splitter bar above the Notes pane up to expand it. 
The table is not visible in Normal view.
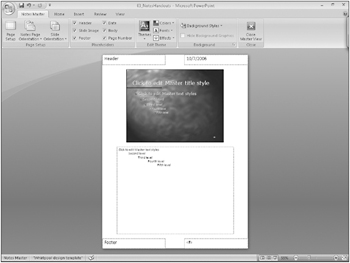
14. Drag the splitter bar down again. Then on the View tab, in the Presentation Views group, click the Notes Master button. 
The Notes Master appears and the Notes Master tab is added to the Ribbon.

15. In the upper-left corner of the page, click the header placeholder, and then type Feng Shui.
16. In the lower-left corner of the page, click the footer placeholder, and then type Beginners’ Class.
17. On the View toolbar, click the Normal button to return to Normal view. ![]()
18. Click the Microsoft Office Button, and then click Print. 
The Print dialog box opens.
19. Click the Print what arrow, select Notes Pages in the list, and then click OK.
You now have a copy of the speaker notes to refer to during the presentation.
20. Display the Print dialog box again, and then change the Print what setting to Handouts.
You can print audience handouts in six formats: one, two, three, four, six, or nine slides per page. The default, six, is set on the Handout master, but you can change it in the Print dialog box.
21. Under Handouts, click the Slides per page arrow, and in the list, click 3.
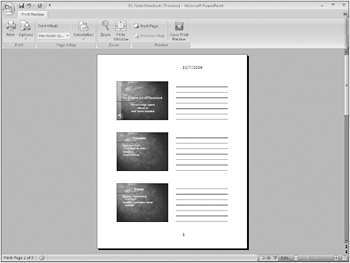
When you print three slides per page, PowerPoint adds lines for notes to the right of each slide, as shown in the diagram on the right side of the dialog box.
22. In the lower-left corner of the dialog box, click Preview.
The first page of the handouts appears in Print Preview.

23. On the Print Preview tab, in the Print group, click the Print button, and then click OK. ![]()
24. Return to Normal view.
Close the 03_NotesHandouts presentation without saving your changes.
EAN: 2147483647
Pages: 231