| If you prefer moving images to stills, Windows XP provides a video-friendly environment. By using the Windows Movie Maker program, Windows XP can capture video from Windows Movie Maker can then be used to edit your video into movies, which you then can save to your hard disk, removable-media drive, or CD for playback on systems through Windows Media Player. The editing process that Windows Movie Maker and other digital video editing programs use is often referred to as non-linear editing, because you can arrange different digital movie sources in any order, and don't need to physically cut or damage video tape or film to edit your movies. The Hardware You Need You will need a video capture card or USB device to capture video from an analog camcorder or video tape player. Some video cards, such as the All-in-Wonder series from ATI, have TV-in jacks that also can be used for analog video capture. If your Web camera is supported by Windows XP, you can use it for video capture without any additional hardware. You will need a supported IEEE-1394 (FireWire) port or add-on card to capture video from a DV camcorder, and Windows XP also must have support for the DV camcorder if you want to interface directly with Windows Movie Maker. TIP If Windows Movie Maker doesn't support your video hardware but it can be used with third-party software, capture your data with third-party software and save it in a Windows Movie-Makercompatible format, such as .mpeg, .mpg, .m1v, .mp2, .mpa, .mpe, .asf, .avi, or .wmv. You can import these types of files into Windows Movie Maker.
The first time you attach a supported DV camcorder to your Windows XP system and turn it on, WIA displays the menu shown in Figure 7.16. You can start Windows Movie Maker or take no action. To make Windows Movie Maker the default action, select it, and then checkmark the Always perform the selected action box below the displayed options. Figure 7.16. Digital video device actions in Windows XP. 
When you select Windows Movie Maker, the Windows Movie Maker opening screen is displayed briefly, and then the Video Capture Wizard box is displayed. 1. | You may be offered the choice between different video and audio inputs for your capture. (If not, go to step 2.) If you have more than one video or audio source, you can choose between them. Depending on the sources you have (such as analog or digital video), you'll see different options. In general, DV gives you very few options because they are not necessary. After choosing the source and related options, click Next.
| 2. | Enter the name of the file to record to, and choose the destination folder. By default, captured files go into My Documents/My Videos. Make sure there is plenty of room (think gigs, not megs) on the destination drive, since video files are large. Browse to a different drive or folder if you need to. Click Next.
| 3. | In the next dialog (see Figure 7.17), you choose the movie quality. This setting determines how the file is captured, how large the file size on disk is, and ultimately the output quality level of the resulting movie. The Other settings option gives you a raft of options for target device, such as Pocket PCs, Web streaming, and so on. The information panel in the bottom of the dialog will help you decide between the options. (You can also click the link Learn More About Video Settings.) Click Next.
Figure 7.17. Setting the quality for your movies. 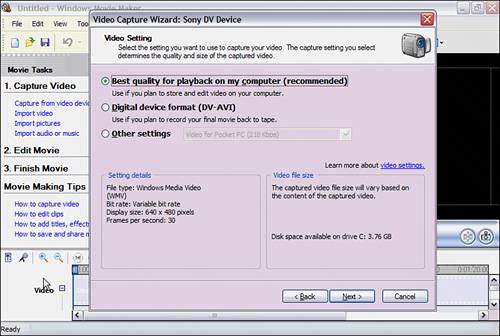
| 4. | On the next dialog, you decide whether to let the capture driver rewind the entire tape and record it automatically (breaking it into clips that you can rearrange, easily cut and paste, and so on), or to manually choose sections of tape to import. Click Next.
| 5. | If you chose the manual approach, you'll now see a dialog box with device controls and some other information and options in it. You can advance and rewind and preview the picture using this dialog. You can also use the controls on your video camera or playback device instead. Either will work. Advance the tape to the start point, then use the Start Capture and Stop Capture buttons in the dialog to create your clips. Movie Maker can also be instructed to make clips from the section you captured. It does this by making a separate clip each time you click the Start Capture and Stop Capture buttons.
Notice also that the dialog reports the available disk space on the target drive. This is only somewhat useful, because it doesn't tell you how many minutes of tape you can capture on that drive, using the selected quality. That depends on the capture settings you chose. You'll have to experiment to figure this out, unfortunately.
|
Each file you save is referred to as a collection of one or more clips in Windows Movie Maker. Importing Digital Still Camera Movies, Snaps, and Sound Files As I mentioned earlier in the chapter, if you want to import videos you shot on your digital still camera, you can do it. Once imported, use those as the basis of your movie or to spice up your other imported video. Simply do this: 1. | In the left panel of Movie Maker, expand the Capture Video section and click on Import Video.
| 2. | Browse to the video file(s) you want, and select them.
| 3. | Click Import.
|
They are added to your working collection to later be put on the movie timeline. When I make movies, I often want to pull in still images, too. Many folks have digital cameras these days, so images are easy to come by. These add richness to your productions. Use the preceding technique, but click on Import Pictures instead of Import Video. You can import audio tracks, too, for spicing up your movies by adding theme songs, background music, speech, and so forth. 1. | Click on import audio or music, browse to the file. Many popular sound file formats are supported (not QuickTime or RealMedia, but the oh-so-common MP3 is, at least).
| 2. | Select the file(s) and click Import (or just double-click the file).
|
Organizing Your Clips The next task is to get organized. You want to get your video clips, stills, and audio into the same collection so you can easily see them in the collection bin. This makes it simpler to pull them onto the timeline in the order you want. 1. | Click the Collections button in the toolbar. The collections panel appears on the left.
| 2. | Right-click on Collections (in the left panel), and choose Create New Collection. Give it a name, such as Dan's Birthday Party.
| 3. | Now drag all your captured video clips, audio clips, and stills for this video production into this collection. (There are other ways to organize collections, such as keeping all video clips in one collection, audio in another, and so forth, but glomming them all together for a given project is the one I use most often.) Move objects around just as you do in Windows Explorer. That is, drag the thumbnails in middle pane over to the destination collection in the left pane. Or, import them into a collection by highlighting the new collection name and then clicking on File, Import Into Collections. You can also drag files from a Windows Explorer window, if you like. Figure 7.18 shows my collection setup for making my Birthday Party movie.
Figure 7.18. Getting your clips organized into a collection makes putting them on the timeline an easier. 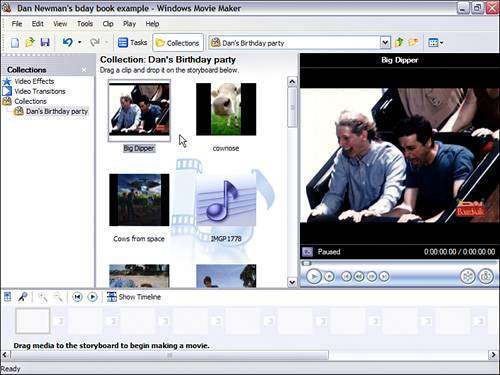
|
NOTE You can resize the sections of the Movie Maker window, such as the Preview pane and Collections pane, by dragging the dividing lines.
Turning Your Video Clips into a Simple Movie Next you start piecing together your movie by dragging your movie clips and/or still images into the Windows Movie Maker storyboard, which is the filmstrip-like area at the bottom of the screen. The clips you drag to the storyboard are positioned left-to-right (you can change the order later). The movie will eventually play starting with the leftmost clip, and move to the right, through all the clips in order. Figure 7.19 shows the storyboard area after adding various clips from DV video I captured while making a movie called Dan's Birthday Party. Figure 7.19. A simple movie built from various video clips displayed in storyboard view. 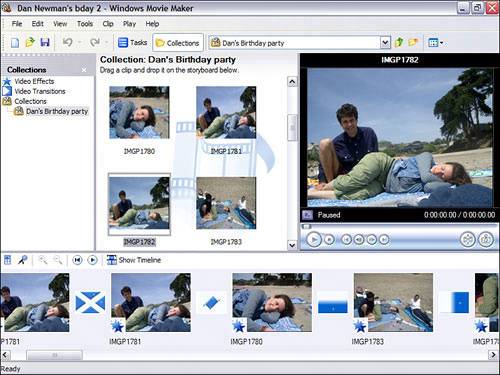
To play only the currently selected video clip in the Collections pane, click the triangular Play button beneath the preview window. To play the entire storyboard, click Play, Play Storyboard/Timeline from the top-level menu. Use the keys in Table 7.2 to control playback: Table 7.2. Windows Movie Maker Playback Control KeysKey | Action |
|---|
Spacebar | Toggles pause/playback | Period | Stop playback | Alt+Left arrow | Display previous frame | Alt+Right arrow | Display next frame | Alt+Ctrl+Left arrow | Moves to previous clip | Alt+Ctrl+Right arrow | Moves to next clip | Alt+Enter | Toggles full screen display |
Editing Your Movie After you drag your clips and images to the storyboard, you can use various tools to adjust the length of each clip, the order of your clips, and the transitions between each clip. I like to trim up my clips at least roughly before I add transitions between them, add background music, credits, and so forth. To change the length of each clip (called trimming), you must use timeline view; click View, Timeline or click on the Show Timeline button just above the storyboard. The timeline replaces the storyboard at the bottom of your screen. To change the order of clips, it's best to be in storyboard view; to edit and trim clips and adjust details of the timing of clips, use Timeline view. Once you have your clips in the basic order you want, you'll typically have to make adjustments such as Trim off the beginning and/or ends of a clip Split a clip into two or more clips so you can move them around on the timeline independently or do transitions between the sections, or apply different effects to each portion. Combine two clips together if you accidentally split them, or because it's easier to work with a smaller number of clips.
To adjust the length of each clip: 1. | Switch to timeline view if necessary.
| 2. | Click on the + or symbols just above the timeline or choose View/Zoom commands to zoom in or out (making the clips appear larger or smaller). Zooming in makes it possible to accurately adjust the clip. You may have to scroll the timeline left and right a bit to find your clip. Use the scroll bar at the bottom of the Movie Maker window.
| 3. | Click the clip in the timeline. Notice that if you hover the mouse pointer over the right or left edge of the clip, a red sizing arrow appears. Now you can drag the clip.
| 4. | To delete the end of the clip, move the trim handle at the start of the clip to the right to the point where you want the clip to start; to delete the end of the clip, drag the trim handle at the end of the clip to the left until you reach the point where you want the clip to end.
|
TIP If you're trying to shorten the end of a video clip, play the video clip from start to finish; then play it again and stop it at the point where you want to cut it. A vertical line in the timeline shows the playback location. Move the trim handle at the end of the clip until it is lined up with the vertical line. You can't make a video clip be longer than its original length; you can only trim it. (Well, you can make it play in slow motionsee the effects section, later in this chapter.) However, still images can play for any length of time. Just drag the still image's edge down the timeline. By default, stills have a length of five seconds. You can "scrub" across the timeline and see your movie play. Just position the pointer on the time area (looks like a ruler) of the timeline view. Then click and drag. The video will play sort of jerkily. If you click on a spot in the timeline ruler, then click the Play button in the Preview window; the preview will start from that point. This is useful for working on a specific area of the movie.
To move a clip from one position to another, you can use either drag and drop or cut and paste. I prefer drag and drop if I can see the source clip and destination location at the same time. Otherwise I use cut and paste. To use drag and drop: 1. | Switch to storyboard view (not required, but easier to use than timeline view).
| 2. | Drag the clip left or right on the timeline. A vertical line indicates where it will be inserted (always just before any clip you are hovering over).
|
To use Cut and Paste: 1. | Switch to storyboard view (not required, but easier to use than timeline view).
| 2. | Right-click the clip in the storyboard.
| 3. | Choose Cut.
| 4. | Click the clip in the timeline that will be behind the clip when you paste it in.
| 5. | Click Edit, Paste.
|
Adding Transitions Between Clips Movie Maker comes with 60 different transition effects to use between clips. Transitions control how one clip blends into the next. The default transition is called a flat cut. Actually, most film and TV transitions are flat cuts. They happen so quickly we barely notice them. Transitions add life to your creations. Like fonts, though, it's easy to overuse transitions. However, an occasional transition is useful, especially between still images or for a special effect such as in a music video. TIP You can download more from various online sources such as http://www.microsoft.com/windowsxp/downloads/powertoys/mmcreate.mspx
There are several ways to add transitions to your production. To create a transition effect from one scene to another: 1. | Switch to Storyboard view. Zoom in as necessary. Notice that there is a little box between each clip. This is the place holder for a transition.
| 2. | In the Collections pane, click on Transitions. A bunch of transitions appear in the middle pane. Double-click on any one of them to see the effect played in the Preview window. When you find the one you want, drag it to the little box between the two clips you're transitioning between. In Figure 7.20, I have just added a checkerboard transition between two clips marked by the pointer.
Figure 7.20. Transitions are dropped on the placeholders between clips in the storyboard. 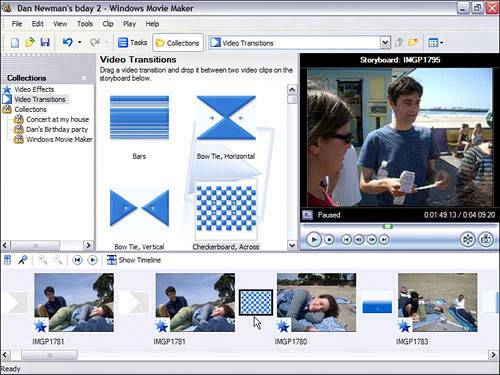
|
TIP You can drag transitions between transition placeholders on the timeline. You can remove a transition by right-clicking on it and choosing Delete.
TIP You can control the length of a dissolve (one clip fades into the next) by overlapping the clips on the timeline.
Adding Video Effects (Filters) to Your Clips Video effects are fun to play with. If you've used Photoshop filters, you know what these are. They change the look of a clip, for example from color to black and white. The nearly 30 different supplied effects run the gamut from painterly, to old fashioned, to slow motion, even to psychedelic. For still shots there are a few transitions that add a sense of motion. This approach is often used in professional documentaries. There are filters also for fading in and out, rotating clips, and increasing and decreasing brightness. When you apply an effect, it alters the way the entire clip plays back. Transitions do not alter the actual clip file on your hard disk; they are just applied as the movie runs, and to the final output file you'll create when you save the movie after editing. You can remove effects at any time, so don't hesitate to experiment. If you split the clip, both halves keep the effect. To apply a video effect: 1. | Switch to storyboard view. (Timeline view works, but I think it's graphically easier to use mode storyboard view.)
| 2. | In the Collections pane, click on Video Effects. The middle pane should show thumbnails of the available effects (see Figure 7.21). (You can choose View, Details to see descriptions of each effect instead of thumbnails.)
Figure 7.21. Applying effects to clips is easy. Just drag and drop the effect on the clip. 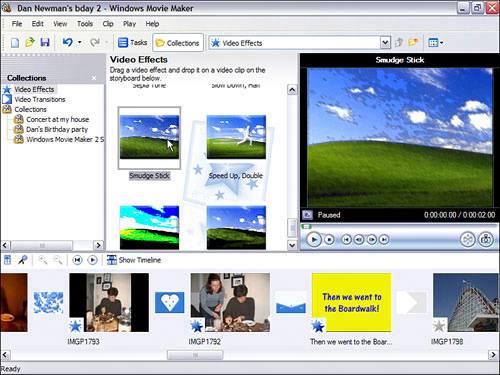
| 3. | Double-click on an effect to see how it works. If you like it, drag and drop it on a clip and then click the play button on the Preview pane to see the effect on the actual clip. If you don't like the effect, right-click on the clip and choose Video Effects to bring up a dialog box. Click on the effect you dislike and click Remove.
| 4. | You can add multiple video effects to a single clip. Effects for that clip are processed in the order listed in the Video Effects dialog box.
|
Adding Narration to Your Movie You can record narration for your movie when the movie is in timeline mode if you have a microphone attached to your computer. To record narration: 1. | Select Timeline mode.
| 2. | Position the cursor somewhere on the timeline where there is no other audio track. (The Audio/Music track is visible below the video track.) Click File, Record Narration.
| 3. | The Record Narration Track pane appears (see Figure 7.22). Click on Show more options and you'll see the default audio device and input source as shown in the figure. To change the defaults, use the drop-down lists.
Figure 7.22. The Record Narration pane, used to record a narration for your movie. 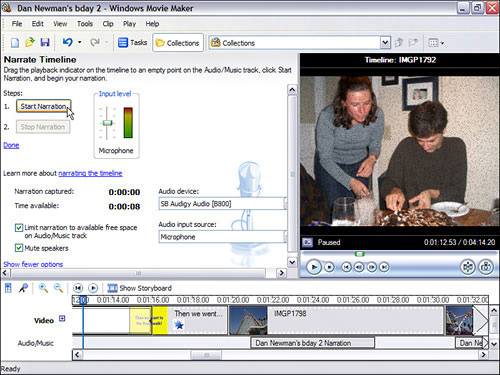
| 4. | It's a good idea to click Mute speakers if you have your sound turned up, because it will prevent feedback between the speakers and the microphone.
| 5. | Adjust the recording level as desired (the level should be somewhere near the middle of the colorful Input level meter).
| 6. | Click Start Narration to begin. Click Stop Narration when you're finished. You'll be asked to name the file. It's saved as a .wma (Windows Media audio) file, then automatically dropped into the timeline in exactly the place where you started narration.
|
Adding Titles to Your Movie While Windows Movie Maker version 1 didn't have built-in titling features, version 2 does. And they are pretty spiffy. There are many styles to choose from. You can have titles appear over top of clips and stills, or as separate slides (like in an old silent movie). You can also create opening and closing animated titles and credits just like in real movies or TV shows. You can spend a few hours just playing with the titling options, so I'll just point you in the right direction. 1. | To add an opening title sequence, choose Tools, Titles and Credits. In a few seconds the titler loads into the left pane.
| 2. | Notice the options you have now. You can add a title:
| 3. | Click on the desired option. As you enter your titles, you'll see them immediately show up in the Preview pane as they will appear in your movie. The real key lies in the options near the bottom of the titler pane: Change the Title Animation, and Change the Text font and color. Play with these to get some fun effects. See Figure 7.23 for an example.
Figure 7.23. The titler pane, for creating overlays and intro and ending credits hosts myriad built-in animated title looks. 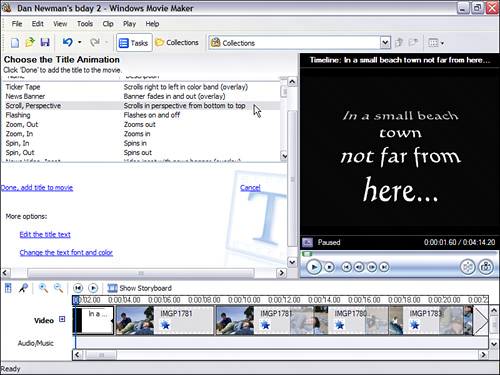
|
TIP There is a Title Overlay track on the timeline, below the audio track. You can slide titles around down there, and trim their lengths, just as you can stills and video clips.
Saving Your Project and Saving Your Movie There are two ways to save your work in Windows Movie Maker. To save the various parts of your movie (the clips on the timeline and the storyboard), click File, Save Project. By default, your Windows Movie Maker Project (.MSWMM) file will be saved to the My Videos folder. Give your project a name, and save it. You should save your projects frequently during the creation and editing process. If you don't, and a system lockup or power outage takes place, your clips will remain, but the structure and timing of your film will be lost, and it will be back to the digital "cutting room" to start over. Here's how to save your movie: 1. | Click File, Save Project.
| 2. | Give it a name and location and click Save.
|
Now your project is saved and safe. You can open it again and fine-tune the project, add to it as you capture more video, or whatever. You can close Movie Maker if you want, and then open it and open the project. All the items in the collection should appear, as will the timeline and storyboard, just as it was when you saved it. Next, you'll want to make sure you are happy with the movie. Once you are, you'll render it, which means to output it in the desired format. This can take a little time, so be ready to take a coffee break while your computer chugs away. Since rendering does take time, it's best to do a dry run of your final movie beforehand. You can see it in the little preview window, or full screen. Simply choose Play, Play Timeline. If happy with it, great. If not, edit as necessary. When you're satisfied with the movie, try outputting to the target medium and see how it looks. 1. | The easiest way to render is to bring up the Movie Tasks sidebar (click on Tasks up in the toolbar). Then expand the Finish Movie section. You'll see these choices: Save to My Computer, Save to CD, Send in Email, Send to the Web, and Send to DV Camera. Choose the option you desire, and move ahead.
| 2. | A wizard will run, asking you for additional details that pertain to your choice. For example, if you choose to make the movie available to viewers over the Web, you'll have to decide what connection speed your viewers will likely be using (see Figure 7.24). Also reported are the size of the final file and how much space is left on your hard drive (the hard disk is always used as the intermediary for rendering). The file is written from the hard disk to the target destination.
Figure 7.24. The options for saving a movie for Web distribution. 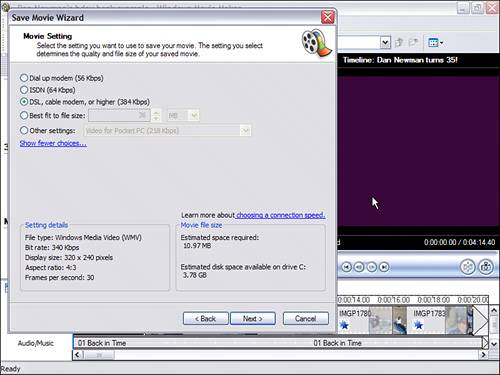
NOTE Movies saved to a recordable CD are saved by using Microsoft HighMAT technology. A HighMAT (High-performance Media Access Technology) CD can contain audio, video, and pictures. HighMAT-compatible consumer electronic devices recognize how the content is organized on the CD, and enable users to play content using the displayed menus. The recordable CD can be played back on a computer as well. Be aware that some older standalone DVD players won't recognize this format and will fail to play the movie. You'll have to experiment and/or do a little research. Newer consumer DVD players recognize more formats (such as rewriteable CDs and DVDs), but older ones don't. As for burning actual DVDs, at this time, Movie Maker doesn't write to DVDs. You'd have to use one of the many DVD-writing programs for that, assuming you have a DVD burner connected to your computer. The procedure for making a DVD from Movie Maker would be a two-stage one. First, you would write the movie to the hard disk from Movie Maker. Then you'd use a DVD authoring program to convert the .WMV file (the program has to know how to deal with .WMV files, obviously) to DVD. TIP Typically for Web posting, you'll output several different versions and allow the viewer to choose between them, based on their connection speed. You'll also need a Web server than can handle the bandwidth of uploading video. There are services on the Web that will do this. Check with your ISP or Web server administrator. If you really get interested in producing experimental videos and sharing them with the world at large, check www.atomfilms.com. | 3. | Just work through each wizard as necessary. Except when outputting to DV tape (make sure to put a tape in the DV camcorder that is not write protected and doesn't have your source material on it, because it will be overwritten), your movie will be output in the proprietary Windows Media Video (WMV) format.
| 4. | A progress bar meter informs you of the process. After the movie is saved, click Yes to view it immediately. Windows Media Player loads the movie and plays it for you.
|
Regardless of the destination of your movie (such as in an email), you'll probably want to make a copy for safekeeping. Consider saving it on your computer, or on a CD. You might also want to back up the project file and possibly the source files. Beyond Windows Movie Maker Windows Movie Maker provides an enjoyable and even pretty powerful way to experiment with digital movie making. Movie Maker 2 is actually powerful enough that I have started using it for small projects rather than using my favorite full-blown video editor. If you get hooked on video creation (which is likely to happen if you have the patience, the eye, and the disposition), you may want to try more powerful editing programs. Some video editors are now available in versions that work directly with DVD-R recorders and have fancy multi-track timelines for editing multi-camera shoots, zillions of effects, color correction, industry-standard SMPTE timecode, capability to produce "edit decision lists (EDLs)," and all kinds of other stuff. Some of the more popular low-priced video-editing programs on the market include Ulead's Video Studio, MGI's VideoWave, and Dazzle's DV-Editor SE. Some IEEE-1394 DV capture cards, TV capture cards, and VGA/TV capture cards may also include various video editing programs, including the previously mentioned ones. More powerful DV-editing programs you might consider Ulead Media Studio Pro, Sony Vegas Video (highly rated), and Adobe's Premiere 6.0, which can be paired with Adobe AfterEffects for exciting special effects. To get more information about Media Studio Pro, and Video Studio see www.ulead.com. VideoWave, see www.roxio.com. Dazzle's lineup of digital video editing programs and hardware, see www.dazzle.com. Keyspan 1394 FireWire laptop card, see www.keyspan.com. SIIG 1394 FireWire laptop card, see www.siig.com. Maxtor external 1394 FireWire hard drives, see www.maxtor.com.
Help Sites and Resources for Digital Video In addition to the product Web sites listed in the previous section, check out these resources: Digital Video Magazine Look for the big "DV" on the cover for news, reviews, and tips for great digital video. The Web companion to the magazine is located at www.dv.com. VideoMaker Magazine Get advice on good videographic techniques as well as buyer's guides and reviews. The Web companion to the magazine is located at www.videomaker.com. CodecCorner The first stop if you're looking for the last word on streaming media compression algorithms (codecs) and technologies for video and Web animations. Find it online at www.codeccorner.com.
|