| Windows XP's Scanner and Camera Wizard, originally introduced with Windows Me, provides a unified interface for transferring pictures from your imaging devices to your computer, your network, or to the World Wide Web. If you have more than one imaging device supported by Windows XP, the Camera and Scanner Wizard displays all supported devices when you launch it from the Start menu (click Start, All Programs, Camera and Scanner Wizard the first time you use it) and allows you to choose the one you want to use (see Figure 7.1). Web cameras, scanners, digital cameras, and card readers are some of the devices the Scanner and Camera Wizard can recognize. The wizard also starts automatically when you press the Scan button on a supported scanner, skipping the dialog box shown in Figure 7.1. In these cases, the wizard skips the Choose Device dialog box and opens the scanner. Figure 7.1. Click the device you want to use, and click Properties to configure it or OK to capture pictures. 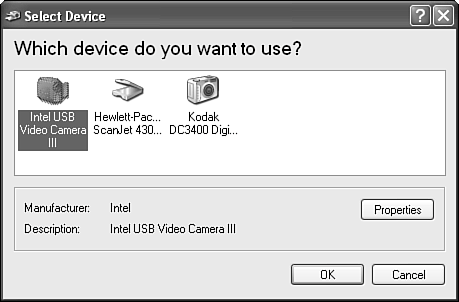
If the Scanner and Camera Wizard is not available on your system, no supported imaging devices have been installed, although you can launch the applet manually through the Control Panel. TIP If you have a choice between a USB-based scanner and other interface types such as SCSI and parallel, choose USB. The Scanner and Camera Wizard automatically detects and uses many USB devices, but it might not work with other interface types unless specific Windows XPcompatible drivers are available. If you set up other scanner types with Windows XP/2000 drivers, you might need to use the scanner's own TWAIN interface to scan photos and other media.
Using the Scanner and Camera Wizard with a Scanner To start the wizard with your scanner, you can push the Scan button on your scanner; open the Scanner and Camera Wizard and choose the scanner from the Scanner and Camera Wizard menu (refer to Figure 7.1); or use the image acquisition feature from within your favorite photo editor or paint program. Image acquisition is located in the File menu of most applications. When the wizard starts, click Next to continue. Follow this procedure to scan your pictures: 1. | On the Choose Scanning Preferences screen, select the picture type and select Preview to prescan your picture with default settings. With some scanners, you might need to press the Scan button to perform the preview (see Figure 7.2).
Figure 7.2. The preview scan has been completed. Use the Custom Settings button to adjust resolution, brightness, and contrast. 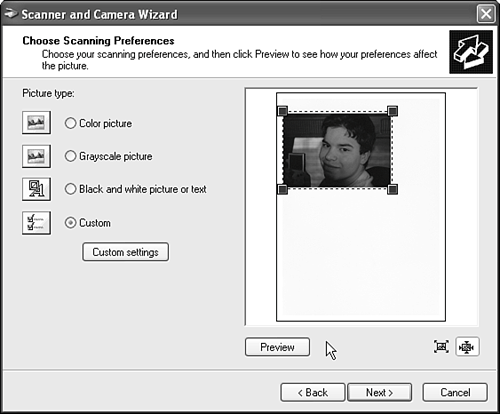
TIP If you place only one photo on your scanner, the wizard automatically selects it for you, as seen in Figure 7.2. Adjust the scan boundaries by dragging the corners only if you want to crop the photo during the scan. If you place more than one picture on the scanner, you will need to adjust the scan boundaries manually to scan each photo. | 2. | Click Custom Settings to adjust the contrast, brightness, and resolution for the scan (I recommend 75dpi for scans you plan to use in slideshows, and 150300 dpi for scans you want to print). Click OK to return to the Choose Scanning Preferences screen, and click Next to scan the picture with the settings you've chosen.
| 3. | On the Picture Name and Destination screen, enter a name for the group of pictures you're scanning, select a file format (BMP, JPG, TIF, and PNG are the options), and select a location. The default location is a subfolder beneath the My Pictures folder (see Figure 7.3). Click Next to scan your picture and save it. Each picture is numbered as it is scanned and saved.
Figure 7.3. Select a group name, file type, and location for your pictures. 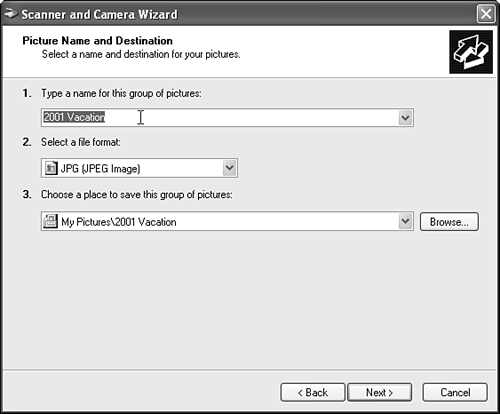
TIP Which file format should you choose? The default, JPEG, creates very small file sizes but does so by discarding fine image detail; it can be used on Web pages. Unless you're short on disk space, I recommend TIF, which creates large file sizes but retains all picture detail. Use BMP if you're saving files for use on the Windows desktop. PNG files also can be used on Web pages. If you save the file in one format and need to convert it into another later, retrieve the file into Windows Paint and save it in the format you need. | 4. | After the picture is scanned, the Other Options screen appears (see Figure 7.4). You can choose to publish your pictures online, order prints from a photo printing Web site, or finish working with the pictures. You also can use the Back button to return to previous menus so you can scan more pictures.
Figure 7.4. To learn more about Windows XP's picture tools, click the working with pictures link. 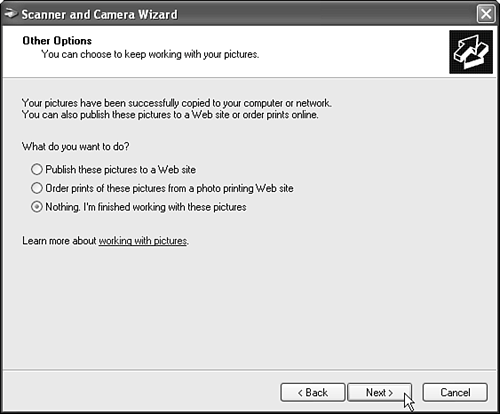
| 5. | Click Next, and the Scanner and Camera Wizard provides an onscreen report of the number of pictures copied (scanned) and their location. Click the link provided to open the folder.
|
 For details about the My Pictures folder, p. 240. For details about the My Pictures folder, p. 240.
Using the Scanner and Camera Wizard with a Digital Camera Start the Camera and Scanner Wizard to retrieve pictures from your digital camera: 1. | Connect your device and turn it on.
| 2. | Click Start, All Programs, Accessories, Scanner and Camera Wizard.
| 3. | If you have more than one imaging device, select your digital camera from the opening menu shown in Figure 7.1, and click OK.
| 4. | If you have only a digital camera, after the wizard locates your device, the opening screen of the wizard appears, as shown in Figure 7.5. To continue, click Next.
Figure 7.5. The Scanner and Camera Wizard identifies your digital camera and offers you the option to work directly from the camera or use the default wizard interface. 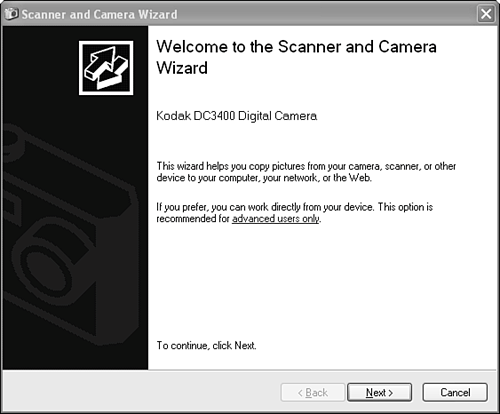
| 5. | By default, all pictures are selected for copying to your computer. To skip a picture, clear the check mark. To rotate it or see its properties, click the buttons below the picture area (see Figure 7.6).
Figure 7.6. The second and third pictures will not be copied because the user has cleared the check marks. The currently selected picture has a heavy border around it. 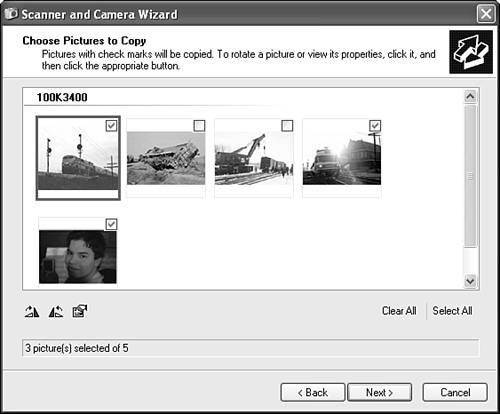
| 6. | On the next screen, you can supply a name for the group of pictures (replace the default "Picture" with your own name) and specify where to store the pictures. If you use the default location (a folder beneath the My Pictures folder), you can use My Picture's multimedia and printing enhancements. You also can have the wizard delete the pictures from your device to free up space after copying them to your system.
| 7. | The wizard displays each picture while it copies the selected pictures and provides a status display onscreen, shown in Figure 7.7.
Figure 7.7. The wizard displays the progress of the copying task. 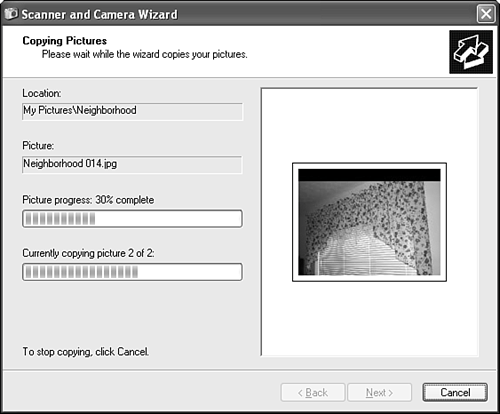
| 8. | If you chose to delete the pictures from your imaging device, the wizard will also delete them and inform you of its progress.
| 9. | When the pictures have been copied, you can choose to publish your pictures online, order prints from a photo printing Web site, or finish working with the pictures. You also can use the Back button to return to previous menus so you can copy pictures you skipped (refer to Figure 7.4).
| 10. | Click Next, and the Scanner and Camera Wizard provides an onscreen report of the number of pictures copied and their location. Click the link provided to open the folder.
|
For details about the My Pictures folder, p. 240.
Using a Card Reader Windows XP has built-in support for popular flash memory card readers, and automatically detects card readers and flash memory cards with pictures when you plug them in. When you plug a flash memory card containing pictures into your card reader, you can choose from several actions (see Figure 7.8): Start the Scanner and Camera Wizard The wizard works with flash memory cards the same way it does with digital cameras. For more information, see "Using the Scanner and Camera Wizard with a Digital Camera," earlier in this chapter. View a slideshow This displays each picture onscreen for a few seconds and continues until you press the Esc key. For more information about slideshows, see "Using Slideshow," later in this chapter. Print pictures directly from the media with the Photo Printing Wizard For more information about printing, see "Using the Photo Printing Wizard," later in this chapter. Open folder to view files This option starts the Windows Explorer. For more information about using this option, see "Using Windows Explorer to View Your Photos," later in this chapter. Take no action Select this option to leave the contents of the flash memory card alone until you decide what you want to do.
Figure 7.8. When you insert a flash memory card containing photos into your card reader, Windows XP displays options to help you copy, view, and print your photos. 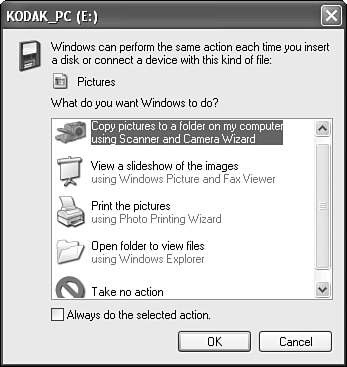
Check Always Do the Selected Action after you choose an action if you want to make that action the default. TIP Use the Always Do the Selected Action option only if you're sure you always want to perform the same task with your pictures. If you leave this box unchecked, you can choose the task you want every time you insert your flash memory card. It takes only a couple of mouse clicks, so my advice is to keep your freedom and don't choose a default action to perform.
Viewing Images Windows XP provides you with two ways to view your pictures: Through Windows Explorer As a slideshow
Which one is better for you? That depends on whether you're looking for immediate gratification or for long-term storage and enjoyment of your pictures. The following sections explain how to use both options. Using Windows Explorer to View Your Photos If you select the Windows Explorer option when you read the photos from your flash memory card, view pictures stored in My Pictures folder or a subfolder, or view the contents of a folder containing photos, Windows Explorer activates several special features designed to make working with your image files easier. Instead of the normal large icons display of files, Windows Explorer switches to a special Filmstrip display option, which uses a large window on the right side of the screen to display the selected picture and shows other pictures in smaller size below navigation and image-rotation buttons (see Figure 7.9). You can use the navigation buttons to select which photo to display, or click on the photo you want to see in the large view. Figure 7.9. The Filmstrip view is used automatically by Windows XP when you view a folder containing photos. 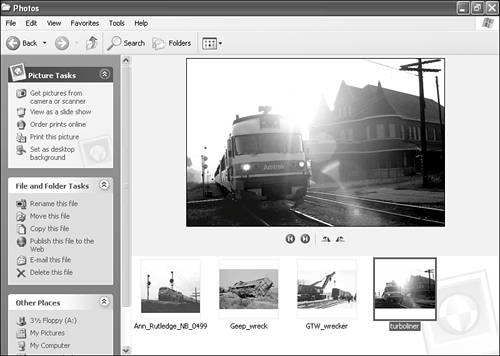
TIP If the filmstrip view isn't selected automatically, click the View tool or the View menu and select Filmstrip. If Filmstrip isn't available because the images are not the correct type or the folder has a mixture of image files and other files, Filmstrip won't be listed as an option. Therefore, if you want to be sure Filmstrip view is available as an option, store your photos in a separate folder from other documents.
The File menu in Explorer also changes when you select a photo, providing the following options: Preview Opens the photo in the Windows Picture and Fax Viewer Edit Opens the photo in an image editor Print Opens the photo printing wizard Refresh Thumbnail Generates a new thumbnail preview of the picture (useful if you've edited the picture) Rotate Clockwise/Counter-Clockwise Rotates the picture in 90-degree increments Set As Desktop Background Puts your digital masterpiece on the Windows desktop Open With Selects another program to open this picture Send To Sends photo to a compressed folder, removable-media drive, or My Documents folder; creates a desktop shortcut; or provides other destinations Properties Displays file properties
TIP By default, the Edit menu in Explorer uses Windows Paint to edit photos. If you prefer another image editor (and who wouldn't?), right-click a photo and select Open With. Windows XP will display Paint and Windows Picture and Fax Viewer, as well as Choose Program. Click Choose Program and select the program you want to use if it's listed, or click Browse to locate the program you prefer. To keep this choice for all files of the same type, check the Always Use the Selected Program box. You also can search the Web for a suitable program. Click OK when you're finished.
Using Slideshow Making a slideshow of your pictures once required you to fire up a program such as PowerPoint and click and paste your way through your digital stack of photos. If all you want to do is view your photos onscreen, you no longer need any third-party software: Just select the slideshow option when it's available within a folder or from the card reader's menu. Windows XP's slideshow option is very simple: It sequences the images in a folder with five seconds per photo and continues to show the pictures in a loop until you press the Esc key on your keyboard. An onscreen toolbar lets you play, pause, move to the previous photo or next photo, or exit the show. You also can use the keyboard commands in Table 7.1 to control the show. Table 7.1. Slideshow Control KeysAction Desired | Keys to Press |
|---|
Go to the previous picture in the folder | Left arrow or Page Up or up arrow | Go to the next picture in the folder | Right arrow or Page Down or down arrow | Rotate picture 90 degrees clockwise | Ctrl+K | Rotate picture 90 degrees counterclockwise | Ctrl+L | Play or pause the slide show | Spacebar (press once to pause, again to play) | Go to the next picture | Enter | Exit the show | Esc | Hide or display toolbar | Tab on or off (toggle) |
TIP If you don't want to display all the images in a folder during your slideshow, just select the ones you want to view with Ctrl+Click or Shift+Click, and then click the Slideshow button on the left side of the Explorer screen or choose Slideshow from the menu. Only the slides you've selected will be displayed.
Using Your Own Photos As a Screen Saver Want to show off the pictures of your spouse or kids but you've run out of room on your desk? You can use the pictures you scan or copy from a digital camera to create a screen saver. To set up your favorite pictures as a screen saver, create a folder with Windows Explorer and copy the pictures you want to use to that folder. Then, open the Display properties sheet in Control Panel, select the Screen Saver tab, select My Pictures Slideshow, and select the folder containing your pictures. You can display each picture for up to three minutes (the minimum is six seconds) and use anywhere from 25% to 100% of the screen. You can stretch small pictures to fit, show filenames, enable transition effects, and use the keyboard to scroll through pictures. Nobody else has a screen saver like it! Using the Photo Printing Wizard Windows XP's Slideshow feature can show you your digital photos immediately. How about instant prints from your digital photos? Thanks to the brand-new Photo Printing Wizard, you can have pictures as fast as your printer can produce them, and get them in a variety of sizes. You can start the Photo Printing Wizard from The flash memory card opening menu The Picture Tasks menu in a photo folder The pull-down menu in a photo folder The File and Folder tasks menu in a regular folder
When the wizard starts, here's how to use it: 1. | The Photo Printing Wizard displays its opening screen. Click Next to continue.
| 2. | The Picture Selection screen lets you select the pictures you want to print. Clear or add check marks to select the pictures you want to print, and click Next to continue.
| 3. | On the Printing Options screen, select the printer you want to use (if you have more than one printer). Click the Properties button to select the paper type, print quality, and other document properties (see Figure 7.10). Click the Advanced button to adjust the number of copies to print and other advanced printer features. Click OK to return to the Printing Options menu, and then click Next.
Figure 7.10. For best results in photo printing, choose the paper type you're using from the list of paper types. 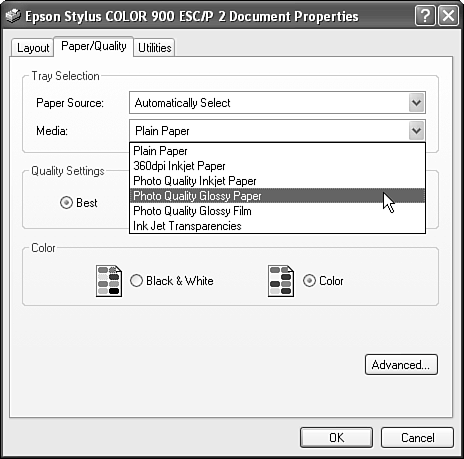
TIP If you haven't used your inkjet printer for several days, or your printouts are of poor quality, you should click the Utilities tab (if available) and run your printer's head cleaning or nozzle test options with plain paper inserted in your printer (take out the photo paper until you're ready to print a good print). Head and nozzle clogs will ruin your printout and waste expensive photo paper, and most recent printers also offer a cleaning routine on this tab. If your printer doesn't have a menu option for head cleaning, check the instruction manual for the correct method to use. You might need to press buttons on the printer to activate a built-in head-cleaning routine. | 4. | Use the Layout selection screen to select how your photos should be laid out on the photo paper. Select from full-page; contact sheets; or sizes such as 3.5x5, 4x6, 5x7, and 8x10, and wallets. The preview shows you how your pictures will be laid out on each page. If you select a size that allows for multiple photos on a page, each image will be laid out once unless you specify a larger number (see Figure 7.11). Click Next to print your photos.
Figure 7.11. Select the layout you want, and the print preview displays your photos accordingly. 
|
Copying Your Pictures to a CD-RW Drive CD-RW drives, which can use either rewritable CD-RW media or recordable CD-R media, have become some of the hottest peripheral options on the market. Previous versions of Windows couldn't use these drives until you installed CD-mastering software, but Windows XP has built-in features that enable you to use a supported CD-RW drive as soon as you install or connect it and turn on your computer. When Windows XP detects a supported CD-RW, the Picture Tasks menu lists Copy to CD as an option. Here's how to use it: 1. | If you want to copy only some of the pictures in your folder, select the pictures you want to copy and click Copy to CD.
| 2. | To copy all photos in the folder to CD, don't select any pictures first. Click Copy all items to CD.
| 3. | The pictures are copied to the CD-RW folder.
| 4. | Repeat steps 13 for other folders that contain pictures you want to add to the CD.
| 5. | Click My Computer in the Other Places menu.
| 6. | Double-click the CD drive where you will store your pictures.
| 7. | The folders you are going to copy are displayed under Files Ready to Be Written to the CD. If you've used the CD for other pictures previously, they also will be listed (see Figure 7.12).
Figure 7.12. Displaying the files to be written to the CD and those already on the CD with Thumbnail view. 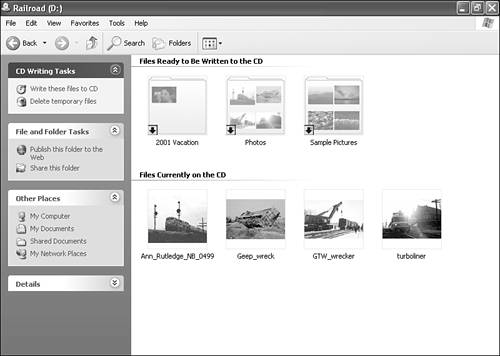
TIP To see a small preview of your picture files as shown in Figure 7.12, select Thumbnails from the View menu or View tool instead of the default Icons view. This provides you with an easy way to be sure you're copying only the pictures you want. | 8. | Click Write These Files to the CD from the CD Writing Tasks menu at the left side of the screen, and the CD Writing Wizard opens.
| 9. | Enter the name of the CD on the opening screen. If you want to create just one CD, select Close the Wizard. Otherwise, click Next to continue.
| 10. | If your pictures were stored in a folder, the wizard creates a folder on the CD for the pictures. While the wizard writes the files to the CD, it displays a progress indicator onscreen (see Figure 7.13).
Figure 7.13. The CD Writing Wizard provides you constant updates on its progress in creating your CD. 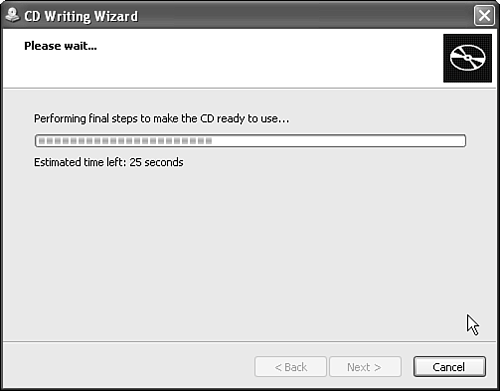
| 11. | The system ejects your CD after copying your picture(s). Click Yes to create another CD if you want or close the wizard. If you elected to close the wizard in step 9, the wizard closes automatically.
|
TIP If your CD-RW drive doesn't offer buffer underrun protection features such as BURNProof, be sure you're not running other programs while you make your CD. A buffer underrun (the drive running out of data to write to the CD) will ruin the CD. Use the Task Manager (press Ctrl+Alt+Del to display it) or the taskbar to see the programs that are running. Close other programs before writing your CD to help assure a successful burn. If you are still having problems making a CD successfully, adjust the speed used by your drive to record data. Open My Computer, right-click the drive, and click the Recording tab. Select the next lower speed than the fastest speed listed and try the recording again (see Figure 7.14). Figure 7.14. Selecting a lower write speed on a CD-RW drive that lacks buffer-underrun protection. 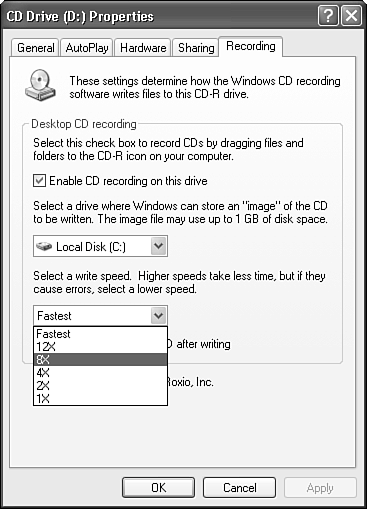
Your photo folders act as regular folders after they've been copied to the CD. If you want to use the special imaging features such as slideshow or photo printing discussed earlier in this chapter, select a file in the folder, open the File menu, and select Preview. The picture is loaded into the Windows Picture and Fax Viewer, which has buttons for photo printing, slideshows, image rotation, editing, and other imaging options. You can use the Forward and Back buttons to select other files in the folder. TIP If you start the copy-to-CD process and discover you're out of media, don't panic. Windows XP stores your pictures in a temporary folder and will remind you to finish the copy process with a pop-up balloon-help message coming out of the system tray. Click on the message when you have more media, and follow the prompts onscreen to complete the copy process or discard the temporary files.
Working with Your Pictures Online Windows XP offers two online options that help you distribute your images to other offices: Publish Photos to the Web Use this option to create an online photo album you can access from any location with Internet access. Ordering Prints Online Get better prints for less cost than using your inkjet printer and its expensive cartridges.
Publishing Your Photos to the Web When you open a folder containing photos, one of the File and Folder Tasks available in the left side of your screen is Publish This Folder/File to the Web. Here's how to use this feature to make your pictures available on the Web: 1. | If you want to publish only some of your photos, select them first, and then click Publish. Otherwise, click Publish.
| 2. | The Web Publishing Wizard starts and connects to the Internet (if you're not already connected). Click Next to continue.
| 3. | Files that will be published are check-marked. Add or remove check marks if desired, and then click Next.
| 4. | Select a service provider from those listed, such as MSN and Xdrive. If you select MSN and you don't have a .NET Passport yet, you must complete the .NET Passport wizard that appears and continue. See "Getting a Passport to Microsoft Country" in Chapter 9 for details.
| 5. | On the File Destination screen, select the destination folder you want to use, or create a new folder. Click Next to continue.
| 6. | On the Adjust picture size dialog box, you can choose to resize your pictures to fit a Small (640x480; default), Medium (800x600), or Large (1024x768) browser window. Clear the check box to leave your photos at their original size.
TIP The most common screen size today is 800x600. If you want to create a fast-loading Web page that maximizes screen area for most users, select Medium. However, if your company has standardized on 17-inch or larger CRTs or 15-inch or larger LCD panels, choose Large, because these monitor sizes are a good match for 1024x768 or higher resolutions. | 7. | Click Next to publish your photos to your chosen provider. If you are publishing only a few pictures or have a broadband (cable modem, DSL, two-way wireless or satellite, or T1) connection, the copying process can take only a few seconds. If you are using an analog (56Kbps or slower) modem or are copying many pictures, the process could take several minutes.
TIP Photos stored in the JPEG (.JPG) format use less disk space and can be published faster than other types of photos. JPEG photos can also be viewed over the Web by standard browsers without using special software. If you plan to publish your photos to the Web, save a copy of each photo as a JPEG file. | 8. | At the end of the process, a URL for your pictures is displayed and a matching shortcut is added to your My Network Places folder. Close the wizard and your site is displayed.
| 9. | If you carry your computer with you to meetings, just set up an Internet connection when you arrive, and click on the shortcut in My Network Places to display your pictures. To display the photos from other Web browsers, enter the URL provided, and provide the username and password assigned by your provider.
|
TIP The Web Publishing Wizard's not the way to go if you're trying to share pictures with other users when you're not present. If you want to share your photos with everyone in your organization, talk to your company's IT managers about setting up a Web page on the company intranet. You can use any Web-publishing program to create customized pages that also can contain company contact information, the company logo, and other content not available with Microsoft's Web Publishing Wizard.
Ordering Prints Online Inkjet printers are great for printing the occasional snapshot or Web page, but corporate bean counters are likely to start throwing things if you try to turn your high-cost-per-page printer into a high-volume photo producer. Save money and get more options with the Online Prints Ordering Wizard. To use the wizard, follow these steps: 1. | Click Order Prints Online from the Picture Tasks menu.
| 2. | When the opening screen of the Online Print Ordering Wizard appears, click Next to continue.
| 3. | Select the pictures you want to use for reprints.
| 4. | Select the service from those listed (see Figure 7.15).
Figure 7.15. Choosing a printing company for reprints of your digital images. 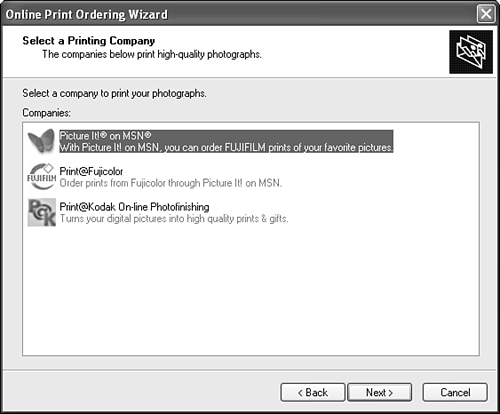
| 5. | Complete the order form that the vendor provides and enter your payment and shipping information when prompted. Depending on the vendor you choose, you can order prints, enlargements, gifts, and novelty items (such as mugs, t-shirts, jigsaw puzzles, and mousepads) from your pictures.
|
TIP Digital pictures printed by an online vendor are higher quality than those you can produce with your inkjet printer, but the quality of the images you send to the vendor affect the prints you'll get back. For best results: Scan your prints at 150dpi for snapshots; use 300dpi if you're scanning only part of a picture. Scan 35mm slides and negatives (which are much smaller than prints) at 1350dpi or higher for 4x6-inch prints. Use a two-megapixel digital camera (1536x1024) or greater resolution for 4x6-inch or larger prints, and set the camera to use the highest quality and highest resolution. The minimum camera resolution recommended for 4x6-inch prints is 640x480 (the "VGA" setting on some cameras); remember, more pixels in the original image means better quality in the final print. The digital still mode on most DV camcorders is usually not nearly high enough quality for printing, although the results will look acceptable onscreen. Order just a few digital prints from a new vendor and evaluate the quality before you place a big order.
Going Beyond Windows XP's Built-In Imaging Tools Windows XP's imaging tools make it easy to get digital images into your computer and keep them organized, but unless you're a perfect photographer, some of those images will need cropping, color-correcting, and other enhancements that Windows XP's tools don't offer. Because WIA-compatible devices can be used from the Acquire menu of your favorite image editor, just as TWAIN-compatible digital cameras and scanners can be, you can use virtually any third-party photo-editing program you prefer to acquire your pictures, or retrieve them from a photo folder for editing after you copy them to your system with the Camera and Scanner Wizard or other Windows XP tool. My favorite is Adobe Photoshop (www.adobe.com), which is immensely powerful, offering layers, automation, and many different ways to control brightness, contrast, and image appearance, but is also quite expensive. If you're on a budget, some capable alternatives include Adobe Photoshop Elements, Jasc Software's Paint Shop Pro (www.jasc.com), and Corel PhotoPaint (www.corel.com), which is part of CorelDRAW. In addition to the product sites listed above, check out these online resources: Imaging Resource (www.imaging-resource.com) Covers the gamut of imaging hardware and software products, and has the unique "Comparometer" feature, which compares the actual output of any two digital cameras from their huge database. DPReview (www.dpreview.com) The interactive buying guide helps you get the digital camera that matches the features you want, and its unique Timeline shows you when the camera you own was introduced. FocalFix (www.focalfix.com) The new name for Focus Online, where readers review their favorite products. John Cowley's Lonestardigital.com A long name for a great site with product reviews and tutorials on both digital imaging hardware and software.
|