Specific Configuration Steps for Windows XP
| Many of the points I've mentioned so far in this chapter are general, conceptual ideas that should be helpful in planning a security strategy, but perhaps not specific enough to directly implement. The following sections provide some specific instructions to tighten security on your Windows XP computer or LAN. These instructions are for a single Windows XP computer or a workgroup without a Windows 200x Server. Server offers more powerful and integrated security tools than are available with Windows XP Professional alone (and happily, it's the domain administrator's job to set it all up). If You Have a Standalone Windows XP Professional ComputerIf you have a standalone system without a LAN, you need to take only a few steps to be sure you're safe when browsing the Internet:
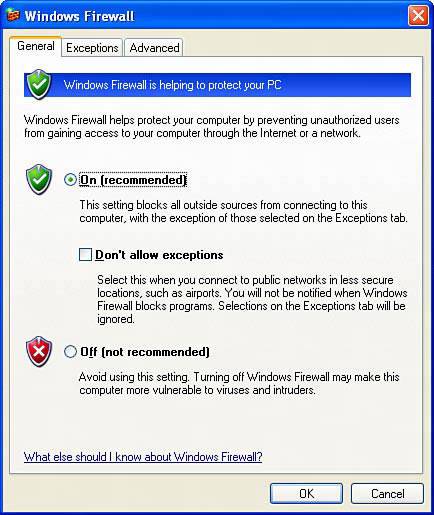
If You Have a LANIf your computer is connected to others through a LAN, follow the first five suggestions from the list in the preceding section. Make the Security Policy changes on each computer. If you are using the Simple File Sharing system option, which I discussed earlier in this chapter, the security situation is quite different than it was in any previous version of Windows. Since all access to shared files over any network or Internet connection is granted or denied access without a password, your one and only line of defense is having a firewall in place between the Internet and your computer. It's absolutely essential that you have a firewall in place, either Windows Firewall or a third-party product. CAUTION If you use cable Internet service with multiple IP addresses provided by your ISP, but have no hardware firewall device in place, you cannot share files on your LAN. For this reason, I urge you NOT to use this type of arrangement. See Chapter 19, "Connecting Your LAN to the Internet," for details. Finally, if you use a wireless network, you must use WEP or WPA encryption to protect your network. Otherwise, thanks to Simple File Sharing, random people passing by could have the same access to your shared files as you do. Enabling Windows FirewallIf you use the Internet, whether directly from your computer or through a network connection, you must be sure that some sort of firewall is in place to prevent Internet denizens from reaching into your computer. If you use a hardware Internet connection sharing device, that will protect you to some extent, and I gave specific tips for adding additional protection in the previous section. But unless you're on a professionally secured corporate network, or you use a third-party firewall product, you should also use Microsoft's Windows Firewall. Starting with Windows XP Service Pack 2, Windows Firewall is turned on by default, and you may already be using it. You can use the following procedure to verify or manually enable the firewall:
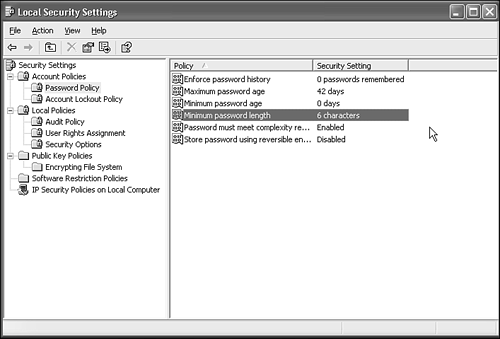
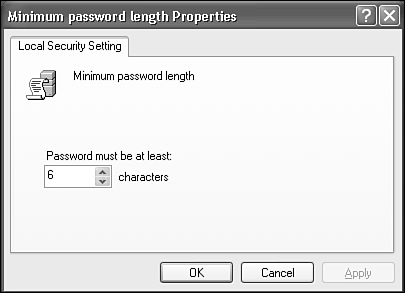
If you want to run a Web server, email system, or other network services that you want to be made available to the outside world, you'll have to "open" the firewall for these services. See "Configuring Windows Firewall" later in this chapter for details. Tightening Local Security PolicyYou should set your machine's own (local) security policy whether your have a standalone computer or are on a LAN. Local Security Policy lets Windows enforce some common-sense security rules, like requiring a password of a certain minimum length. If your computer is part of a Windows domain-type network, your local security policy settings will likely be superseded by policies set by your domain administrator, but you should set them anyway so that you're protected if your domain administrator doesn't specify a so-called global policy. To configure local security policy, log in as a Computer Administrator, and choose Start, All Programs, Administrative Tools, Local Security Policy. (If the Administrative Tools icon doesn't appear on the menu, the Administrative Tools Control Panel applet can get you there.) A familiar Explorer view then appears with several main security policy categories in the left pane, as shown in Figure 21.4. I'll list several policy items you may want to change. Figure 21.4. The Local Policy Editor lets you tighten security by restricting unsafe configuration options. To change the settings, select the policy categories from the left pane, and double-click the policy names in the right pane. Appropriate Properties dialogs appear for each; an example is shown in Figure 21.5. Figure 21.5. Each security policy item has a Properties dialog. You can enter the settings shown in the tables in the following sections.
You don't need to change all the policies. I'll list the important ones in the following sections. Account PoliciesAccount policies can be used to require long, difficult, frequently changed passwords, and make it hard for users to recycle the same passwords over and over when forced to change. You should lock out accounts that fail several login attempts, locally or over the LAN. Table 21.3 shows the password policies and recommended altered settings, and Table 21.4 show the options at your disposal for locking out an account.
Local PoliciesYou should have Windows make an entry in the Event Log whenever someone oversteps his or her bounds. Table 21.5 shows the audit policies and recommended settings.
No changes are necessary in the User Rights assignments section, but you might want to view these entries to see what sorts of permission restrictions Windows uses. Finally, go through the security options, as listed in Table 21.6. Security options are used to restrict what users can do with system options.
NOTE If you're interested in how Windows regulates the operation of your computer, take a look at the settings under User Rights Assignment and Security Options. You'll probably never need to change any of these settings, but these two sections are the heart of Windows's security controls. When you log out and back in, the new restrictive security policies will take effect. |
EAN: 2147483647
Pages: 450

