Assigning Resources
|
|
Now that you understand how Project behaves when resources are assigned to a task, or when an assignment changes, let’s examine various ways to assign both work and material resources.
An assignment relates a task to the resource responsible for the task. There are many reasons to assign resources. Here are a few:
-
Establishing responsibility for the project’s task
-
Reporting for project management
-
Tracking individual and group performance on tasks
-
Accurately measuring human and material resources used to complete individual tasks, project phases, and the project as a whole
-
Tracking and managing project costs
As we noted earlier in the chapter, you don’t have to assign resources to every task in a project. Some tasks, such as product review by customers, have a duration but may not consume project resources. If you don’t have resources working on a task, don’t assign resources to the task.
Assigning Resources from the Assign Resources Dialog Box
To assign resources using the Assign Resources dialog box:
-
Switch to Gantt Chart view (ViewØGantt Chart).
-
Select the task(s) for which you want to create the assignment.
-
Click the Assign Resources button on the Standard toolbar.
-
Select a resource name in the Assign Resources dialog box.
-
To assign a resource part-time, use the spin box control or type a percentage less than 100% in the Units field. To assign multiple units of the same resource, use the spin box control or type a percentage greater than 100% in the Units field. To assign more than one resource, select each resource.
-
Click the Assign button to assign the resource.
If a person is listed in your e-mail address book, and you haven’t yet entered them on your project’s Resource Sheet, you can assign them directly from the address book. With the task selected in the Gantt Chart view, open the Assign Resources dialog box. Click the Resource List Options button to expand the dialog box; then click the Add Resources button. Select From Address Book to open the Select Resources dialog box. Find and select the person you want to assign, and click the Add button.
When you assign a distribution list or group list, all the members of the list are assigned to the selected task.
Assigning Resources Using the Task Form
When you use the Task Form to enter or view assignments, you usually split the window and display a task view such as Gantt Chart view in one pane and the Task Form in the other. This workspace configuration is shown in Figure 10.8.
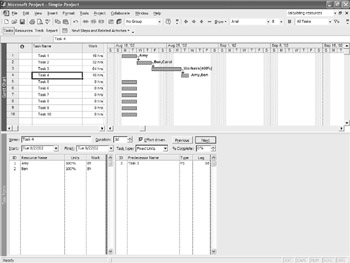
Figure 10.8: Display the Task Form and the Gantt chart in a split window.
The Task Form provides a wealth of information about the task selected in the Gantt Chart view, and it is the best view to use if you change the Task Type and Effort Driven settings as you assign resources to the project tasks. You can see the proposed start and finish dates, the Task Type and Effort Driven settings, as well as the task’s predecessors and lag, and resources. To show the Gantt chart and the Task Form, follow these steps:
-
Choose ViewØGantt Chart to switch to the Gantt Chart view.
-
Choose WindowØSplit Window.
-
Click in the lower pane, and choose ViewØMore Views to open the More Views dialog box.
-
Select Task Form and then click OK.
To assign resources using the Task Form:
-
In the Gantt chart, select the task(s) to which you want to assign resources.
-
In the Task Form, select a resource from the Resource Name drop-down list.
-
In the Units and Work columns, use the spin box controls to enter units, work, or both.
-
Repeat steps 2 and 3 until all resources are chosen for the selected task.
-
Click the OK button in the Task Form to assign the resource(s).
The Task Form gives you a major advantage when you’re assigning multiple resources to tasks. In the Assign Resource dialog box, if you change the units for one resource and then switch to another resource, Project assigns the first resource and then calculates work or duration for the entire task, based only on the first resource. In the Task Form, all resources are assigned at the same time; when you use the Task Form, Project doesn’t accidentally calculate work or duration prematurely.
You can assign resources to project summary tasks. Assign a resource to the summary task if increased duration for the summary task increases their workload—for example, a supervisor or administrative assistant for the team assigned to the tasks rolled up in the summary task. If the resource’s workload does not change with the duration of the summary task, assign the resource to a subtask rather than the summary task.
Assigning Resources in Project Professional
Pro If you use Project Professional and Project Server, you can assign tasks to resources that are shared in an enterprise-wide resource pool. This pool is a database of available resources across the corporate network, stored on the Project Server.
Server You can assign and manage these resources from within Project Professional, or from Project Web Access’s Resource Center page. To learn more about using Project Professional and the enterprise resource pool, turn to Chapter 21. To learn more about Web Access and the Resource Center, turn to Chapter 22.
Assigning Material Resources to Tasks
Material resources are materials consumed in the completion of a task, as opposed to equipment used to complete a task. When you assign a material resource, you specify the way the material is consumed. With variable material consumption, the quantity of material consumed changes as task duration changes. Examples of variable material consumption include the following:
-
Fuel for a generator
-
35mm film in a photo shoot or movie
-
Disposable paint rollers
-
Bottled gases used in welding
-
Antibacterial scrub soap used in a surgical unit
Variable consumption resources are assigned at an amount per time period based on the material label listed for the resource (see Figure 10.9): 10 gallons per day (10 gal/d), 2 packs per hour (2 pk/h), 4 tons per month (4 ton/mo).
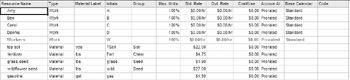
Figure 10.9: Specify resource consumption based on the Resource Sheet’s material label.
Choosing the fixed material consumption method indicates that the amount of material used is not related to the duration of the task. Examples of fixed material consumption include the following:
-
Topsoil in a landscaping project
-
Deck boards and wood posts used to build a deck
-
Squares of shingles and rolls of roofing nails used on a roof
-
Primer, paint, or wallpaper used to paint a room
-
Two-by-fours used to frame a house
-
Rivets and steel plate used to build a ship
Materials consumed in a fixed quantity, regardless of duration, are assigned without a time period: 10 gallons (10 gal), 2 packs (2 pk), 4 tons (4 ton). When you assign the material resource, Project calculates work: the total materials used in the task. You can assign material resources from Gantt Chart view with or without the Task Form.
To assign material resources to a task in Gantt Chart view:
-
Switch to Gantt Chart view (ViewØGantt Chart).
-
Select the task(s) that you want to create the assignment for.
-
Click the Assign Resources button on the Standard toolbar.
-
Select the material resource name in the Assign Resources dialog box.
-
To assign a fixed consumption resource, enter the number of units of the resource that will be used in the task. To assign a variable consumption resource, enter the number of units per unit of duration.
-
Click the Assign button to assign the resource.
|
|
EAN: 2147483647
Pages: 241