Viewing Project Updates
|
|
Server When your entire team uses Web Access, any changes they make to their task assignments are automatically entered into the project file stored on Project Server. No e-mail messages need to be sent; changes are registered as they occur.
Accepting and Rejecting Task Changes
As a manager, you can view and approve task changes by clicking the Updates tab from any Web Access page. This displays the View Task Changes Submitted by Resources page shown in Figure 22.43—otherwise known as the Updates Center. By default, the Updates Center shows a Gantt Chart view with all changes noted in the Indicators column. Hover your cursor over each icon in the Indicators column to view details about the change.
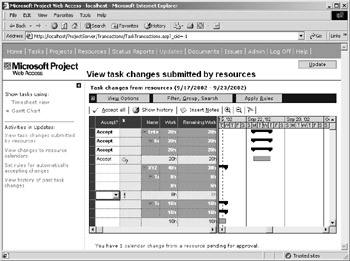
Figure 22.43 : View all task changes submitted by resources in your project.
| Note | You can sort, filter, group, and search for specific tasks listed on this page. You can also display the information in Timesheet view by clicking the Timesheet View link in the Activities pane. |
When a change has been submitted, you can choose to accept or reject that change. You do this by clicking in the Accept? column next to the task change and then clicking the down arrow. Select either Accept or Reject from the pull-down list, or leave the field blank to postpone a decision. To accept all submitted task changes, click the Accept All link.
When you’re done accepting or rejecting changes, click the Update button at the top of the page. This launches a copy of Project Professional with the changed project(s) opened. Updates are made to the project(s) and then you’re shown a message box asking if you want to save these updates. Click OK to complete the process.
If you rejected a task change, that task is obviously not updated within the project. Instead, the resource that requested the change is notified by e-mail that the requested change has been rejected.
Viewing Past Updates
You may have occasion to examine past changes that have been made to the projects you manage. To view all past task changes, click the View History of Task Past Task Changes link in the Update Center’s Activities pane, or click the Show History link above the task change table. This displays a large Gantt chart containing all historical task changes. Use the View Options and Filter, Group, Search tab to configure the chart with more manageable views.
Viewing Calendar Changes
You can also view changes that any resources make to their personal work calendars. Click the View Changes to Resource Calendars link in the Update Center’s Activities pane to display the display a table of changes, similar to the one shown in Figure 22.44. In the case of calendar changes, the resource has the final say; all changes are automatically accepted without any input from your part.
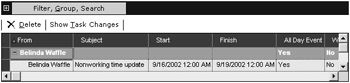
Figure 22.44: View changes that resources have made to their calendars.
Setting Rules for Automatically Accepting Changes
If you manage a large group or large project, manually accepting or rejecting all task changes can become a daunting task in and of itself. You can, however, configure Web Access to automatically accept or reject certain types of updates by creating rules to manage the change requests.
Begin by selecting Set Rules for Automatically Accepting Rules from the Update Center’s Activities pane. This displays a page listing all previously created rules; when you first start using Web Access, this rules table will be empty.
To create a new rule, follow these steps:
-
Click the New Rule link to launch the Set Rules Wizard.
-
Use the first page of the wizard, shown in Figure 22.45, to automatically accept certain types of task changes. Select the type of request to which you want the rule applied; to set a more detailed criterion, select Only Task Updates That Fit the Following Criterion; then specify a Field, Operator, and Value to define the type of request. Click Next to proceed.
-
When the second page of the wizard appears, choose to accept task changes from all current and future projects, or only from selected projects. Click Next to proceed.
-
When the final page of the wizard appears, choose to accept task changes from all current and future resources, or only from selected resources. Enter a name for this rule and then click Finish.
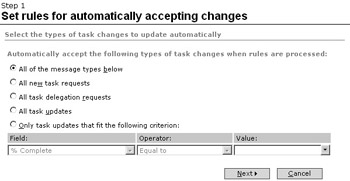
Figure 22.45: Select the types of task changes to which you want the rule applied.
The new rule now appears in the Set Rules for Automatically Accepting Changes page, as shown in Figure 22.46. To enable the rule, click the Enabled box next to the rule. After a rule is enabled, all task changes that meet the specified criteria will be automatically handled according to the rule’s built-in instructions.
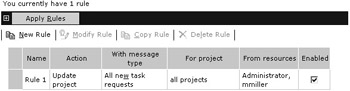
Figure 22.46: Enable rules to automatically manage task changes.
|
|
EAN: 2147483647
Pages: 241