Exporting Data from Project
|
|
The knowledge amassed in a typical project can benefit the entire organization, but the best way to share this information is not always a Gantt chart. It may be better to use your Project data to create more traditional reports, publications, and presentations. For example, you can send selected project data to an Excel spreadsheet for some serious financial analyses.
When you’re starting a project, you’ll be motivated to import data because it saves time for you and your team. At the end of the project, export critical data to provide a jumpstart for the next project—you might be the project manager!
Using the Export Tools
As in the Import section of this chapter, we’ll begin with a quick review of the wizards, dialog boxes, and controls you’ll use to export files. You’ll use the same tools to map fields for export as you did for import. Although Excel worksheets are used in this demonstration, the dialog boxes displayed and the steps taken to export your data are the same for all Project file formats.
When you save a Project file in a non-native file format, you’re exporting the file. Choose File Ø Save As to open the Save As dialog box; then use these controls to choose a file type and location:
Save As Type Select the format of your new file.
Save In and Places bars Select the destination of your saved file.
ODBC button Used to select an ODBC data source, this button opens the Select Data source dialog box. You’ll find information about data sources in the “Importing Data from Databases” section earlier in this chapter.
If you’re exporting to any non-Project file type other than an ODBC database, when you click the Save button after selecting the file type, you launch the new Project 2002 Export Wizard.
Defining the Data to Export
Clicking the Save button in the Save As dialog box launches the Export Wizard, which looks and operates amazingly like the Import Wizard. (We think they were identical twins, separated at birth.)
When you click the Next button on Export Wizard’s opening screen, you see the Data screen, shown in Figure 18.14. You can choose to export your entire project (the first option in this example), or just selected data.
If you choose to export the entire project, all you have to do is click the Finish button. Project will take it from there, mapping the project’s fields to a standard template in the file format you selected.
If you choose to export only selected data, click the Next button. This displays the Map screen, which gives you the option of creating a new data map or using an existing map. Make your choice and then click Next.
If you chose to use an existing map, the wizard now displays the Map Selection screen, shown in Figure 18.15. Choose the map you want to use and then click Next, which takes you to the Map Options screen. If you chose to create a new map on the Data screen, click Next to be taken directly to the Map Options screen.

Figure 18.14: Choose to export selected data, or an entire project.
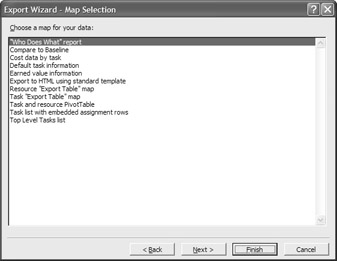
Figure 18.15: Use the Map Selection screen to use an existing data map.
Setting Options for the Exported Data File
The Map Options screen enables you to choose which types of data to export—tasks, resources, assignments, or some combination of the three. This screen also presents application-specific options, including:
Export Header Row Selecting this option sends descriptive header fields, along with the data being exported.
Include Assignment Rows in Output Project organizes exported data so that assignment rows appear below tasks or resources, similar to the Task Usage and Resource Usage views.
Text Delimiter (text files only) Defines the character used to indicate that a field has ended. The choices are Tab, Space, and Comma. Tab is the default for TXT files, and Comma is the default for CSV files.
File Origin (text files only) Specifies the system character set of the data to be exported. For all Project files, this setting is Windows (ANSI).
Set options for your exported file and then click Next.
Mapping Exported Data
Next up is either the Task Mapping or Resource Mapping screen (depending on what you’re exporting—tasks or resources), shown in Figure 18.16. This looks and works similar to the Task Mapping (or Resource Mapping) screen in the Import Wizard. Give the destination file a name; then proceed to map the From and To fields. (Each field displays a pull-down menu of options when clicked.) If you chose to use an existing data map, these fields should be pre-selected for you.
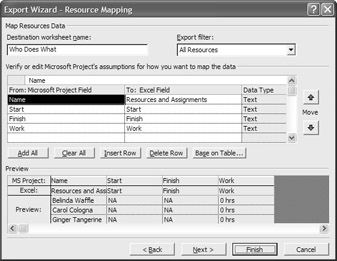
Figure 18.16: Use the Resource (or Task) Mapping screen to map Project fields to the export file.
The options and controls on this screen include:
Destination Worksheet Name Type a name in the box for the database table, worksheet, or HTML table title. This field is not available for text files (TXT and CSV).
Export Filter drop-down list Select an option from the Export filter box to select only certain tasks or resources to be exported. This contains all the filtering options available in Project.
Add All button Adds all of the fields from the source file to import to the import/ export map.
Clear All button Removes all the mapped fields from Mapped Field List.
Insert Row button Inserts a blank row above the selected row in the Mapped Field List.
Delete Row button Deletes the selected row from the Mapped Field List.
Base on Table button Adds all of the fields contained in a task or resource table to the map.
FROM: Microsoft Project Field column Choose field names from the drop-down list in each row to specify the fields that you want to export.
TO: Worksheet/Database/Table/Text Field column Enter field names in the rows to specify the fields that you want to create. Each field must have a unique name within the imported file.
Data Type column Format of the data contained in each row. For some file formats such as XLS and TXT, all of the Data Types will appear as text, even though they might be numerical in the project table definitions.
Move Up and Move Down buttons Use these buttons to move the selected row up or down in the Mapped Field List.
The preview pane at the bottom of the screen changes to reflect the data map you’re creating. Each column contains the field name from Microsoft Project, the field name in the export file, and a preview of the first three rows of data from the selected Project table.
Finalizing the Export
When you’ve completed the Resource or Task Mapping screen, click Next to display the End of Map Definition screen. If you want to save a new map you’ve created, click the Save Map button; otherwise, click the Finish button to begin exporting your file.
Exporting to Specific Applications
In this section, you’ll find step-by-step instructions and examples for exporting Project 2002 files to specific applications. As with importing, the export routines for each application vary only because of the different file formats used by applications. Whether you’re exporting Excel, Access, Project, ODBC databases, or text files, you use the same tools.
Exporting to Project 98
If you coordinate with other managers who haven’t yet upgraded to Project 2002 (or 2000), you will need to save your projects in the older Project 98 file format. Doing so is extremely easy, and requires no manual mapping.
-
An ongoing project has spanned multiple releases of Microsoft Project, and your organization was the first to upgrade.
-
Projects are being shared between groups with different versions of Microsoft Project.
Project 98 uses the MPP and MPT file formats.
To save a file in the Project 98 MPP format, follow these steps:
-
Open the project that you want to save.
-
Select File Ø Save As to open the Save As dialog box.
-
Select Microsoft Project 98 in the Save as Type drop-down list.
-
Select the destination for the new file the Save In drop-down list or Places bar.
-
Choose a destination filename from the file list, or type in a new name.
-
Click the Save button.
-
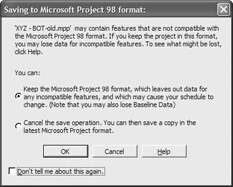
Project now displays a dialog box warning you that some features in your project may not be compatible with Project 98. You already know this, so select the Keep as Project 98 Format option and then click OK. Your file will now be exported.
Warning You can import files from all the prior versions of Project, but doing this is a one-way street for Project 4 files because Project 2002 doesn’t export to the older MPX format. So unless you save your project as a Project 98 MPP and then open Microsoft Project 98 and save the file as a previous version, you can’t export a file to Project 4 (and earlier versions).
Exporting to Microsoft Excel Workbooks and Pivot Tables
You can export Project field data to Microsoft Excel either as a spreadsheet or as a pivot table (two worksheets in a workbook). Because Excel data is not stored relationally, Assignment records that are associated with resources and tasks can be exported to Excel, but they will not be formatted (outlined and indented) as in Project. Assignment rows will appear below their corresponding Task or Resource rows, but will be indistinguishable.
-
It’s time for some serious number-crunching.
-
You want to run some “what if?” scenarios using Excel’s Solver to support your project-management decisions.
-
Pivot Tables are the best way to graphically show relationships.
Microsoft Excel uses the XLS file format.
Exporting an Entire Project to a Workbook
Follow these steps to export data from an entire project to an Excel workbook. This is the easiest way to export Excel-format data because it maps your Project data directly into compatible fields in a Project Excel template. (Importing a Project Excel template is equally simple— mapping is automatic.)
-
Open the project you want to export.
-
Select File Ø Save As. The File Save dialog box is displayed.
-
Select Microsoft Excel Workbook in the Save as Type drop-down list.
-
Select the destination for the file in the Save In drop-down list or Places bar.
-
Choose a destination filename from the file list or type in a new name.
-
Click the Save button. The Export Wizard is now launched; click Next to proceed.
-
When the Data screen appears, choose the Project Excel Template option; then click Finish. A new Excel worksheet is created with columns that map exactly to your Project data.
Exporting Selected Data to a Workbook
Exporting only selected data from your project is slightly more involved, though still executed from within the Export Wizard. Follow these steps:
-
Open the project you want to export.
-
Select File Ø Save As. The File Save dialog box is displayed.
-
Select Microsoft Excel Workbook in the Save as Type drop-down list.
-
Select the destination for the file in the Save In drop-down list or Places bar.
-
Choose a destination filename from the file list, or type in a new name.
-
Click the Save button. The Export Wizard is now launched; click Next to proceed.
-
When the Data screen appears, select Use Existing Map and then click Next.
-
When the Map Selection screen appears, select a data map to use, and click Next.
-
When the Map Options screen appears, as shown in Figure 18.17, the options for the map you selected should be pre-selected. Make sure that the Export Header Row option is selected; then click Next.

Figure 18.17: Use the Map Options screen to select Excel-specific export options. -
The Resource Mapping screen now appears, with all the From and To fields pre-mapped. Make any desired changes; then click the Next button.
-
When the End of Map Definition screen appears, click Finish. Your Project data will now be exported to an Excel workbook.
When you open the new Excel file, each column corresponds to a specific resource, task, or assignment, as you can see in Figure 18.18.
| Note | If you chose to export more than one type of item—tasks and resources, for example—each item is displayed on a separate worksheet. |
Exporting Data for an Excel Pivot Table
A pivot table is a powerful tool for data analysis. Pivot tables summarize the columns of information in a database in relationship to each other. You will need to work with the pivot table, however, to make it beautiful, and to adjust the layout and tweak the data being charted.
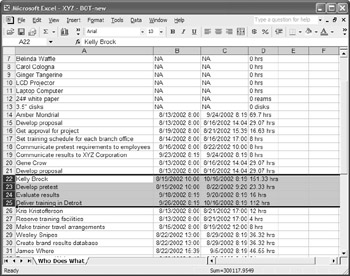
Figure 18.18: An exported Excel file with the resource and its embedded assignments highlighted.
| Note | See your Excel documentation for more information on working with pivot tables. |
To export Project data to an Excel pivot table, follow the same steps as for exporting to a regular Excel worksheet with the exception of selecting Microsoft Excel PivotTable from the Files of Type list in the Save As dialog box.
You’ll also notice one slight change from the normal Export Wizard screens. When you reach the Map Options screen, you’ll see that the Excel options have been replaced with the following message:
Exporting to Microsoft Excel PivotTables creates two sheets for each type of data you choose to export. One sheet contains the data used for the PivotTable and the other contains a default PivotTable. The last field in each map is used as the default data field for the PivotTable. All other fields are used as row fields in the PivotTable.
That out of the way, you can go ahead and complete the wizard as normal. Project then creates the pivot table file.
Use the Analyze Timescaled Data Wizard to Export to Excel
The Analyze Timescaled Data Wizard exports cost data to Excel so that you can analyze costs and cost variances (including the PERT variances) by the day, month, or other period. Data exported from the XYZ-BOT file is shown in Figure 18.19.
The Analyze Timescaled Data Wizard is launched from the Analysis toolbar (choose View Ø Toolbars Ø Analysis from the menu, or right-click on any toolbar and then choose Analysis).

Figure 18.19: Use the Analyze Timescaled Data Wizard to export cost data to Microsoft Excel.
You can export the entire project, or selected tasks. To export data using the wizard:
-
Switch to Gantt Chart view and then display the Analysis toolbar (View Ø Toolbars Ø Analysis).
-
Select the tasks for which you want to export cost information.
-
Click the Analyze Timescaled Data in Excel button on the toolbar to launch the wizard.
-
In the first step of the wizard, choose Entire Project or Currently Selected Tasks. Click Next.
-
In the second step of the wizard, shown in Figure 18.20, use the Add and Remove buttons to create the list of fields to export. In Excel, the fields will appear in the order they’re listed in the Field to Export list. It’s difficult to rearrange the fields in Excel, so make sure they appear in the order you want before clicking Next.
-
In the third step of the wizard, shown in Figure 18.21, enter starting and ending dates for the export; then choose a time unit from the Units drop-down list, and click Next.
-
In the fourth step, select it you want Excel to graph the exported data. Click Next.
-
In the final step, click the Export Data button to launch Excel and then begin the export.
The exported data (refer to Figure 18.19) lists each task, followed by the timephased data for the fields you selected in the wizard. The final rows of the spreadsheet list totals for each field.
The wizard does not create row totals. To determine, for example, the total cost variance for the selected tasks, add totals in the first blank column in the Excel worksheet.
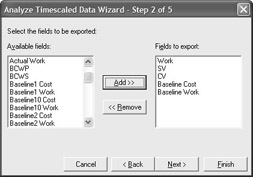
Figure 18.20: Use the Add and Remove buttons to create the export field list.
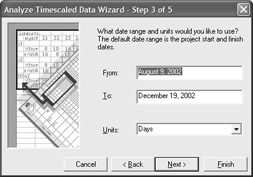
Figure 18.21: Choose a date range and reporting unit in the Analyze Time-scaled Data Wizard.
Exporting Data to Text Files
Project 2002 allows you to export ASCII text in three different formats: comma-separated values (CVS), tab-delimited text (TXT), and space-delimited text (TXT).
-
Text files are the most basically formatted and easily sharedñespecially with users who have older machines or software.
-
Text files can be read by nearly all applications.
-
Text files are small, so you can e-mail data using a slower modem and not suffer too much.
Text files use the TXT and CSV file formats.
Use the following procedure to export data to a text file using a predefined export map.
-
Open the Project file you want to export.
-
Choose File Ø Save As to open the Save As dialog box.
-
Change the Files of Type to Text (Tab delimited) for tab or space-delimited files, or CSV (Comma delimited) to create comma-delimited files.
-
Use the Save In drop-down list or Places bar to select your text file destination.
-
Select the file or type a filename, and click the Save button. The Export Wizard is now launched; click the Next button to proceed.
-
When the Data screen appears, select Use Existing Map and then click Next.
-
When the Map Selection screen appears, select a data map to use; then click Next.
-
When the Map Options screen appears, as shown in Figure 18.22, the type of data to export should be pre-selected, based on the map you selected. In the Text File Options section, choose whether or not to include headers and row assignments; then pull down the Text Delimiter list, and choose either Tab or Space. Click Next to proceed.

Figure 18.22: You can designate the text delimiter to use on the Map Options screen. -
The Resource Mapping screen now appears with all the From and To fields pre-mapped. Make any desired changes and then click the Next button.
-
When the End of Map Definition screen appears, click Finish. Your Project data will now be exported to an Excel workbook.
Exporting Data to Databases
Project enables you to save your data in either the MPD (Project) or MDB (Access) database formats. You can also export your data to any number of ODBC formats.
-
To send project data for analysis on heavy-duty mainframe or mini-computer-based databases
-
To query Project 2002 data using SQL and OLAP tools
Databases use the MPD, MDB, and various ODBC file formats.
Save an Entire Project as a Project Database (MPD)
The preferred (and most common) procedure is to save your entire project into a Project database (MPD format). An MPD file can contain multiple projects, and be queried just like an Access Database (MDB).
-
Open the project you want to save.
-
Choose File Ø Save As.
-
In the Save As dialog box, select the destination for the database file.
-
Select Project Database in the Save As Type drop-down list.
-
Type or select the filename for your exported database. Remember that database files can contain multiple projects when choosing a filename.
-
Click Save.
-
The Export Wizard now launches with the Project Definition screen displayed, as shown in Figure 18.23. Change or accept the project name; then click the Finish button. Your data is now exported.
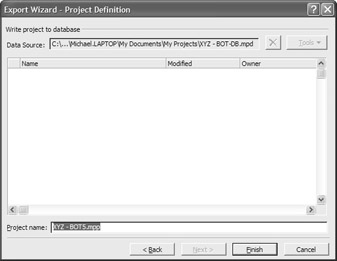
Figure 18.23: The Project Definition screen is the only Export Wizard screen displayed when you save to a Project database file.
Save an Entire Project as an Access Database (MDB)
Saving to an Access database file (MDB format) is slightly more involved because you have to work through the entire Export Wizard. That’s because you can choose to save selected data, as well as the entire project.
-
Open the project you want to save.
-
Choose File Ø Save As.
-
In the Save As dialog box, select the destination for the database file.
-
Select Microsoft Access Database in the Save As Type drop-down list.
-
Type or select the filename for your exported database. Remember that database files can contain multiple projects when choosing a filename.
-
Click Save to launch the Export Wizard; then click Next to proceed.
-
When you see the Data screen, shown in Figure 18.24, elect to save the entire project or just selected data; then click Next.

Figure 18.24: When you save to an Access database, you can save the entire project or just selected data. -
If you chose to save selected data, you now see the Map screen; choose to use either a new or existing map and then click Next.
-
If you chose to use an existing map (on the Data screen), you’ll now see the Map Selection screen. Select the map to use; then click Next.
-
When the Map Options screen appears, select to export tasks, resources, or assignments and then click Next.
-
The Resource Mapping screen now appears. Map the From and To fields; then click the Next button.
-
When the End of Map Definition screen appears, click Finish. Your Project data will now be exported to an Access database.
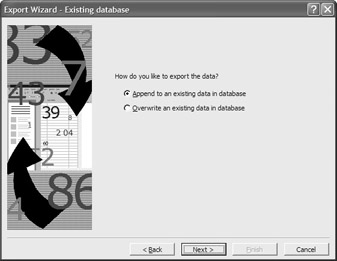
When you’re working with the Access format, you can choose to save the new data to an existing database file. If you do, when the Export Wizard launches it will display the Existing Database screen, shown here. When you see this screen, you have three choices: appending the data you are saving onto the end of the existing database, overwriting the database with the data you’re exporting, or canceling and renaming your destination file. Appending your project file will allow multiple projects to be stored in the same database.
Export Data to an ODBC Database
ODBC database management is much more involved than using an enduser-friendly database, such as Microsoft Access. Accordingly, exporting Project data to an ODBC database is more complicated than exporting to a Project or Access database. Follow these steps:
-
Open the project you want to save.
-
Choose File Ø Save As.
-
In the Save As dialog box, click the ODBC button to display the Select Data Source dialog box. (This is the same dialog box shown in Figure 18.10.)
-
Select either the File Data Source or Machine Data Source tabs to display the list of data sources defined on your system.
-
Select a data source and then click OK.
-
Project now launches the Export Wizard. Click the Next button to proceed.
-
When the Data screen appears, elect to save the entire project; then click Next.
-
The Project Definition screen now appears. Enter a name for this project in your database; then click the Finish button.
Warning If you don’t have the correct data source predefined, you may need to refer to “Importing Data Using ODBC,” earlier in this chapter, or speak with your network administrator.
Exporting Data as HTML
Hypertext markup language, or HTML, is the language of the Web, and is fast becoming the universal language for data presentation. HTML pages can be published on your web server, and viewed in a browser by users, regardless of the type of computer they use.
-
To publish data on your intranet or the Internet.
-
To share data with users on Unix systems.
-
To take “snapshots” of project data for posterity.
HTML files use the HTM and HTML file formats.
Project uses import/export maps to determine which fields are exported to HTML, and may use a template to determine how and where the information is displayed in the HTML file. Follow these steps to export the currently open project:
-
Open the project that you want to save.
-
Select File Ø Save As to open the Save As dialog box.
Tip You can also open this dialog box and then start the Export Wizard by selecting File Ø Save As Web Page.
-
Select Web Page from the Save As Type drop-down list.
-
Select the destination for the new file the Save In drop-down list or Places bar.
-
Choose a destination filename from the file list, or type in a new name.
-
Click the Save button. The Export Wizard is now launched; click Next to proceed.
-
When the Map screen appears, choose to use an existing map or create a new map; then click Next.
-
If you chose to create a new map, you now go directly to the Map Options screen. If you chose to use an existing map, you see the Map Selection screen. Select a map and then click Next to go to the Map Options screen.
-
The Map Options screen, shown in Figure 18.25, displays the typical data export options (tasks, resources, assignments), as well as some new HTML-specific options.
-
You can choose to export header rows and assignment rows, just as you can with other export file types.
-
You can also choose to base the exported data on an existing HTML template; click the Browse button to select a pre-defined template.
-
Finally, you can choose to include a graphic in the final HTML page; click the Browse button to find an image file to insert.
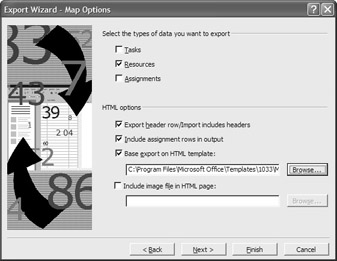
Figure 18.25: Select HTML-specific options on the Map Options screen.
-
-
When the Resource Mapping screen appears, select which fields to map; then click Next.
-
When you see the End of Map Definition screen, click the Finish button.
Project now uses the selected data to create an HTML web page, similar to the one shown in Figure 18.26.
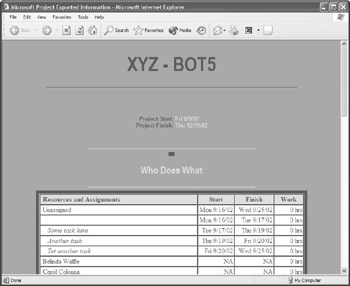
Figure 18.26: Project data displayed as an HTML web page.
| Tip | You can edit the sample templates that Microsoft Project provides for creating formatted HTML files from exported data, or you can create your own templates. If you’re exporting project data based on your own custom template, make sure that the template includes Microsoft Project template tags for all of the data being exported by the map, and make sure that all the tags have the correct spelling and syntax. |
When you export project data and images to HTML format, it’s best to keep all your exported files in the same directory so there are no paths in the HTML output. If you move the resulting files, move them together and keep the relative paths the same in the destination directories.
If you find that the image file is not showing after exporting to HTML format, check the following possibilities:
-
If you export Microsoft Project data to HTML format and then move the resulting HTML file, be sure to move all the associated image files as well. If you don’t move image files, they will not display when you open the HTML file in the new location.
-
If you export Microsoft Project data to HTML format and then move the resulting HTML file, make sure that the destination directories have the same relative relationship as the source directories because only relative paths are stored in the HTML output.
-
If you’re using an HTML template, the image tag could be missing or incorrect.
-
If you specify an image file with an HTTP or FTP address, Microsoft Project will not verify the access to or the existence of the image file. Make sure that you can access the image file at the specified address.
Exporting Data as XML
New to Project 2002 is the capability to export to XML (eXtensible markup language) format. XML is the standard language for describing and delivering data in a web page format. It is complimentary to HTML; HTML describes how things look; XML describes how different data types act.
| Note | Project 2002 can also import XML files; it cannot import HTML files. |
-
To publish data on your intranet or the Internet.
-
To take “snapshots” of project data for posterity.
-
To integrate your project into an organization that has standardized on the XML format.
XML files use the XML file format.
Because the XML format maps exactly to Project data, exporting to XML is a relatively simple process, as seen in the following steps:
-
Open the project that you want to save.
-
Select File Ø Save As to open the Save As dialog box.
-
Select XML Format from the Save As Type drop-down list.
-
Select the destination for the new file the Save In drop-down list or Places bar.
-
Choose a destination filename from the file list, or type in a new name.
-
Click the Save button.
-
If prompted, click Save Without a Baseline or Save With a Baseline.
Because XML permits highly defined data fields, there is no need to create an export map for your Project data. Project data automatically maps to appropriate XML tags— making XML the ideal format for displaying Project data on the Web.
|
|
EAN: 2147483647
Pages: 241