Importing Data from Specific Applications
|
|
In this section, you’ll find step-by-step instructions and examples for file imports from specific applications. The details of the import processes differ because the file formats differ. For example, when importing from Excel, you have to choose the worksheet in which the data is stored. A delimited symbol is required for delimited text files.
Thanks to Project’s Import Wizard, however, the overall process is similar—regardless of the native format of the import data source. Whether you’re importing files from Excel, Access, an earlier version of Project, ODBC databases, or text files created by Notepad or a word processor, you’ll use the Import Wizard to walk through similar step-by-step processes. After you’ve imported data from a couple of different file formats, you’ll be able to confidently import data from any format into a Project file.
Importing from Previous Versions of Project
Project 2002 is backward compatible, and will allow you to open all the file types used in previous Project versions with no manual mapping required. As Project has matured, however, the number of available fields and functions has greatly increased. This means older projects may appear incomplete, or may yield unexpected results in Date Scheduling and Duration fields. Carefully check your older Project files for completeness and accuracy after importing.
-
An ongoing project has spanned multiple releases of Microsoft Project and your organization finally upgraded its software.
-
A new project needs historical information contained in an old project.
-
Projects are being shared between groups with different versions of Microsoft Project.
Prior versions of Project use these file formats: MPP, MPW, MPX, and MPT.
To open a file created in a previous version of Project, follow these steps:
-
Select File Ø Open. The Files of Type List Box default is Microsoft Project Files (MP*), so all Project files in the selected directory location will be listed with the exception of MDB files (Project Database files created in Project 4.x and earlier).
-
Select the location of the file you want to open in the Look In drop-down list.
-
Choose the Project filename from the file list and then click the Open button. The project opens and displays in your default view.
Tip To import MDB files, see “Importing Data from an Access Database,” later in this section.
Beginning with Project 98, new I/O architecture was designed for extensibility, employing a scheme for installable file serializers (converters). This new architecture provides a way to implement forward-compatibility with future versions of Project. For example, for the next version of Microsoft Project (2004, perhaps?), if the appropriate serializer is available for Project 2002, a Project 2004 MPP file could presumably be opened in Project 2002. The way that new features from the future version are handled when opening the file in a previous version depends entirely on the designer of the serializer.
Note that this forward compatibility began with Microsoft Project 98; serializers are not available for Microsoft Project 4.x.
Importing Microsoft Excel Workbooks
Workbook files in Microsoft Excel have the XLS file suffix. Pivot table files, which also have the XLS suffix, cannot be imported into Project. Spreadsheet files created using other applications should first be imported into Excel (or be saved in either tab-delimited TXT files or comma-separated CSV files) and then imported following the directions for “Importing Text Files,” later in this section.
-
Your Human Resources department keeps employee information in Excel that you can import into your project’s Resource table.
-
Resource hourly rates have changed and need to be adjusted using a complex calculation. Calculate the new rates in Excel and then import the revised data into Project.
-
Data from many applications can be exported in an Excel format file that you can then import into your Project file. For example, Outlook contact and task data can be saved as an Excel file and then imported into Project.
-
You can streamline data entry for a large project. It’s much easier to enter repetitive information into a spreadsheet.
Microsoft Excel workbooks use the XLS file format.
If you want to import specific records or columns of data, you have to open the file in Excel and modify the data so that it only contains the information to be imported. This can be done by filtering, editing, or grouping and then saving the result as a new file. Because data is mapped by field name, it is not necessary to sort the spreadsheet in the same order as the project. Each column must, however, have a unique name.
| Note | Project 2002 does not let you open a Microsoft Excel file that is password-protected; instead, you get an alert saying that the file cannot be opened. Remove the password in Excel and then save the file. After importing, you can restore the password. |
Preparing Excel Spreadsheets to Import
A new feature in Project 2002 enables you to create Excel spreadsheets that more easily map into Microsoft Project files. This is especially useful if you begin a new project in Excel and then later import that project data into Project.
When you install Project 2002, two new Excel templates are created and made available to the Excel program. When you create a new Excel spreadsheet (from within Excel, choose File Ø New), Excel typically displays the Templates dialog box.
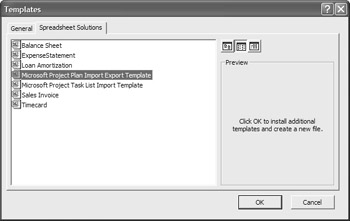
Click the Spreadsheet Solutions tab and you’ll see two new Project-related templates:
Microsoft Project Plan Import Export Template This template contains four separate worksheets (Task_Table, Resource_Table, Assignment_Table, and Info_Table) as well as a bevy of pre-assigned columns you can use to enter Project-like data. Use this template for complex projects.
Microsoft Project Task List Import Template As you can see in Figure 18.5, this is a simpler template, containing just two worksheets (Task_Table and Microsoft_Project) and seven commonly used fields (ID, Name, Duration, Start, Deadline, Resource Names, and Notes). Use this project for simple projects, or projects where you only know selected data at the time.
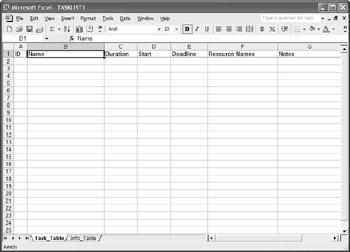
Figure 18.5: Use the Microsoft Project Task List Import Template when you start your projects in Excel.
You aren’t required to use these templates to import Excel data into Project, but they will make the job easier when you prefer to start your projects in spreadsheet format. With these templates, there is no guessing when it comes to mapping spreadsheet data into Project fields.
Importing Data from Excel
Whether you use the new Excel templates or a normally formatted Excel spreadsheet, it’s relatively easy to import your Excel data into Project. In this example, we will import an Excel spreadsheet that contains the same fields as the “Who Does What” report import data map.
| Tip | The complete list of fields included in each Project 2002 import/export map appears in Table 18.2 (near the beginning of this chapter). |
This file may have originally been exported from Project using the “Who Does What” map, or you or another thoughtful user may have arranged the worksheet so that it uses the same field names as the map. (It takes less time to rearrange columns and change a few headings in an Excel worksheet than it does to create a custom data map.)
To import data from Excel using an existing data map, follow these steps:
-
In Project, select File Ø Open. The File Open dialog box is displayed.
-
Change the Files of Type to Microsoft Excel Workbooks.
-
Use the Look In drop-down list to locate the proper folder and file.
-
Select the file, and click the Open button.
-
The Import Wizard now opens; click the Next button.
-
When the Map screen appears, select Use Existing Map and then click Next.
-
When the Map Selection screen appears, choose the map you want to use and then click the Next button. (For our example, we’ll use the “Who Does What” report.)
-
When the Import Mode screen appears, select Append the Data to the Active Project and then click Next.
-
When the Map Options screen appears (shown in Figure 18.6), select which types of data you’re importing (for our example, select Resources), select the Import Includes Headers option, and click Next.
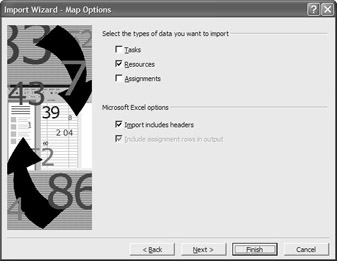
Figure 18.6: Make sure you check the Import Headers Option on the Map Options screen. -
When the Resource Mapping screen appears, pull down the Source Worksheet Name list and then select Sheet One. The mapping table is now populated with the fields from your spreadsheet, as shown in Figure 18.7.
-
Most of the From fields should be automatically mapped to the proper To fields. In our example, the only field not correctly mapped is the Resources and Assignments field. Pull down the matching To field (which should say “not mapped”), and select Name. Click Next when ready.
-
When the End of Map Definition Screen appears, if you want to save this modified map, click the Save Map button, give the map a name, and click Save; otherwise, click Finish to import the data.
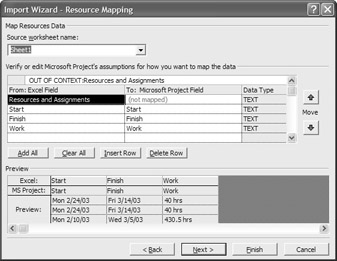
Figure 18.7: The Resource Mapping screen contains the field mapping detail.
Importing Text Files
It’s possible that you might come across some text data that you’ll want to import into your projects. You might find text file data in the form of memos or reports, or as the output of web page forms used to gather information about visitors and logins. In most cases, the text file will require some pre-formatting before it is ready to be imported into Microsoft Project.
| Note | A Microsoft Word document is not a text file, although a Word document can be saved as a text file (with a TXT extension). |
-
You have access to data created in an application, such as Microsoft Word or the Windows Notepad, that is needed in your project, and you don’t want to retype it all.
-
You work with an outside source that uses a non-Windows operating system, and you need to exchange project information.
-
You are plagued with space constraints, and text files are the most compact format.
Text files use the TXT and CSV file formats.
Before you begin importing a text file, open it and make sure that the file is delimited with either tabs, commas, or spaces between each field. (This means that you have to clearly separate columns of data; each column imports into Project as a separate field.) One of the three delimiters—tabs, commas, or spaces—has to be used consistently throughout the file. For example, you can’t import a file when some fields are separated by spaces, and others are separated by commas. In either the TXT or CSV format, a standard carriage return (hard return) separates records.
For word processing documents such as those created in Microsoft Word, open the file in its native application and then choose File Ø Save As. Select the tab-delimited text file (TXT) or Comma-Separated Values (CSV) file format. If a header record doesn’t already exist, enter one at the top of the file with unique descriptive headings for each column. This will greatly ease the import process by displaying import field names to match against the Project field names.
Preparing Text Files for Import
You can’t always dictate the quality of the data you receive. You often have to take what you get. Perhaps you’ve requested a list of materials to add to your project’s Resource Sheet, and someone has saved the contents of a Word document, including the materials table, into a text file. They then added some data separated by spaces or commas from another Word document; or an Excel worksheet that includes commas within cells (such as 512 West Elm Street, Apt. 2) has been saved as a CSV file. The commas within the record are acting as delimiters, which means that Apt. 2 becomes the City, the city name is used for a State field, and so on. In both of these examples the file has the data you need, but not in a format you can import. Does this happen? Absolutely. When it does, here are the strategies we use to “shake and bake” the data into a usable form:
Determine what the data really looks like. Open the text file in Word, and click the Show/ Hide button on the Standard toolbar. With the non-printing characters displayed, data separated by tabs looks different than data separated by hitting the spacebar a few times:
![]()
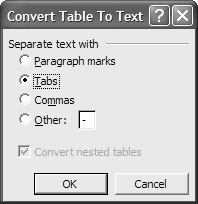
If the file appears to be largely tab-delimited, use Word’s Convert Text To Table feature (Table Ø Convert Ø Text to Table) to pour the text into a table. Records that are formatted differently from the first record stand out because they don’t fill all the cells in a table row. Use copy and paste to put data in the correct columns of the table. When the data is consistent, use Convert Table to Text (Table Ø Convert Ø Table to Text) to convert the table to tab-delimited text or comma-delimited text:
If a file has more than one field’s value in a column (for example, the resource’s group name is followed by its full name) or if it uses more than one field for a single Project field (for example, separate first name and last name fields, conflicting with Project’s use of a single field, Resource Name), try opening the file in Excel. You may be required to complete some minimal mapping before Excel will open the file, but it will be worth your time. Excel is the best place to deal with data that is consistent but needs to be split or combined.
Use Excel’s Text to Columns feature (Data Ø Text to Columns) to separate a single field into multiple columns.
To combine two columns (say, first name and last name) into a single column, create a formula. If, for example, the first names are in column A, and the last names are in B, the formula would combine cells A5 and B5, including a space between the two to produce a full name that can be imported into the Resource Name field in Project:
=A5&" "&B5
When you’re finished parsing the data into the fields you need, choose File Ø Save As and save the document as a text file, or save the document in Excel and then import the Excel workbook.
Importing a Text File
Follow these steps to use a predefined import data map to import data from a delimited text file:
-
In Project, choose File Ø Open to display the Open dialog box.
-
Change the Files of Type to Text (TXT) or Comma-Separated Values (CSV).
-
Use the Look In drop-down list to locate the proper folder and file.
-
Select the file and then click the Open button.
-
The Import Wizard now opens; click the Next button.
-
When the Map screen appears, select Use Existing Map and then click Next.
-
When the Map Selection screen appears, choose the map you want to use and then click the Next button. (For our example, we’ll use the “Who Does What” report.)
-
When the Import Mode screen appears, select Append the Data to the Active Project, and click Next.
-
When the Map Options screen appears (shown in Figure 18.8), select which types of data you’re importing (for our example, select Resources) and then choose the appropriate text file options. You need to select whether the text file you’re importing includes headers, and what kind of delimiter is used. Click Next when ready to proceed.
Note The Import Wizard will analyze your text file and attempt to automatically configure the text file options; you should double-check these settings, and adjust them accordingly.
-
When the Resource Mapping screen appears, assign the various To and From fields. Depending on how well your text file was laid out, some of these fields might be automatically mapped. Click Next when done.
-
When the End of Map Definition Screen appears, if you want to save this modified map, click the Save Map button. Give the map a name and then click Save; otherwise, click Finish to import the data.

Figure 18.8: Select the appropriate text file options on the Map Options screen.
Importing Data from Databases
In large and mid-sized organizations, much of the data that project managers deem worth importing is housed in databases. The departments that own information you want to include in your Project file—Personnel, Materials Management, Manufacturing, and Purchasing, for example—are big-time database users. Database applications give them a place to store all the excellent information coveted by project managers like you and me.
Earlier versions of Project could export and read the Access file format (MDB). Access versions 2000 and later will open the Microsoft Project Database (MPD) files created by Project 2002. Importing data from Access isn’t significantly different from importing an Excel or a text file.
| Tip | From Project’s point of view, there are three database formats: Project Database, Access, and ODBC-compliant. |
-
You work for a large corporation, and the only databases that can hold all of your employee data are on a mainframe.
-
You have specific Access applications that team members use for reporting progress.
-
Resource or materials information is stored in an Access database.
-
You ran queries on multiple project files in a database, and have updated them accordingly. You now need to put the data back in Project.
-
You need to open a project created in Project 4 and stored in an Access database (MDB) file.
Database files use the MPD, MDB, and various ODBC formats file formats.
Importing a Project from a Project Database
The Microsoft Project Database (MPD) format is a proprietary file format for Project’s database information, and it’s completely compatible with Microsoft Access. This format contains all project data for one or many projects, and is the preferred method of exchanging project data.
| Note | MPD replaces the old MPX format used in Project 4. |
To import a complete project from a Project Database, follow these steps:
-
In Project, choose File Ø Open to display the Open dialog box.
-
Change the Files of Type to Project Database.
-
Use the Look In drop-down list to locate the proper folder and file.
-
Select the file, and click the Open button.
-
The Import Wizard now opens and goes directly to the Project Definition screen, shown in Figure 18.9.
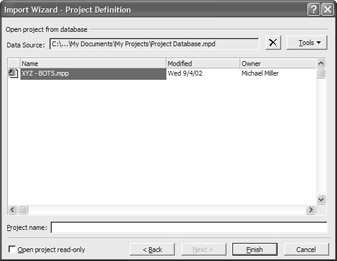
Figure 18.9: The Project Definition screen lists all projects contained in the selected database. -
Select the project you want to import, enter a new Project Name, and click Finish.
Warning If project data in the MPD file has been changed by using an application other than Project, it may no longer be compatible with Project’s table and field definitions. If any inconsistencies are encountered during an import, Project generates an error log so you can make corrections to the file.
Tip If you saved Project 2000 or Project 98 projects in their (older) database formats, you can easily upgrade those files to the Project 2002 database format using the Database Upgrade utility. You can download this utility from the Microsoft Project website (www.microsoft.com/project/); it automatically converts the database files to the new format.
Importing Data from an Access Database
You use the exact same procedure to import data from an Access database as you do for import-ing data from a Project database. The only difference is in the Open dialog box, where you select Microsoft Access Database from the Files of Type list. The rest of the import process is identical to a Project database import.
Importing Data Using ODBC
Access is a great database, but some companies and institutions store the bulk of their information on mainframes or large minicomputer databases, not in PC-based databases such as Access. Until recently, that wealth of organizational data was only accessible to mainframe users. If new reports or queries were required, it was time to call in the programmers.
Improved software and hardware for microcomputer access to mainframe data have radically changed the role of PCs in business, and Project 2002 continues the trend toward greater desktop access to hard-core corporate data with support for the latest version of ODBC (Open Database Connectivity). ODBC is an open standard for database access. ODBC was not developed by Microsoft, but it is often thought of as a Microsoft standard because Windows was the first operating system to support ODBC. Access and SQL Server are both ODBC-compliant, as are many other database programs.
Widespread use of the ODBC standard means that you can query data from a variety of sources on your PC, whether or not the data was created on a PC. For example, you might want to import information from a SQL Server or Oracle database by using Project. To do this, you will use a combination of software:
-
Microsoft Project 2002 to map the data and perform the import
-
The ODBC Driver Manager, which is part of Windows 95/98/NT/2000/XP
-
A specific ODBC driver designed to allow Query to allow access to the SQL Server or Oracle database
-
The SQL Server or Oracle database
Importing from an ODBC-compliant database involves one extra step you don’t find when importing from other types of files. Before you open the file in Project and launch the Import Wizard, you have to set up the ODBC data source, a combination of the database and the appropriate ODBC driver. ODBC-compliant databases usually ship with their own ODBC drivers, and there are third-party drivers available. The ODBC drivers installed on your computer are displayed when you select a data source.
Before you can set up a data source, you must have the appropriate ODBC driver. Drivers installed on your computer are listed in the Select Data Source dialog box that’s displayed when you click the ODBC button to open the data source. There are two types of ODBC drivers: 16-bit and 32-bit. If you’re using Microsoft Office 2000/XP or Project 2000/2002, you can use the 32-bit drivers. Use of the 16-bit drivers depends on your operating system. Windows NT Workstation supports both 16- and 32-bit drivers; only 32-bit drivers are supported under Windows 95, 98, 2000, Me, and XP. If you’re running Windows and working with vendors to acquire an ODBC driver, make sure that you specify that you require a 32-bit driver.
Occasionally, you’ll come across a database that doesn’t ship with ODBC drivers. It may take some research, but ODBC is such a dominant standard that it’s created a market for drivers where none existed five years ago. If the data source you need to connect to is less mainstream and you have to resort to a third-party driver, however, be prepared to pay a hefty price. Drivers for older databases with a relatively small number of PC-based users generally cost more. We recently paid over $700 for an ODBC driver for an obscure database to which we really needed to connect some PCs. Get a demo or a return guarantee before you buy; some ODBC drivers are not supported by Project 2002.
The newest ODBC drivers have their own installation programs. Older drivers that required setup through the Control Panel are no longer supported in the version of ODBC that ships with Project 2000/2002 and Office 2000/XP.
To import data from an ODBC database, open the Open dialog box (File Ø Open). Click the ODBC button in the dialog box to open the Select Data Source dialog box, shown in Figure 18.10. This dialog box is used to connect to file data sources that have ODBC drivers on your machine. File data sources can be shared with other users who have access to the same drivers. Machine data sources are stored on your PC, and cannot be shared. Machine data sources are recommended for use with Project, but you can set up a file data source if you prefer.
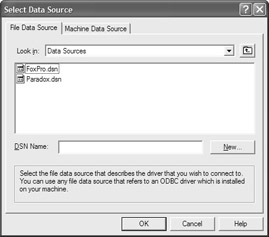
Figure 18.10: Use the File Data Source tab to get to ODBC drivers.
| Tip | If you want to use Project to analyze information about a database that is not listed in the File Data Sources list or Machine Data Sources list, check with the database manufacturer to find out how to get a 32-bit ODBC driver. Often, you’ll find that it was included with the software. You can also check the Microsoft website (www.microsoft.com) for additional ODBC drivers. |
To set up a file data source, set these options on the File Data Source tab of the Select Data Source dialog box:
Look In drop-down list Displays the current directory for which the subdirectories and file data source names (DSNs) are displayed.
File Data Sources list Displays all file DSNs and subdirectories contained within the directory displayed in the Look In drop-down list. Double-clicking a DSN connects to the data source.
DSN Name Displays the file DSN name selected in the File Data Sources list (or, you can enter a new file DSN name).
New button Adds a new file data source. If you click this button, the Create New Data Source dialog box appears with a list of drivers. Choose the driver for which you are adding a file DSN. Click Next and then specify the keywords for the file DSN.
A machine data source is specific to the machine on which you are working, and cannot be shared. This is the recommended ODBC data source when working with Project 2002. Click the Machine Data Source tab, shown in Figure 18.11, and set these options to use a machine data source:
Machine Data Sources List A list of all user and system DSNs that includes the name and type of each DSN. Double-clicking a DSN connects to the data source.
Data Source Name, Type, and Description columns in the Machine Data Sources List Defines the machine data sources available. Type can be User or System. User data sources are specific to a user on your machine, and System data sources can be shared by all users on your machine or by a system-wide service.
New button Adds a new machine data source. If you click this button, the Create New Data Source dialog box appears with a list of drivers. Choose the driver for which you are adding a user or system DSN. After you click Next, you can verify that the keywords for the DSN are correct.
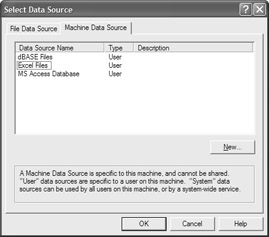
Figure 18.11: Machine Data Source tab of the ODBC dialog box
After you select your data source, click OK. The Import Wizard opens and goes directly to the Project Definition screen. From here you can select a database and then set up your import.
Importing XML Data
New to Project 2002 is the ability to import data in the XML (eXtensible markup language) format. Because XML was designed to handle complex data types, it maps precisely to the Project data format, making importing a breeze.
-
You need to open a project data stored in the XML format
-
You have specific XML-based applications that team members use for reporting progress.
-
Resource or materials information is stored in the XML format.
XML files use the XML file format.
-
In Project, choose File Ø Open to display the Open dialog box.
-
Change the Files of Type to XML Format.
-
Use the Look In drop-down list to locate the proper folder and file.
-
Select the file and then click the Open button.
-
The Import Wizard now opens directly to the Import Mode screen, shown in Figure 18.12. Select whether you want to import the XML file as a new project, append the data to an existing project, or merge the data into an existing project.
-
When you click the Next button, the XML data is used to create a new project, or cleanly imported into the currently open project.

Figure 18.12: Project 2002 enables you to import XML files.
Importing Task Lists from Microsoft Outlook
In previous versions of Project, it was impossible to import task lists directly from Microsoft Outlook. You had to go through a convoluted process of saving the task list as an Excel file and then importing the Excel file into Project. Project 2002, however, supports direct importing of Outlook task lists.
-
You or your team members are using Outlook to track progress on specific tasks for a current project.
-
You want to examine work on a previous project that was tracked only within Outlook.
Outlook task lists are imported directly into Project from within Outlook; they don’t exist in separate files.
-
Within Project, open a blank project.
-
Select Tools Ø Import Outlook Tasks.
-
When the Import Outlook Tasks dialog box appears (shown in Figure 18.13), select the tasks you want to import by checking the check box in front of each task.
-
Click OK to import the tasks.
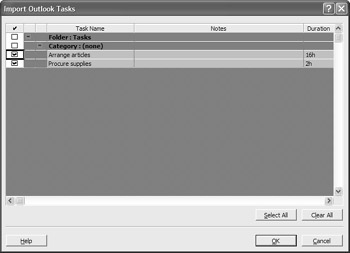
Figure 18.13: Import Outlook tasks directly into Project 2002.
The Outlook tasks are imported into Project, in alphabetical order. You can now organize and edit the tasks, as necessary.
| Note | You can also import Outlook task lists into an existing Project file; the new tasks are appended to the end of the project’s current tasks. |
|
|
EAN: 2147483647
Pages: 241