Creating the Physical Deployment Design
| Imagine commissioning a sculptor to build a marvelous statue for the center of your entryway. The artist builds the statue in his workshop and, upon completion, drives the statue in a truck to your residence. The artist had measured the area where the statue was to be placed, but neglected to measure the door opening. So when the artist tries to fit the statue through the doorway, it turns out to be too large and cannot be moved through the opening without force or restructuring the door. This example illustrates the effectiveness of considering your deployment plans before the solution is even built. Measuring the doorway before building the statue seems obvious in the preceding example, but often obvious elements are not considered, and the project does not deploy properly. For example, if no plans are made to migrate data, and your new solution replaces the customer's database, you will be in some serious hot water. DeploymentEven the most basic deployments can become extremely complex in an enterprise environment. Therefore, understanding how to package the service layers discussed in Chapter 9 into deployable projects is important. Visual Studio .NET includes multiple robust tools for deployment that save time over traditional approaches. .NET also offers XCOPY for simple deployment requirements. Before I begin explaining the feature-rich .NET deployment suites, take a look at the two central points in the physical development environment:
Windows Installer is a built-in installation program on the Windows OS that contains a database of Registry and file information for every application installed. Windows Installer package .msi files are most commonly implemented with aid from Visual Studio .NET's setup and deployment projects. Visual Studio .NET Deployment ProjectsVisual Studio .NET offers the following types of setup and deployment projects:
To select a project, choose File, New, Project from the Visual Studio menu and select Setup and Deployment Projects in the Project Types list (see Figure 10.1). Notice that the deployment projects described in the previous list are displayed in this dialog box. You will also notice a Setup Wizard, which provides assistance with setup selection. Figure 10.1. Selecting a deployment project in Visual Studio .NET.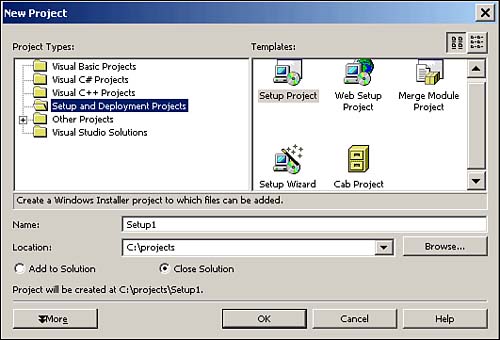 The standard Setup Projects and Web Setup Projects offer a simple-to-use GUI with the capability to perform the following actions:
Web Interface DeploymentASP.NET applications are deployed by using Web Setup Projects. If business components are deployed to the same servers as the Web project, you should consider placing these business objects into a Merge Module Project and including the module in your Web Setup Project. From the Properties menu of Visual Studio .NET's Web Setup Project, you can specify IIS settings, such as allowing read, write, execute, browsing, and script source access. After the project has been deployed, you can use ASP.NET's web.config file to adjust tracing, exception handling, state management, and other custom settings that might have been included. Web Service DeploymentDeployment of a Web Service is similar to that of an ASP.NET application. Web Services use the Web Setup Project to distribute the solution. All the rules for Web interface deployment also hold true with Web Services deployment. A Web Service is found and consumed through discovery information that's statically or dynamically provided. If the Web Service is to be found statically, a discovery file (.disco file extension) must be created and deployed with the Web Service. A .disco file is an XML-based file that uses the Web Services Description Language (WSDL) standard. If a service is to be found dynamically, a .vdisco discovery file is created, and the WSDL is created on-the-fly. Windows Forms DeploymentWindows Forms deployment has become much simpler in .NET. COM component registration issues have faded away and Windows Forms are actually deployable through Web servers, similar to a Web interface. With the past deployment issues addressed in .NET, you now get the best of both worlds: easy deployment and rich client offline capabilities. Using a new technology called No-Touch Deployment, Windows Forms can be accessed through HTTP in a manner similar to Web pages. Any client browser (Internet Explorer 5.01 and later) can access a .NET executable via HTTP and download a local copy in the temporary cache. The executable runs on the client's machine in a sandbox, much like an ASP.NET application. If new assemblies become available the next time the client accesses the Web server, the new assemblies are downloaded, replacing the older versions. The executable can run offline, similarly to any Windows form, and be as responsive as a Windows form by using a multithreaded request approach. A request can be handled by using a background thread; upon completion, a call is placed to MethodInvoker() and the UI is updated. To the client, the page has not disappeared while the request is being made. Many enterprise applications have made the switch from a client/server model to Web applications over the years, but with the use of No-Touch Deployment, you can bet that many will be coming back to Windows Forms to satisfy their cravings for responsiveness and a rich client interface. LicensingSoftware licensing enables you to validate that the client installing the product has the required permissions. The licensing process typically involves the following: A caller requests a class, and the class validates the caller against keys stored in the binary file. Validation is typically handled by a call to a runtime framework component when the class is instantiated. The validation component verifies that the client has a valid key that matches the key stored in the binary file. .NET Licensing.NET Licensing offers various utilities to aid in validating and creating licensed assemblies. These utilities include a built-in class called LicenseManager that validates the client caller and the License Compiler (LC.exe) command-line utility to obtain runtime keys and store them in binary format for inclusion into the licensed assembly. License keys (.licenses files) are automatically provided when using Visual Studio .NET; therefore, a call to LC.exe is not necessary. To mark a class for validation, simply add the License Provider attribute (LicenseProviderAttribute). After a class has been marked for validation, call the static Validate() method from the LicenseManager class in the constructor of your licensed class. The validate method returns your license, which should be saved to a member-level variable of type License. Licensing can be performed on Windows Forms controls, Web controls, and standard classes. To consume a licensed class, you call the constructor in much the same way you instantiate any class (new Class). The instantiated class validates the request in the constructor. The only other step to consuming a licensed class is including a reference in the .licx file. This one-line reference includes the class's <namespace>, <class name>, and <assembly name>. The .licx file is no more than a text file with class references. It is created automatically if you use Visual Studio .NET Designer, but if you code the consumption at runtime, the .licx file is created manually. One .licx file handles all licensed classes within an assembly. Custom LicensingAfter creating licensed components, you might need to create more complex validation routines than those provided through the .NET Framework. If so, you can create a custom license provider by inheriting from the LicenseProvider class and overriding the IsKeyValid() and GetLicense() methods. Data MigrationIn many cases, a customer's data source is replaced or upgraded with a modern relational database management system (RDBMS) database. A successful migration plan is essential for moving existing data into the new data source. A customer could have data stored in any kind of format, located across multiple sources, such as Excel, text files, RDBMS databases, mainframes, XML, and so forth. OLE DB drivers are used to access any of these data sources as long as they support the OLE DB standard. Estimating how long a migration will take could be important. The maximum rate of data transfer supported over a specific connection is known as bandwidth. Bandwidth simply tells you that X amount of data can be transferred per second. After you know the bandwidth, you can divide the total size of the data you want to transfer by the amount per second to give you the total transfer time. Some systems might allow you to transfer data for only a certain amount of time (in seconds), thus making it important to understand the line's transfer capacity.
SQL Server 2000 Data MigrationSQL Server 2000 has two excellent utilities for data transfer between data sources: Bulk Copy Utility (BCP) and Data Transformation Services (DTS). The main difference between these migration utilities is that DTS has data-mapping transformation capabilities and can save a package to run as a scheduled job. BCP is a command-line utility that offers quick transfer of heterogeneous systems, but supports no transformation abilities. DTS, a newer technology, is literally a full application in its own right, with an extensive GUI. Bulk Copy UtilityBCP offers the capability to transfer data in from a data file to a table or out from a table to a data file. To access BCP, type BCP <table> <command type> <file> <parameters> at a command prompt. The command type could be IN or OUT. There are multiple parameter options; the most common are a service account's username and password for connection to the database. Keep in mind that 90% of all transfers are much more detailed and require the advanced capabilities of DTS. Data Transformation ServicesDTS is an excellent choice for transferring data between data sources that support OLE DB, such as DB2, Oracle, previous versions of SQL, and so forth. Data doesn't have to match up between diverse data sources because DTS has the capability to transform data so that it conforms to a set of standards. For example, you might want to convert data to uppercase or lowercase letters and retrieve data from the "foo" table with a column named "bar" and import data into another table called "employees" with a "name" column. DTS enables you to transform the data and create new mappings, as shown in the preceding example. DTS packages are ideal for transferring multiple tables, as opposed to BCP, which can handle only one table at a time. BCP is faster, but when multiple tables are involved, DTS is a much quicker solution. DTS offers an easy-to-use DTS Wizard, which quickly creates packages. After creating a DTS package, you can run a scheduled job, which is a huge time savings over manually running an operation every day. UpgradingPhysical specifications should include an upgrade plan to apply bug fixes and enhance solution capabilities that did not make it into version one. When an upgrade takes place, you are usually faced with patching or reinstalling the application. Visual Studio .NET doesn't provide built-in support for patching, but Windows Installer platform tools, such as Orca.exe and MsiMSP.exe, can produce patch files. On many occasions, you wind up reinstalling the application by using another .msi file. Windows Installer automatically handles all cleanup issues as long as you use the original installer package. If you choose to build a new deployment package, remove the existing package first through Add/Remove Programs. When multiple applications need to use different versions of the same assembly on the same server, you should implement versioning (discussed in the following section). Upgrading in .NET has gotten easier with Windows No-Touch Deployment. The client can invoke updates, and the system can automatically check and download updates when available. VersioningBecause .NET assemblies are not registered in the Registry as in their COM predecessor, versioning is no longer an issue. You can have different versions of the same assembly on a server without causing any problems. If the assembly is accessible globally to any application on the machine through the GAC, a side-by-side versioning schema is automatically applied. The GAC stores specific references to each assembly, thus allowing any version of the same assembly to be accessed independently. The GAC should be used for business objects and other .dll assemblies that need to perform logic between multiple assemblies on the server. For example, when creating two Web applications, you should consider storing data access and business logic in the GAC so that both projects could access the .dll files. However, you wouldn't want to store the Web project's .dll in the GAC because the assemblies are mutually exclusive. Instead, your Web project .dll would be located within the bin folder under the project's root folder. The diagram in Figure 10.2 contains two versions of the System.Windows.Forms class, based on versions 1.0 and 1.1 of the .NET Framework. Note that the version numbers differ (1.0.3300.0 and 1.1.5000.0). Figure 10.2. Global Assembly Cache (GAC) side-by-side versioning.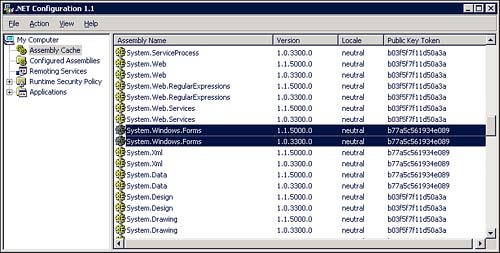 .NET Automatic UpdatesNo patching or repacking is necessary when executables are built to retrieve automatic updates from a Web server. An executable, such as Windows Forms, can invoke automatic updates if it knows the following:
The suggested No-Touch Deployment uses an asynchronous thread that checks handled requests. As results are returned, the screen is repainted. When using No-Touch Deployment, updates are automatically loaded when the application is initialized and the client is online. When you are not using No-Touch Deployment, updates can be implemented in much the same way as no-touch handles requests. Use an asynchronous thread to check for updates, and when an update is found, repaint the screen. You can have this thread on a timer running hourly checks, or you can check for updates only when the application is initially loaded. |
EAN: 2147483647
Pages: 175