| The transparency flattener presets control how the transparency effects, drop shadows, and feathers are handled during output. To create a transparency flattener preset: 1. | Choose Edit > Transparency Flattener Presets. This opens the Transparency Flattener Presets dialog box  . .
The Transparency Flattener Presets dialog box lets you define new presets for handling transparency effects. 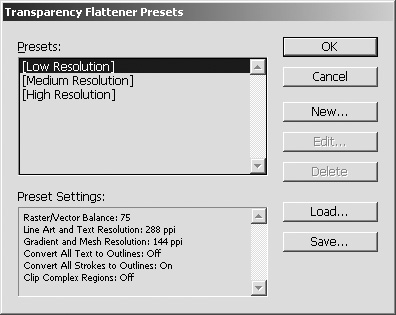 | 2. | Click the New button. The Transparency Flattener Preset Options dialog box appears  . .
The Transparency Flattener Preset Options dialog box contains the settings for a custom transparency flattener preset. 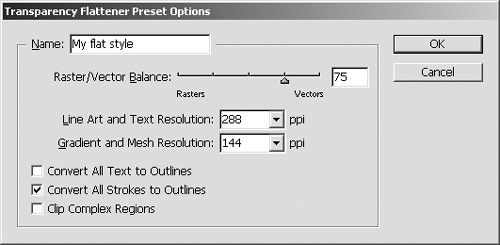 | 3. | Use the Name field to name the preset.
| 4. | In the Options area, move the Raster/Vector Balance slider to create more vector or more rasterized artwork  . .
The Options area in the Transparency Flattener Preset Options dialog box. 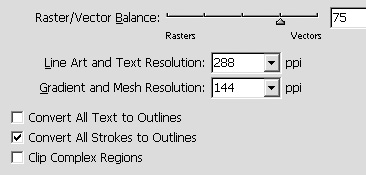 | 5. | Set an output resolution for rasterized artwork in the Flattener Resolution field.
Tip A setting of 300 dpi is sufficient for most output. | 6. | Set an output resolution for gradient objects in the Gradient and Mesh Resolution field.
Tip A setting of 150 dpi is sufficient for most gradients. | 7. | Check Convert All Text to Outlines to convert the text to paths.
Tip If this box is not checked, only transparent portions of the text may be converted to outlines, which may make that text thicker than other text. This option makes the text width consistent. | 8. | If you have strokes that pass through different transparencies, you may want to choose Convert All Strokes to Outlines to convert the strokes to filled paths.
| 9. | Check Clip Complex Regions to ensure that any differences in raster and vector objects always fall along existing paths.
Tip This can result in complex clipping paths, which may not print on some devices. |
To edit a transparency flattener preset: 1. | Choose the preset you want to edit.
Tip The three default presets, surrounded by brackets, cannot be edited  . .
The three default transparency flattener presets in brackets cannot be edited or deleted. 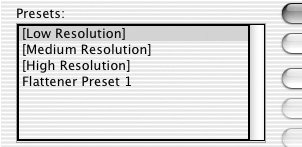 | 2. | Click the Edit button.
| 3. | Edit the preset in the Transparency Flattener Presets dialog box.
Tip The Preset Settings area displays a readout of the settings for each preset  . .
The Preset Settings area displays a readout of the settings for a particular transparency flattener preset. 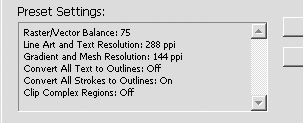 |
To delete transparency flattener presets: 1. | Choose the presets you want to delete.
Tip The three default presets, surrounded by brackets, cannot be deleted . Tip Use the Shift key to select multiple adjacent presets. Use the Cmd/Ctrl key to select multiple nonadjacent presets. | 2. | Click the Delete button.
|
You can also save transparency flattener presets to share among others. Once saved, the presets can then be loaded onto other machines. To save a transparency flattener preset: 1. | Choose the presets you want to save.
Tip Use the Shift key to select multiple adjacent presets. Use the Cmd/Ctrl key to select multiple nonadjacent presets. | 2. | Click the Save button.
| 3. | Name the file.
|
To load a transparency flattener preset: 1. | Click the Load button.
| 2. | Navigate to find the file that contains the presets.
| 3. | Click Open. The presets appear in the Transparency Flattener Presets dialog box.
|
You can apply a flattener preset to the document in the Advanced category of the Print dialog box (see page 477). However, you may have one page that requires special flattener controls. InDesign lets you apply flattener presets to each specific spread. Tip Flattening must be handled on a per spread, not per page, basis.
To apply a flattener preset to an individual spread: 1. | Move to the spread.
| 2. | In the Pages palette menu, choose one of the following from the Spread Flattening menu:
Default leaves the spread flattening at whatever setting is applied to the document. None (Ignore Transparency) prints the spread without any transparency effect. This setting is useful for print shops that need to troubleshoot during output. Custom opens the Custom Spread Flattener Settings dialog box. These settings are identical to ones in the Transparency Flattener Preset Options dialog box (see page 478)  . .
The Custom Spread Flattener Settings dialog box lets you apply different flattener controls to a specific spread. 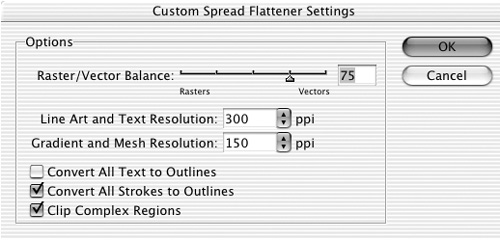
|
A Short Course in Flattening You may feel a little overwhelmed by all the controls for flattening transparency. Don't panic, most of the flattening options are best set by the print house that will output your files. However, there are some simple rules that can make it easier to get successful results when flattening artwork. Unless you absolutely want text to be part of a transparency effect, keep your text above any transparency effects. For instance, instead of putting text underneath a drop shadow, move it above  . If the text is black, you won't see any difference in the final output. If it's a color, set it to overprint. . If the text is black, you won't see any difference in the final output. If it's a color, set it to overprint. Try to avoid overlapping two gradients with transparency effects. That combination creates objects that are much too complex. Run tests. The first time I used transparency and blend modes, I sent ten sample pages to my publisher, who had them output at the print shop. We looked to make sure none of the text had changed and there were no problems with the images. It saved us a lot of worry when the book went to press. |
Instead of waiting for your file to be printed, you can preview how the flattening will occur with the Flattener Preview palette. To preview the flattener settings: 1. | Choose Window > Output Preview > Flattener. This opens the Flattener Preview palette  . .
The Flattener Preview palette lets you see the effects of the flattener presets on your document. 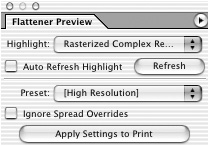 | 2. | Choose one of the options from the Highlight menu  . This controls which objects will be displayed in the flattener preview. (See the chart on the next page for a description of each of these options.) . This controls which objects will be displayed in the flattener preview. (See the chart on the next page for a description of each of these options.)
Use the Highlight menu to choose which objects will be displayed in the flattener preview. 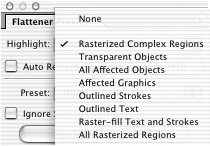 | 3. | Use the Preset menu to choose which flattener preset is used to control the flattener preview.
| 4. | Click the Refresh button to update the screen preview. The page displays the highlighted objects in red against other grayscale objects .
The Flattener preview highlights the objects affected by transparency. Here the text below the shadow is highlighted. The text above the shadow is not. 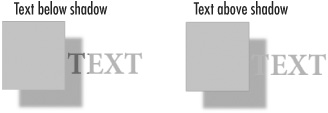 or
Check Auto Refresh Highlight to have the screen update automatically.
| 5. | Check Ignore Spread Overrides to use only the setting in the Preset menu.
| 6. | If you want, click the Apply Settings to Print button to apply the settings to the Advanced category of the Print dialog box.
Tip You can open the Transparency Flattener Presets dialog box using the Flattener Preview palette menu. |
Transparency Resources This book can hardly cover all the aspects of setting transparency and flattening. For more information see the InDesign online Help pages. Also, download the document Achieving Reliable Print Output with Transparency on the Adobe Web site. Finally, if you are a service provider, you should look at the Print Service Provider Resources page of the Adobe Solutions Network (ASN). |
Highlight menu setting | Flattener Preview applied |
|---|
None | Turns off the flattener preview. | Rasterized Complex Regions | Highlights areas that will be rasterized according to the settings in the Raster/Vector Balance slider. | Transparent Objects | Highlights objects that are the sources of transparency effects. This includes objects with opacity settings, blend modes, feathers, drop shadows, alpha channels, and placed images with transparency. | All Affected Objects | Highlights the transparent objects as well as the objects that are affected by transparency. | Affected Graphics | Highlights all placed images affected by transparency or transparency effects. | Outlined Strokes | Highlights the strokes that will be outlined due to transparency or because the Convert All Strokes to Outlines option is selected. | Outlined Text | Highlights the text that will be outlined due to transparency or because the Convert All Text to Outlines option is selected. | Raster-fill Text and Strokes | Highlights text and strokes that have rasterized fills due to flattening. | All Rasterized Regions | Highlights the objects that will be rasterized. |
|