| The term facing pages refers to documents such as this book where pages on one side of its spine face the pages on the other side. (This is also called a spread.) Single pages, such as advertisements, are set with facing pages turned off. To set facing pages: With the Document Setup dialog box open, click Facing Pages. This changes the document from single page to facing pages  and and  . .
The left and right margins on nonfacing pages. 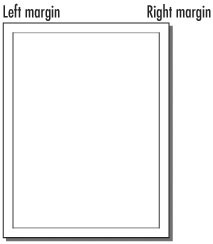
The outside and inside margins on facing pages. 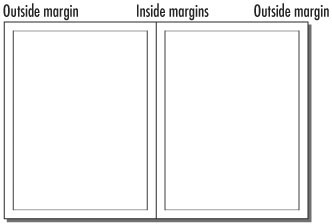 Tip When a document is set for facing pages, the names in the dialog box for the Left and Right margins change to Inside and Outside margins .
The page size is the size of the individual pages of the document. To set the size of the page: Choose one of the following 11 choices from the Page Size menu  : : Letter, 8½ by 11 inches. Legal, 8½ by 14 inches. Tabloid, 11 by 17 inches. Letter-Half, 8½ by 5½ inches. Legal-Half, 8½ by 7 inches. A4, 21 by 29.7 centimeters. A3, 29.7 by 42 centimeters. A5, 14.8 by 21 centimeters. B5, 17.6 by 25 centimeters. Compact Disc, 4.7222 by 4.75 inches. Custom, which allows you to enter your own specific values.
The Page Size menu offers standard U.S. and international paper sizes, as well as customization controls. 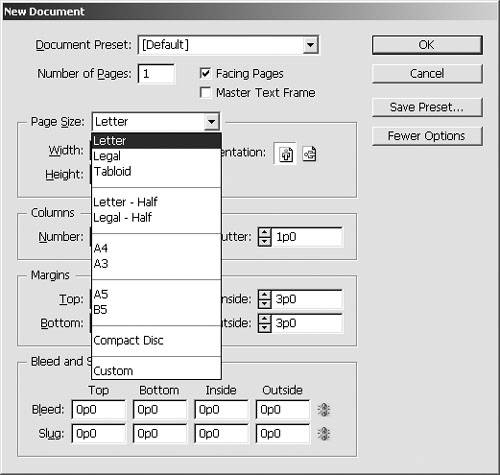 Tip The A4, A3, A5, and B5 sizes are used primarily outside of the United States.
Tip If you change the values in the Width or the Height field, the Page Size automatically switches to the Custom setting.
The term orientation refers to how the page is positioned, either up and down or sideways. To set the orientation: Click the Portrait orientation to create a document where the width is always less than the height  . .
The Orientation choices let you set the position of the page. 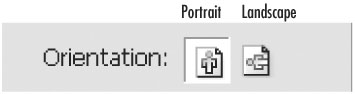 or Click the Landscape orientation to create a document where the width is always greater than the height .
To set the margins: 1. | Click the field arrows or enter an amount for the Top and Bottom fields.
| 2. | If the document is set for facing pages, click the field arrows or enter an amount for the Inside and Outside fields  . .
The margin settings for a document with facing pages. 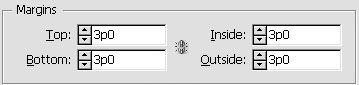 or
If the document is not set for facing pages, click the field arrows or enter an amount for the Left and Right margins  . .
The margin settings for a document with nonfacing pages. 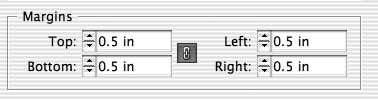 Tip For a facing page document, you can set the outside margin to be twice the size of the inside margin. That way the two inside margins combine around the gutter to be the same size as the outside margin. Tip When you finish typing in one of the fields, press the Tab key to jump to the next field. Tip Click the Make Same Size icon in the Margins area to control how the margins are created  . When the icon displays a link, all the margins will be the same size. When the icon displays a broken link, you can enter different sizes for each margin. . When the icon displays a link, all the margins will be the same size. When the icon displays a broken link, you can enter different sizes for each margin. |
Click the Make Same Size icon to automatically enter the same amount for all four margins. 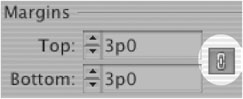 You can also set visible guides for columns and the gutters (or spaces) between the columns. To set the columns and gutters: 1. | Click the field arrows or enter an amount for the number of columns  . .
The column settings let you set the number of columns and the amount of space for the gutter between the columns.  | 2. | Click the field arrows or enter an amount for the gutter .
Tip The columns and gutters act as guidelines on your page  . You can still place text or graphics across or outside the columns or gutters. . You can still place text or graphics across or outside the columns or gutters. |
A two-column document with margin, column, and gutter guidelines. 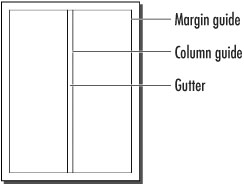 Wouldn't it be nice if the New Document dialog box remembered your favorite setup so you wouldn't have to change the settings each time you start a new document? It can, and that's called setting the defaults. To set the document defaults: 1. | Close all InDesign documents, leaving just the application open.
| 2. | Choose File > Document Setup. The Document Setup dialog box appears.
| 3. | Make whatever changes you want to the options in the Document Setup dialog box.
| 4. | Click OK. The settings you have chosen become the default for any new documents.
Tip You can also specify a Document Preset (see page 24) to use as the document default. |
Setting Other Defaults As you work in InDesign, you will discover other areas where you would like to set defaults. Perhaps you'd like certain colors to appear (or not appear) in each new document. Or you would like certain text options to appear automatically. Just as you can set the Document Setup options with no document open, you can also set other defaults. With no document open, go to the menu and choose those options you would like to set as a default. Whatever is available for you to choose can then be set as a default. |
|