| The Layer Options dialog box contains some housekeeping options that make it easier to organize and work with layers  . (See the previous section for how to open the Layer Options dialog box.) . (See the previous section for how to open the Layer Options dialog box.)
The Layer Options dialog box is the command center for all the attributes of a layer. 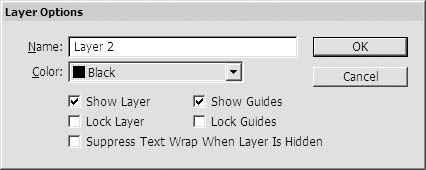 To name a layer: Use the Name field to name the layer. Tip If you have many layers, you should use descriptive names instead of the default names Layer 1, Layer 2, etc.
Each layer has a color associated with it. This is the color used to highlight object frames and paths. To set the highlight color for a layer: - Choose a color from one of the 37 colors in the Color list
 . .
The Color list contains all the choices for highlighting objects. 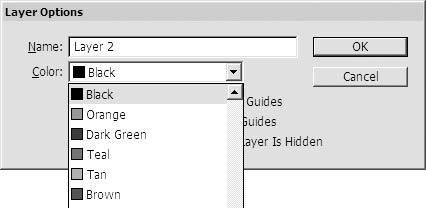 Tip Each new layer is automatically assigned the next color in the Color list. This means you can have 37 layers without ever repeating a color. Tip Select Custom to choose your own color for a layer.
Layers help you organize your documents. For instance, if you lock a layer you lock all the objects, so they cannot be selected, moved, modified, or deleted. To lock a layer: 1. | Choose Lock Layer from the Layer Options dialog box.
or
Click the Toggle Lock space in the Layers palette  . A pencil with a slash indicates that the layer is locked. A blank space indicates the layer is unlocked. . A pencil with a slash indicates that the layer is locked. A blank space indicates the layer is unlocked.
Click the Toggle Lock space to lock the layer. The spotlighted icons indicate that the layer is locked. 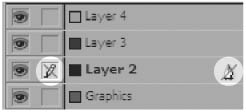 Tip Use the Lock Others command from the Layers palette menu or Opt/Alt-click the Toggle Lock space in one layer to lock all the other layers in the document  . .
Opt/Alt-click the Toggle Lock space to lock all the other layers in the document. 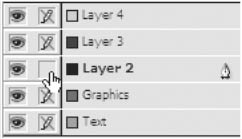 |
You can also use layers to hide and show the information on the layer. This can make it easy to focus on certain information. Hidden layers do not print. To hide a layer: - Deselect Show Layer from the Layer Options dialog box.
or
Click the Toggle Visibility space in the Layers palette so that the space is blank  . When the space is blank, the layer is invisible. . When the space is blank, the layer is invisible.
Click the Toggle Visibility space to hide or show the layer. 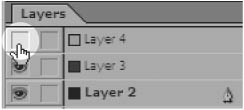 Tip You cannot work on invisible layers. Tip Use the Hide Others command from the Layers palette menu or Opt/Alt-click the Toggle Visibility space in one layer to hide all the other layers in the document  . .
Opt/Alt-click the Toggle Visibility space to hide all the other layers in the document. 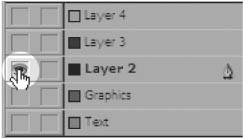
To show a layer: - Select Show Layer from the Layer Options dialog box.
or
Click the Toggle Visibility space in the Layers palette. When the eyeball is visible, the layer is visible.
So What About the Photoshop Layers? If you've read anything about the features in InDesign CS2, you've probably seen that InDesign allows you to manipulate the layers in placed Photoshop files. What does that mean and why haven't I covered the feature in this chapter? The reason is that the Photoshop layers are not controlled using the Layers palette. The Photoshop layers are controlled using the Image Import Options. The layers in Photoshop are not the same as the layers in InDesign. (To find out how you can manipulate the layers in Photoshop, see page 219.) |
Although hidden layers don't print, you can control some of their on-screen attributes in the Layer Options dialog box such as whether the guides are visible or not, and how the text wraps on a hidden layer. To control the guides on a layer: 1. | Choose Show Guides in the Layer Options dialog box to display the guides for that layer.
| 2. | Choose Lock Guides to protect the guides on the layer from being changed.
|
The Layer Options dialog box contains the Suppress Text Wrap When Layer Is Hidden setting which controls what happens if you turn off the visibility for a layer that has a text wrap applied to images  . .
The Suppress Text Wrap When Layer Is Hidden option controls what happens to the text wrap for hidden layers. 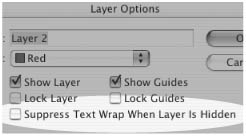 To control the text wrap for hidden layers: 1. | Apply a text wrap to an image that is on one layer.
| 2. | Create text that is on another layer  . .
An image with a text wrap is placed on one layer affecting the text on another layer.  | 3. | Set the Layer Options dialog box as follows:
Turn off Suppress Text Wrap When Layer Is Hidden to maintain the text wrap when the layer is visible  . .
When the layer is hidden, the wrap continues to affect text when the Suppress Text Wrap option is turned off. 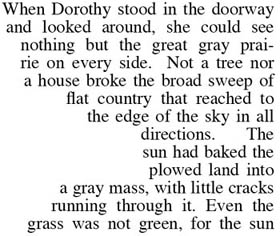 Turn on Suppress Text Wrap When Layer Is Hidden to discard the text wrap when the layer is not visible  . .
When the layer is hidden, the wrap does not affect text when the Suppress Text Wrap option is turned on. 
|
|