| Every new document includes a master page. When you add objects to the master page, they appear on all the document pages based on that master page. To add objects to a master page: 1. | In the Pages palette, double-click the name of the master page  . This opens the master page in the document window. . This opens the master page in the document window.
Double-click a master page in the Pages palette to view that master page in the document window. 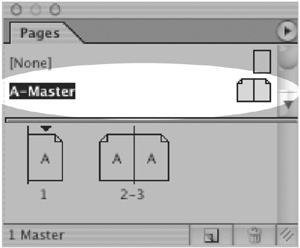 | 2. | Add text boxes, graphics, or any other elements you want on the master page.
Tip If the document has been set for facing pages, there are two sides to the master page, left-hand and right-hand. The left-hand master page governs the left-hand document pages. Similarly, the right-hand master page governs the right-hand document pages. | 3. | Double-click the name of the document page to make it the active page. Any items placed on the master page now appear on the document page.
Tip Reopen the master page to make any changes to the master-page elements. Those changes appear on the document pages. |
You can have many master pages in a document. This allows you to have different layouts for different parts of your document. To create new master pages: 1. | Choose New Master from the Pages palette menu. This opens the New Master dialog box  . .
The New Master dialog box allows you to set the attributes for the master page. 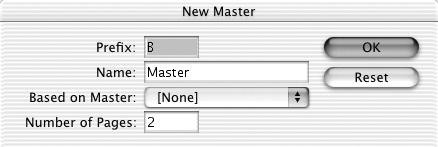 | 2. | Choose a letter for the prefix for the master page.
Tip The prefix is the letter that appears inside the pages that have that master page applied to them. | 3. | Enter a name for the master page.
| 4. | Use the pop-up menu to set which master page, if any, the new master page should be based on.
Tip Basing one master page on another allows you to make changes on one master page that are applied to the other. | 5. | Enter the number of pages for the master. This allows you to create spreads that serve as master pages.
Tip To create a new master page without opening the New Master dialog box, hold the Cmd/Ctrl key and click the New Page icon at the bottom of the Pages palette. |
As you work, you might want to convert a document page into a master page. InDesign makes it easy to turn a document page into a master page. To convert a document page to a master page: 1. | Select the page or pages.
| 2. | Drag the page or pages from the document area to the master page area  . .
Drag a document page into the master page area to convert the document page to a master. 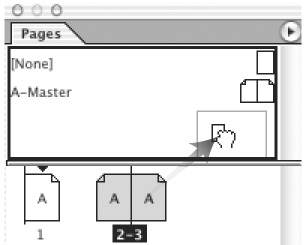 or
Choose Save as Master from the Pages palette menu.
|
Strategies for Basing Master Pages on Each Other I have three master page spreads for this book. One master the main master holds only the guides and page numbers for the book. The master for ordinary pages is based on that main master. The master for the chapter opener is also based on that main master. That way, if I need to move the page numbers I only need to change the page number on the main master. The other masters update automatically. |
New pages are based on the master page applied to the last existing page of the document. You can easily change the master page that governs pages. To apply a new master to a page: 1. | Select the page or pages.
| 2. | Choose Apply Master to Pages from the Pages palette. This opens the Apply Master dialog box  . .
The Apply Master dialog box allows you to change the master that governs pages. 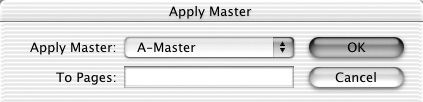 | 3. | Use the Apply Master menu to apply a master to the pages.
| 4. | Use the To Pages field to change the selected pages.
Tip Selecting None creates pages that have no master page applied. |
To apply masters with the Pages palette: - Drag the master page onto the document pages as follows:
To apply to a single page, drag the master page icon onto the page. A rectangle appears around the page  . .
The rectangle around the single page indicates that the master will be applied to that page only.  To apply to a spread, drag the master page icon onto the spread. A rectangle appears around the spread  . .
The rectangle around the spread indicates that the master will be applied to the spread. 
You can also base one master page on another using the Pages palette. To base masters on existing masters: 1. | Create a new master or spread.
| 2. | Drag one master page onto another.
To base the spread on the master, drag the master onto the spread. To base one page on the master, drag the master onto a single page.
| 3. | Release the mouse button. The prefix of the master appears inside the second master page  . The prefix indicates that the master page governs the other master page. . The prefix indicates that the master page governs the other master page.
The letters inside the page icons indicate what masters are applied to pages or other masters. 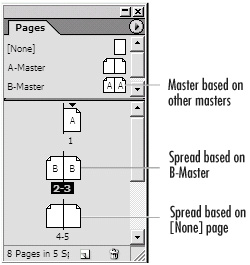 |
Ordinarily you modify the elements of a master page only on the master page itself. The elements on the document pages are protected from being selected or modified. However, you can release that protection and modify the master elements by creating local overrides. To modify master elements on document pages: 1. | Hold Cmd/Ctrl-Shift and click the element you want to modify. This releases the protection and selects the element.
| 2. | Make any local override changes to the element.
Tip An object can still have some links to the master page even if local overrides have been applied (see "Overriding Master Page Elements" on this page). |
You might want to modify all the master elements on a page. Rather than release each item one by one, InDesign lets you do it with a single command. To release all master elements on a page: - Choose Override All Master Page Items from the Pages palette menu. This releases the objects so they can be modified on the document page.
Once you have created a local override on a master page element, it may still have links to the original master page item. If you want, you can completely sever all ties between the master page item and the item on the document page. To separate an item from the master item: 1. | Select the object that has been released from the master page.
| 2. | Choose Detach Selection From Master in the Pages palette menu. Any changes you make on the master page will no longer be applied to that object.
|
Overriding Master Page Elements If you modify a master page element on a document page, the local override loses its link to the master page element. However, the element may have partial links to the master page element. Let's say you add a stroke to an object on the document page. From that point on, the stroke of the element is removed from the control of the element on the master page. But other attributes of the element maintain their link to the master page item. For instance, the position of the element maintains a link to the master page item. So if you move the element on the master page, the item on the document page also moves. Similarly, the fill color of the elements on the document pages changes if you change the master page element. Only the formatting for the stroke is separated from the master page element. |
How Many Master Pages? While it may seem like a lot of work to set up master pages, the more masters you have the easier it is to lay out complicated documents. A weekly magazine can easily have 50 or more master pages some for special editorial spreads and others for different types of advertising spaces. Some publishers insist that every page must be based on a master and do not allow any modifications of the master page elements. Others let the designers override the master pages. You decide which way best suits your work habits and the project. |
Stacking Order of Master Page Items The items on the master page are always behind any new items you may put on a page. But when you release the master page items from the master page, they always spring to the front of the document page. If you want, you can use the Object > Arrange menu to change the stacking order of the items. However, if you release many items on many pages, it may seem cumbersome to move them backwards. Instead, create two layers in your document (see Chapter 11, "Layers"). Put all the master page elements on the bottom layer, and your regular document objects on the top layer. That way when you release the master page items, they will not move in front of your regular page items. |
Of course you can also separate all the objects on a page from their links to the master page items. To separate all the master items on a page: 1. | Use the command, Override All Master Page Items, to first release all the master page items from the master page.
| 2. | Choose Detach All Objects From Master in the Pages palette menu. This severs any remaining link between the item and the master page.
Tip Only those items that were released from the master page can then be detatched from the master page. If an item is unreleased from the master page, it cannot be detatched. |
You can also hide master page items on document pages so they do not print. To change the display of master page items: - Choose Hide Master Items from the Pages palette menu.
or
Choose Show Master Items from the Pages palette menu.
InDesign also lets you quickly clear all local overrides and reapply the master page items to the document page. To remove local overrides and reapply the master: - Choose Remove All Local Overrides in the Pages palette menu. All local override elements will be deleted and the master page items will be reapplied.
|