| Once you have imported the text into the loaded text cursor (see page 261), you can choose how the text flows into the document. This allows you to flow text and create pages at the same time. To import text into a new frame: - Drag the loaded text cursor to create a text frame that contains the text
 . The straight lines indicate the text will be placed into a new frame. . The straight lines indicate the text will be placed into a new frame.
The straight lines around the loaded text cursor indicates that the text will be placed into a new text frame.  or
Click the loaded text cursor on the page. InDesign creates a text frame the width of the margins of the page.
Tip To unload the text cursor, choose any tool in the toolbox.
You can place text automatically into text frames that are master page items. This makes it easy to flow text from page to page. To create master text frames: To import text into an existing or master frame: 1. | Move the loaded text cursor inside the frame.
Tip The text frame does not have to be selected. Tip The curved lines around the cursor indicates that the text will flow into that frame  . .
The curved lines around the loaded text cursor indicates that the text will be placed into an existing frame.  | 2. | Click the loaded text cursor inside the frame. The text flows into the frame.
|
What Can You Do With a Loaded Cursor? Once you load a cursor with text, it may seem like all you can do is click to place the text. However, there are some things you can do without losing the text loaded into the cursor. You can: Use any of the menu or Pages palette commands to add pages to the document. Use the keyboard shortcuts to zoom in or out. Use the scroll bars to move through the page or the document. Move the onscreen elements, such as the palettes, to new positions.
And remember, never point a loaded cursor at anyone! |
If you want, you can import many pages of text so they're linked from one page to another. There are several techniques for flowing the text. The manual method lets you choose exactly where the text should appear. For instance, you can use this method to place text onto noncontiguous pages. Tip While it is possible to flow text from page to page without a master text frame, it is easier if you have chosen to use a master text frame.
To manually flow text: 1. | Import the text so that you have a loaded cursor.
| 2. | Move the cursor inside the area where the master text frame is located.
Tip The cursor displays curved lines when it is within the area of the master text frame  . .
Move the loaded cursor inside an existing or master frame to flow text onto a page.  | 3. | Click inside the area where the master text frame is located. The text fills the frame. If there is more text, an overflow symbol appears at the bottom of the frame  . .
If there is more text than can fit on the page, an overflow (plus sign) symbol appears at the bottom of the frame. 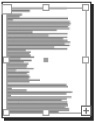 | 4. | Click the overflow symbol to load the overflow text into the cursor  . .
Click the overflow symbol to manually load the overflow text into the cursor. 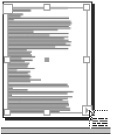 | 5. | Move to another page. The cursor changes to a link symbol  . Click to flow the text onto that page . Click to flow the text onto that page  . .
Click the link cursor to flow the text to the next page. 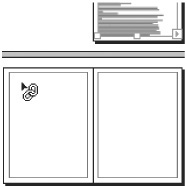
The text flows onto the next page. 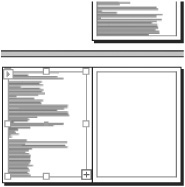 | 6. | If there is additional overflow text, repeat steps 3, 4, and 5 until all the text has been manually flowed onto the pages.
|
Flowing text manually is tedious and cumbersome. Rather than manually load the overflow text onto the cursor, you can use the semi-autoflow command to easily load the cursor with the overflow text. To semi-autoflow text: 1. | Import the text so that you have a loaded cursor.
| 2. | Hold the Opt/Alt key to display the semi-autoflow cursor  . .
The semi-autoflow cursors let you flow text page by page.  Tip The cursor displays curved lines if you place it inside an existing frame  . .
The semi-autoflow cursor indicates that the text will automatically load any overflow into the text cursor.  | 3. | Click inside an existing frame or drag to create a text frame. The semi-autoflow cursor automatically loads any overflow text into a new cursor, which can be placed into a new frame  . .
After clicking with the semi-autoflow cursor the text is automatically loaded into a new cursor. 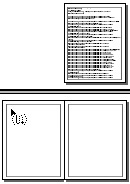 | 4. | Hold the Opt/Alt key and click or drag to create another text box linked to the first.
| 5. | Repeat step 4 as many times as necessary to place all the text in the story  . .
Each click with the semi-autoflow cursor loads the text onto new pages. 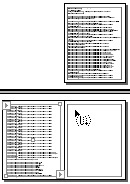 |
The semi-autoflow command may not be practical for flowing more than a few pages of text. If you have many pages of text, you can automatically flow the text and create new pages at the same time using the autoflow feature. To autoflow pages with text: 1. | Import the text so that you have a loaded cursor.
| 2. | Hold the Shift key. This cursor changes to the autoflow text cursor  . .
Use the autoflow cursors to create all the pages necessary to hold the imported text.  | 3. | Move the cursor over the area inside the margins of the page. The curved autoflow cursor appears  . .
The autoflow cursor indicates that new pages will be created as the text is imported.  | 4. | Click the mouse button. This flows the text onto that page and creates as many additional pages as are necessary to hold all the text  . .
After clicking with the autoflow cursor new pages are created to hold the text.  Tip Do not select the master text frame before you flow the text or you will lose the ability to autoflow the text. |
What if you want to automatically flow text onto the existing pages of a document without adding any new pages? That's what the fixed-page autoflow cursor does. This allows you to import text onto a fixed number of pages and then format the text so that it fits within that number of pages. To flow text onto a fixed number of pages: 1. | Import the text so that you have a loaded cursor.
| 2. | Hold the Shift+Opt/Alt keys. The cursor changes to the fixed-page autoflow cursor  . .
Use the fixed-page autoflow cursors to flow text only onto the existing pages.  | 3. | Click anywhere inside the margins of the page  . This flows the text automatically onto as many pages as are in the document. If there is more text, an overflow symbol appears on the last page. . This flows the text automatically onto as many pages as are in the document. If there is more text, an overflow symbol appears on the last page.
The fixed-page autoflow cursor indicates the text will flow only onto existing pages in the document.  |
You can import dummy text into a frame instead of importing real text. To add placeholder text: 1. | Click inside a frame.
| 2. | Choose Type > Fill with Placeholder Text. The dummy text fills the frame  . .
Lore dionsectet, velit num nit prat verosto eu facin ullan ex ex ero enis at. Duisismod lesequamet eum delisim nisl exeriureet acing ercilla alissed tat. | Lor ad te mincillan hendre feugiat praestio ea amet ip estrud dit in hendignis enim delenim ver sit velisi bla feugue delesequipit ulluptat alis nostrud doluptat. Ut prat luptat alit | A sample of the placeholder text that is used to fill text frames. |
Tip You can use text for the placeholder by saving a file named placeholder.txt in the InDesign application folder. |
|