Linking Files in Illustrator and InDesign
| Way back in the days of mechanical board layouts, type and graphics were literally pasted on the layout. Although the type was the final artwork, the graphics were simply placeholders for external camera negatives that were attached to the back of the layout. As the mechanical was prepared for printing, the negatives would be processed and the images inserted into the final print. In that way the graphics were linked to the layout. Today's electronic page-layout programs work similarly. Artwork from external programs are placed as linked graphics in either Illustrator or InDesign. However, compared to their ancestors taped to the back of the layout, linked graphics in the CS2 applications give you much more flexibility. In this section we describe how to link graphics in Illustrator and InDesign, including which import options to choose, how to view and control imported graphics using the Links palette, when to embed rather than link graphics, and how to apply Illustrator effects to linked images. On their face, linked files may not seem as intelligent as the Smart Objects in Photoshop and GoLive that we discussed in the previous section, but they function in a similar way. Just as Smart Objects allow you to edit the original source file and have it update in the Photoshop or GoLive files, so do linked images allow you to edit the original file and have it update in Illustrator or InDesign. Placing Linked ImagesBoth Illustrator and InDesign allow you to add linked images to your layouts. Placing graphics is generally the preferred way of importing graphics into these applications. (For a list of the types of images you can add to Illustrator and InDesign layouts, see "Saving Pixels" in Chapter 4, "Pixels and Raster File Formats." For vector formats that can be placed in InDesign, see "Saving and Exporting Vectors" in Chapter 5, "Getting to the Point of Vector Graphics.") In either application, you choose File > Place and navigate to select the image you want to place. Figure 9-11 shows the Place dialog boxes for both applications. Figure 9-11. In Illustrator, the Place dialog box lets you placed a graphic as linked or embedded (left). In InDesign, the Place dialog box creates a link to an external file (right).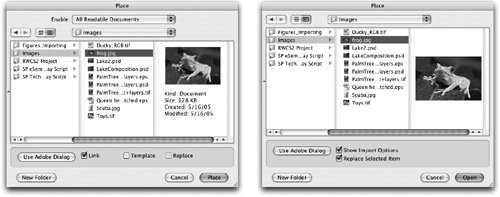 In Illustrator, the Place dialog box includes an option to unlink the graphic, creating an embedded graphic (discussed later in this section). In Illustrator, you select the image to place, and it automatically appears on the page. InDesign automatically creates a link to the high-resolution file on disk when you click Open. InDesign also gives a number of options for how the graphic will be linked (discussed in the "Importing Options" section that follows). In InDesign, you click to add the linked image to the page.
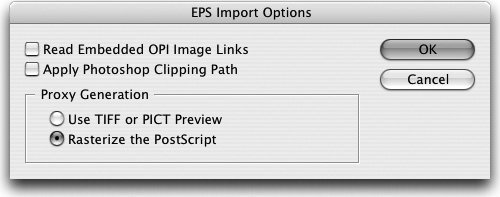
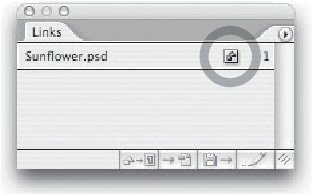
Choosing Import Options in Illustrator and InDesignChoosing File > Place presents options for handling imported files. To show InDesign's specified import options, you must check the Show Import Options check box in the Place dialog box (Figure 9-11), or hold down the Shift key as you select the file. The dialog box differs depending on the kind of graphic you're importing. Importing Bitmapped ImagesIn InDesign, when you choose File > Place, the Image Import Options dialog box appears if you select a TIFF, PSD, JPEG, GIF, or BMP file (Figure 9-12). If the image contains a clipping path, the Apply Photoshop Clipping Path option becomes available on the Image panel. (You can also use the Clipping Path dialog box, as we discuss in the following section, "Choosing InDesign Clipping Path Options.") If the file contains an alpha channel, you can apply transparency to the image for a selected channel. InDesign CS2 previews the effect of the clipping path or alpha channel before you place it. (Unfortunately, there is no way to choose another alpha channel after you've placed the image.) Figure 9-12. InDesign CS2 Image Import Options dialog box with options for placing bitmapped images. The Color panel gives you color-management options that we discuss in Chapter 10, "Colors and Color Management." Layered native Photoshop PSD files also will have options for turning on and off layers and layer options. (See "Changing Visibility for Layers and Layer Comps" in Chapter 12, "The Flexibility of Layers.") Importing EPS FilesPlacing a Photoshop EPS or Photoshop DCS file with Show Import Options turned on displays the EPS Import Options dialog box (Figure 9-13). Checking Apply Photoshop Clipping Path applies an embedded clipping path. Turning on the Rasterize The PostScript option causes InDesign to create a very good preview for an EPS file (much better than the one saved with the file), although this takes a little more time to place. Figure 9-13. InDesign CS2 EPS Import Options dialog box, with option to rasterize a better preview for an EPS file. Importing PDF FilesBoth Illustrator and InDesign provide previews when you place PDF files (Figure 9-14) but remember, in InDesign you have to choose Show Import Options in the Place dialog box to see the PDF import controls and preview options. Both applications allow you to choose, in the Crop To menu, how much of a PDF page to import. You can choose to crop the page to the Bounding Box, or the Art, Crop, Trim, Bleed, or Media boxes (if those areas have been defined within the PDF document). InDesign includes an option to show a transparent background behind the PDF file. This allows you to layer PDF artwork over colors or images. Figure 9-14. The Place PDF dialog box in Illustrator CS2 (left) and in InDesign CS2 (right) let you choose a cropping method and select which pages to place.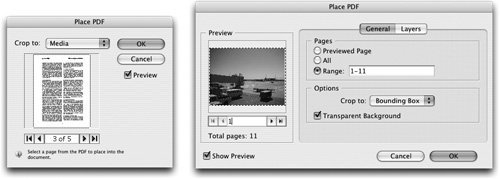 Illustrator import options are limited to choosing which page in a PDF file you want to place and changing the visibility of layer comps, which we discuss "Changing Visibility for Layers and Layer Comps" section in Chapter 12, "The Flexibility of Layers." PDF files can contain more than one page. Unfortunately, Illustrator only imports one of them at a time. InDesign lets you place multipage PDF files. You can choose to place all or a range of pages. Viewing and Controlling Linked ImagesIllustrator and InDesign display linked images in the Links palette, which is very similar in both applications (see Figure 9-15). You use this palette to view and control all of your linked graphics. Figure 9-15. The Illustrator CS2 Links palette lets you display a small thumbnail icon of the placed image (left); the InDesign CS2 palette does not (right).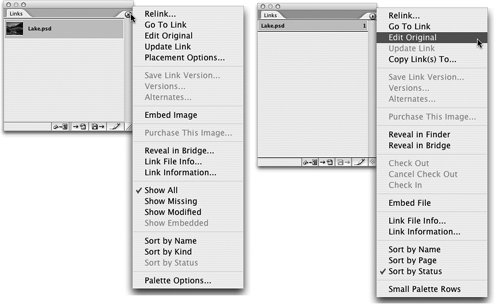 When linked graphics are not up-to-date, icons appear in the Links palette to give you status information (Figure 9-16 shows the InDesign palette, but the icons are the same in Illustrator). The stop-sign icon with a question mark indicates a missing graphic that must be updated. The triangle with an exclamation point icon indicates an out-of-date graphic that has been modified outside of Illustrator or InDesign. A camera icon, new in the CS2 applications, indicates when an Adobe Stock Photo comp is placed into a layout. The comp must be replaced by a high-resolution version for high-resolution output. Figure 9-16. Icons provide information in the InDesign Links palette. You can modify the original image by selecting the placed image in the Links palette, and choosing Edit Original from the palette menu or clicking the Edit Original button at the bottom of the palette. This automatically launches the program that created the file and opens the file. In the case of Photoshop, Illustrator, and Acrobat, each application will open its own files. However, you are not limited to just the Creative Suite applications. For instance, if you select a linked Macromedia FreeHand EPS file, choosing Edit Original causes FreeHand to open that file. Here's a brief summary of the most important functions of the Links palette. You can either choose an option from the palette menu or click the button at the bottom of the palette:
Once you have saved the changes to the original file, you can switch back to the layout. The changes are automatically applied to the placed image. This seems awfully similar to what Smart Objects do in Photoshop. Photoshop Smart Objects store information for the editable file within the Photoshop file. In contrast, Illustrator and InDesign keep information about linked images in an external file.
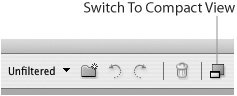
Dragging and Dropping GraphicsDrag-and-drop is the easiest way to import graphics into Illustrator or InDesign. You can drag in graphics several ways from Photoshop, from the Desktop, or from Adobe Bridge. Be careful, though. If you're ultimately going for high-end output, you may lose valuable information if you don't do it from the "right" place. You need to know from where drag-and-drop works best to create a link to a high-resolution file. You might be able to get away with a low-resolution file if you're printing just to an office inkjet printer. But why learn bad habits? Dragging from PhotoshopWe see a lot of people who make the mistake of selecting their image in the Photoshop document window and then dragging it into Illustrator or InDesign documents. Don't do it!!! You'll only drag a low-resolution, unlinked image that is not suitable for professional printing. But many designers tell us that they saw a demonstration where someone from Adobe dragged a file from Photoshop into Illustrator or InDesign. Were they dreaming, or did they really see it? Yes, there is one situation where you can drag from the Photoshop application into Illustrator or InDesign dragging from the Photoshop CS File Browser (the predecessor to the Adobe Bridge file browser) onto the Illustrator or InDesign page. But since Photoshop CS2 no longer has a File Browser, that situation is no longer relevant. So don't drag from Photoshop! Tip: One drag for Mac users Macintosh users have one additional option: they can drag the small document icon from the title bar of the Photoshop window onto the Illustrator or InDesign page. This is the same as dragging the file from Bridge. This feature is only available, though, if the document has been saved with no changes outstanding. Dragging from the DesktopYou can drag files from your Desktop (the Macintosh Finder or Windows Explorer) and drop them into Illustrator or InDesign. Essentially, this is the same as using the Place command except that you can't set any new import options. For example, if you drag a multipage PDF file, you can only place the first page even if your import options had been set for placing all the pages. However, dragging from the Desktop does create a link to the high-resolution file. Dragging from Adobe BridgeBy far the easiest way to import graphics is from Adobe Bridge. Steve used this method when working with InDesign (and Microsoft Word!) when writing this book. Use Bridge to navigate to the folder that contains the graphics you want to use (for tips, see Chapter 3, "View from the Bridge"). Click the Switch To Compact View button at the top right of the Bridge window (Figure 9-17). This reduces the size of the Bridge window and keeps it in front of other applications. Then drag your image from the Bridge window into your Illustrator or InDesign layout (Figure 9-18); this process creates a link to the graphic. Illustrator will always create a new image frame and cannot replace an image. InDesign displays different placement icons depending on whether the image will create a new frame or will go into an existing frame. Figure 9-17. Click the Switch To Compact View button to reduce the size of the Bridge window. Figure 9-18. Drag an image from the Bridge window over your Illustrator or InDesign layout, and then release the mouse. Tip: Dragging Text Files As long as we're talking about dragging files, the same rules apply to dragging text files into InDesign. You can drag them from Bridge or the Desktop. You can even drag text and graphic files at the same time. Copying and Pasting GraphicsWhile you might assume that copying and pasting graphics would work easily, this is the least reliable method of importing graphics into Illustrator and InDesign. Copying and pasting works to import small amounts of text. But it doesn't work reliably to import bitmapped graphics, in our experience, and always embeds an unlinked, low-resolution image. However, you can use this method to copy vector graphics between the CS2 applications. We tell you how in "Moving Paths Between Applications" in Chapter 5, "Getting to the Point of Vector Graphics." Embedding ImagesLinked images have always been a feature of page-layout programs. One of the primary reasons for this was that imported images could be extremely large in file size. The engineers who first designed page-layout programs believed it would be better just to link to the original file, rather than include all the information in the page layout. A link would make it easier to save the page-layout file without all the extra information for placed images. Another reason to link files is that you can make changes to the linked image and it automatically updates itself wherever it appears. You wouldn't want to have to make changes to each instance of an image that appears many times in a book or magazine. But at times you might want to include the whole imported image in the page-layout file. One reason to include the image is that you don't have to remember to include the external linked-image file when you send the layout to the print shop. (Missing linked images are the number-1 problem when printing files.) Another reason is that you can apply certain effects to embedded images that you can't in linked images (see "Applying Effects to Embedded Images" later in this chapter). Also, you have more flexibility with InDesign snippets when you embed images (see "InDesign Snippets" later in this chapter). It's very easy to change a linked image to an embedded one. Select the image and choose Embed Image from the Links palette in either Illustrator or InDesign. An Embedded icon appears next to the name of the image in the Links palette (Figure 9-19). When you embed a graphic, the application no longer pays attention to the graphic stored on the hard drive, but embeds the entire image within the file. Figure 9-19. Links palette with Embedded icon, indicating that image is no longer linked to external file. Generally, we recommend linking whenever possible, because embedded graphics can be problematic in some prepress workflows:
Unembedding ImagesSo what if you want to unembed an image? In InDesign, you select the embedded image and choose Unembed File. You can choose to link back to the original file or create a new file from the embedded image. The benefit of linking back to the original file is that if you have made any modifications to the original file, they will automatically be applied to the layout. Illustrator has no Unembed File command. Does that mean that embedded images are forever trapped in your Illustrator layouts with no chance to be linked back to the original file? Hardly. Although you can't export the embedded image, you can choose Relink from the Links palette. Illustrator discards the embedded image and links back to the original file or any other file you select. Applying Illustrator Effects to Linked ImagesIn Illustrator, you can apply any of the Effects commands to a placed, linked image. Some effects, such as the Photoshop effects for Artistic, Blur, Brush Stroke, and so on, can be applied to either linked or embedded images. Other effects, such as Add Arrowhead or the Pathfinder commands, are primarily suited for vector artwork and do nothing to a placed image. But some effects can be seen only when applied to embedded images. (See Table 9-1 for a summary of the Illustrator effects and how they can be applied to linked or embedded raster images.)
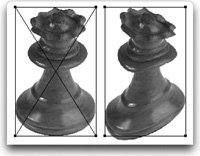
As Table 9-1 shows, the warp effects do nothing to linked images. However, we want to have the benefits of the warp effects, be able to modify the original Photoshop file, and also see those changes in the Illustrator layout. Fortunately we discovered a trick that allows all this to happen. Start by placing the image in the Illustrator file, and use the Links palette to embed the image. Apply the effect from the Warp submenu to the embedded file. The effect is applied to the item and appears in the Appearance palette. Now let's say you want to modify the image in Photoshop. In Illustrator, choose Relink from the Links palette menu. The effect disappears from the image. Don't panic. Use the Edit Original command to make whatever changes you want to the Photoshop document, and save the work. Those changes appear in the linked image back in Illustrator file. Here's where you get lucky. Even though you can't see the warp effect, choose Embed Image from the Links palette. As soon as you embed the image, the warp effect reappears. Illustrator has kept the warp effect applied to the image. So even though you couldn't see it in the linked image, it pops back on when the image is embedded again. Figure 9-20. Linked image with invisible warp effect (left); embedded image with visible warp effect (right). |

EAN: 2147483647
Pages: 192