Slicing and Dicing Images
| Many years ago, web designers discovered that large images could be made to download faster or just appear to download faster if the images were divided into separate areas (called slices) and assembled in the web browser using HTML tables. Slicing images also meant that certain areas of an image could have different optimization settings than other parts of the image. Slicing also let webmasters modify smaller sections of an image, rather than the entire image. Photoshop, Illustrator, and ImageReady can slice images and generate the HTML code that reassembles them on a web page later. GoLive does not let you create or modify the position or size of slice. However, GoLive can read the slices created in the other programs and create the tables to hold them.
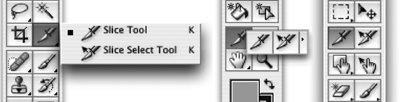
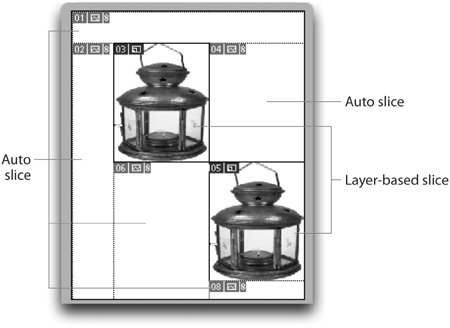
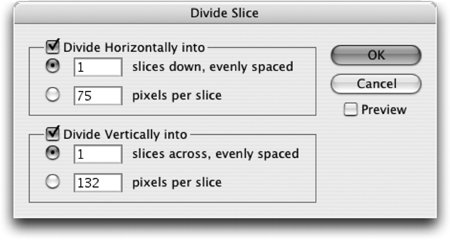
Creating SlicesThere are several different ways to create slices. You can create slices manually or you can create slices automatically from the boundaries of a layer or object. You can also create slices from guides. Each technique has its own advantages and drawbacks. User SlicesThe most obvious way to create slices is to use the Slice tool found in the Tools palette of Photoshop, Illustrator, and ImageReady (Figure 17-3). The process is simple: you drag with the Slice tool to create the rectangle that defines the area of the slice. This manual method creates what's known as a user slice. User slices can be resized or moved any way that you want. That makes them useful for targeting specific areas of an image that are not defined as an object or layer. Figure 17-3. The Slice tools and Slice Select tools in Photoshop (left), Illustrator (center), and ImageReady (right). In Illustrator you can also create user slices by selecting an object and choosing Object > Slice > Make From Selection. This creates a slice that is the same size as the selected objects. Layer-based and Object-based SlicesThe smarter way to create slices is to create layer-based slices. These are slices that automatically expand or contract to enclose the image on a layer. In Photoshop or ImageReady, select the layer that you want to convert into a slice, and then choose Layer > New Layer Based Slice. This creates a slice that is exactly the size of the pixels on that layer. Even better, the layer-based slice automatically adjusts its size if you change the size of the artwork in the layer. You can create a similar type of slice in Illustrator, but it's not called a layer-based slice. Select the object or group that you want to turn into a slice, and choose Object > Slice > Make. The slice will be tied to the underlying object and will resize accordingly. We call these object-based slices. Unlike the layer-based slices in Photoshop, which are always connected to the size of the layer, these Illustrator slices will adjust to the size of the original object but can also be manually resized. Simply resize the artwork, and the slice adjusts accordingly. If you manually resize the object-based slice, it immediately loses its connection to the size of the object below. From that point onward, the slice and the object no longer resize together. Converting Layer-Based slices to User SlicesThere are times when you may want to convert a layer-based slice in Photoshop or ImageReady into a user slice. For instance, you may want to expand the slice so that it neatly fills up an area in the artwork. To do so in ImageReady, simply go to the Slices menu and choose Promote To User Slice. Since Photoshop has no Slices menu, you need to select the slice and then Control/right-click and choose Promote To User Slice from the context menu. (We don't feel user slices are a promotion from layer-based slices, but that's what Adobe calls it.) Once a slice has been promoted from layer-based to user slice, it can be moved or resized at will. As mentioned in the previous section, Illustrator slices don't need to be promoted. They can simply be selected and resized at any time. Auto SlicesSlices are reassembled in web pages using HTMLbased tables. However, tables can only contain rectangular cells in a grid-like structure. If you create a user or layer-based slice in the middle of an image, it needs to have supporting slices to fill the rest of the table and display the image correctly. These other, supporting slices are called auto slices (see Figure 17-4). Figure 17-4. The two layer-based slices in the image generate the additional auto slices. Photoshop, ImageReady, and Illustrator create auto slices as necessary when you create slices. The auto slices are indicated by lighter colors for their numbers. Slices from GuidesYou can create slices from guides that have been applied to a document. In Photoshop or ImageReady, first create the guides that you want to use as slices, and then choose the Slice tool in the Tools palette. Click the Slices From Guides button in the Options bar. This creates user slices from the areas defined by the guides. It also deletes any slices that were previously applied to the image. To do the same in Illustrator, create the guides, and then choose Object > Slice > Create From Guides. As in Photoshop, this creates user slices that delete any previously created slices. Dividing an Existing SliceThe Divide Slices command (see Figure 17-5) allows you to divide a slice area into a specific number of slices or to create the slices based on specific pixel sizes. In Photoshop, first choose the Slice tool or the Slice Select tool. Then Control/right-click to access the Divide Slices command. In ImageReady you can choose Slice > Divide Slices when any tool is selected. Figure 17-5. Create a grid of horizontal and vertical slices using the Divide Slice dialog box. The Divide Slices command works slightly differently in Illustrator than it does in Photoshop or ImageReady. In Photoshop or ImageReady, you can apply the Divide Slices command when you first create or open the document. This is because the entire image is automatically contained in a defined slice when you start a new document. However, in Illustrator, a new document doesn't have a slice in it until you define one, so you'll have to define and select a slice before you can use the Divide Slices dialog box (Object > Slice > Divide Slices). Working with and Viewing SlicesWorking with slices is similar to working with any other object or layer. You can select, move, delete, and copy slices. However, there are a few special techniques you need to know. Selecting and Moving SlicesChoose the Slice Select tool to select, move, and resize slices. To select multiple slices anywhere in the layout, Shift-click while you select them. Use the Option/Alt key to create a copy of a slice as you drag it. The Save For Web dialog box has its own Slice Select tool. This tool allows you to select slices to apply specific optimization settings to them. However, you can't move or resize the slices in the Photoshop or Illustrator Save For Web dialog box. If you need to resize or otherwise modify a slice, you need to quit this dialog box and then make your changes in the document window. This is why ImageReady is the preferred application for working with slices. With ImageReady, you can move and select slices in the document window as well as set the slice options. Viewing SlicesThere are several ways to view slices, depending on the program and context in which you are viewing them. Here are the locations in which you can view them:
Assembling SlicesOnce you have sliced an image into pieces, someone or something is going to have to put it back together. The language for assembling sliced images into a complete picture is called an HTML table. While there are those who can write their own code to reassemble sliced images, rest assured you don't have to learn any code to create the tables for sliced images. Photoshop, Illustrator, and ImageReady do it all for you. Setting Individual Slice OptionsOnce you've sliced an image, each individual slice can be set to specific properties. These slice options let you turn slices into image maps that contain links to other web pages or email addresses (see Figure 17-6). Figure 17-6. The Slice Options dialog box in Photoshop (left) and Illustrator (center), and the Slice palette in ImageReady (right).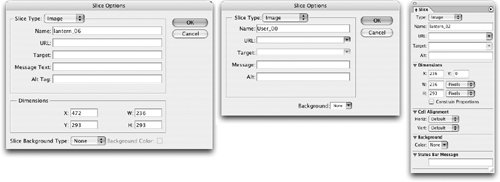 You access the slice options in Photoshop by selecting the slice or slices and then choosing Edit Slice Options from the context menu. You can also double-click with either of the slice tools over a slice area to open the Slice Options dialog box. In Illustrator you select the slice or slices and then choose Object > Slice > Slice Options. You access the slice options in ImageReady by selecting the slice or slices and then opening the Slice palette (Window > Slice). You can set the following slice options:
Outputting the Slices and TableThis is the final step in creating a sliced image outputting the images and the HTML code necessary to reassemble the slices in a table. If you're in Photoshop or Illustrator, you can do this simply by choosing File > Save For Web. You then click the Save button to open the Save Optimized As dialog box (Figure 17-7). Figure 17-7. Save Optimized As dialog box and related menus.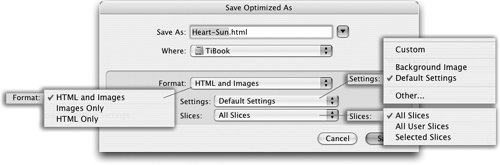 In ImageReady, the regular document window is the equivalent of the Save For Web dialog box. You choose File > Save Optimized or File > Save Optimized As to get to the Save Optimized As dialog box. The options for the slice files are defined in the Save Optimized As dialog box:
Choosing Output SettingsWhile image designers are interested mainly in the appearance and size of web graphics, web site designers need to manage the naming conventions, comments, and other advanced attributes of those images. You can control these output settings by choosing Other in the Settings menu in the Save Optimized As dialog box. This opens the Output Settings dialog box. If you have opened this dialog box through Image Ready, you will see seven sections (shown in Figure 17-8). If you have opened the dialog box through Photoshop or Illustrator, you will see only four sections.
Figure 17-8. All seven sections of the Output Settings dialog box in ImageReady.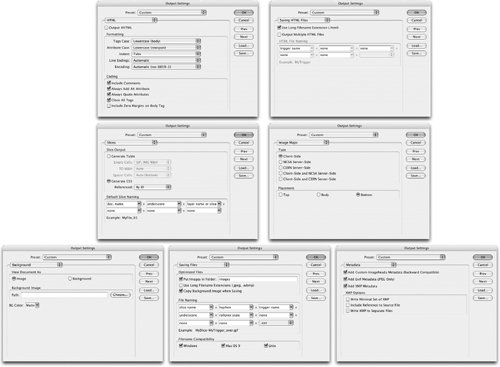 Tip: Save Your Output Settings Use the Save button to save the settings for all seven sections of the Output Settings dialog box. This adds the settings as a preset at the top of the dialog box. Assembling Smart Object Slices in GoLiveSmart Objects in GoLive allow you to add native Photoshop and Illustrator files into GoLive web layouts and then use the Save For Web dialog box to optimize them. The real beauty of these Smart Objects is not just that they can be inserted into GoLive, but that any slices that were created in Photoshop, Illustrator, or ImageReady are recognized in GoLive's Save For Web dialog box. (For more information on working with Smart Objects in GoLive, see "Smart Objects in GoLive" in Chapter 9, "Smart Objects and Intelligent Layouts.") |
EAN: 2147483647
Pages: 192