Accessing the Network from Native Clients
| Test Objectives Covered:
By definition, a network is a collection of computers that share three important features: the ability to communicate with each other, the ability to share resources, and the ability to access remote hosts on other networks. NetWare 6 enhances this cross-platform connectivity with the introduction of the NFAP. NFAP is a server-based solution that enables Windows, Macintosh, and Linux/Unix clients to securely access NetWare storage using their own integrated client software. In addition, NFAP enables you to manage non-NetWare clients through eDirectory. In previous versions of NetWare, Windows, Macintosh, and Linux/Unix clients were required to use special versions of the Novell Client. This was always very messy and sometimes quite awkward. Now, with NFAP, these clients can access centralized NetWare storage using their own integrated operating system. For example, Macintosh clients can now access NetWare files using their native AppleTalk Filing Protocol (AFP). In this lesson, we will begin with the fundamentals of NFAP, and then we will dive into the installation and configuration section with more detail about how to activate this exciting new AAA platform. Let's get started with the fundamentals of NFAP. Novell Native File Access Pack (NFAP) FundamentalsNFAP behaves slightly differently in each of the five operating system environments it supports. The cool thing is it "morphs" automatically to use the native protocol of the client it is communicating with. For example, NFAP communicates with Macintosh clients using the AFP protocol, and it transforms the NetWare server into a virtual AppleShare server. Following is a list of the platforms supported by the NetWare 6 NFAP chameleon:
In this section, we will learn how the NFAP chameleon performs its magic for the three most popular native clients Windows, Macintosh, and Linux/Unix. Just a hint it's all smoke and mirrors. Windows NFAPWindows NFAP enables native Windows clients to access NetWare servers by using the Common Internet File System (CIFS) protocol. CIFS is a standard, cross-platform file-sharing protocol that allows users to share files on the Internet without installing any additional client software. Windows 95/98/NT/2000/Me clients are CIFS-enabled by default. NetWare 6 Windows NFAP provides the following features and benefits. Windows NFAP
Once Windows NFAP is installed on the NetWare 6 server, native CIFS client access is a breeze. As I mentioned earlier, NFAP enables NetWare servers to appear as Windows servers on the client desktop. In the Windows 2000/NT/Me world, the NFAP server can be found by choosing Computers Near Me in the My Network Places desktop icon. In the Windows 95/98 world, the Windows NFAP server appears in Network Neighborhood. Remember that the host workgroup or domain for your NFAP chameleon is established during NFAP software installation. TIP Windows NFAP requires the Microsoft Client, which is installed by default during Windows 2000/NT installation. If your clients are using Windows 95/98, you must install the Microsoft Client manually before NFAP servers will appear. In addition, you should be aware that the NFAP server name is not the same as the NetWare server that hosts it. This means you can be creative and descriptive when defining NFAP server names. Macintosh NFAPMacintosh NFAP enables native Macintosh Clients to access NetWare servers by using the Application Filing Protocol (AFP). With Macintosh NFAP installed, the NetWare server appears to Macintosh Clients as an AppleShare IP server in the Chooser (MacOS 8/9) or Network Browser (MacOS X). Macintosh NFAP provides the following features and benefits. Macintosh NFAP
To access NetWare files from a client running MacOS 8/9, you must select Chooser from the Apple menu. Then choose AppleTalk and Server IP Address. Once you get there, simply enter the NFAP IP address or DNS name and authenticate. Finally, click Connect to make the NFAP server available. To access NetWare files from a client using MacOS X, you must use the Network Browser. This new IP-based facility can be found by selecting Go from the Apple menu and choosing Connect to Server. Similarly, you must enter the IP address or DNS name of the NFAP server and choose Connect to authenticate. The Macintosh NFAP connection process described above can be automated by creating a NetWare server alias on the Macintosh desktop. This alias is retained after rebooting and allows the native MacOS to autoauthenticate to the NFAP server using Keychain. To do so, simply select the NetWare server icon from the Macintosh desktop and choose File, Make Alias. TIP If your Macintosh users want to access files on a NetWare 5 server, you must specify the server IP address or DNS name. This is because Macintosh NFAP relies on SLPv2 for server discovery and this advanced version of the Service Location Protocol (SLP) is only available in NetWare 6. Linux/Unix NFAPLinux and Unix use the Network File System (NFS) protocol to access files over the network. After Novell NFAP is installed on a NetWare server, Linux and Unix users can mount exported network storage and use it as their own file system via a virtual NFS server. Before Unix users can access a NetWare file system, it must be made available to NFS clients. This process is called "exporting the file system." During the exporting process, you can define various levels of server access control and configure how the information is accessed. For example, you can restrict NetWare file access to specific Unix workstations and/or export the directory as Read-Only. Exporting and mounting a NetWare file system to a Unix workstation consists of two tasks:
TIP Linux/Unix NFAP supports the native Network Information System (NIS) so Unix users can be administered through the eDirectory tree. NetWare and Linux and Unix servers use different methods for controlling access to files. Although both have similar directory and file security, NetWare security is more elaborate. At their most basic levels, both systems assign access controls to similar user types. However, each server uses slightly different methodologies. Fortunately, NFAP maps these differences so that setting access controls from one system has similar meaning and effect on the other. In fact, you have five different choices for how you want Linux/Unix NFAP to handle server access control. The choice is yours. As network administrator, you have the responsibility of choosing the type of access control that suits your network setup. The five "access control modes" supported by NFAP are
Unfortunately, new NetWare 6 NSS volumes only support Independent Mode. In Independent Mode, no rights/permissions mapping is performed. Therefore, NFS rules apply for NFS clients and NetWare rules apply for NetWare clients. This is okay because Independent Mode is strongly recommended for most NetWare 6 volumes. Otherwise performance can suffer because of the creation of excessive numbers of trustees.
That completes our fundamental lesson in NetWare 6 NFAP. Now let's learn how to put this great new capability to work by installing and configuring it on a NetWare 6 server. Novell Native File Access Pack (NFAP) ConfigurationNow it's time for action. Enabling Novell NFAP is a relatively straightforward process. First, you must make sure that the host server and distributed workstations meet the minimum system requirements. Then you can install NFAP by using the NetWare 6 installation GUI. This involves selecting the Macintosh, Windows, and/or Linux/Unix components to install and configuring certain protocol parameters. After Novell NFAP installation is complete, you must select or create user objects and assign them simple passwords before they can access the network natively. This is all part of NFAP configuration. When users access a network resource by using their native protocols, they enter their NetWare username and simple password which is verified by NetWare. This is all part of the high-security methodology maintained by NetWare 6. Now let's take a closer look at Novell NFAP configuration starting with the minimum system requirements. NFAP System RequirementsAs we learned earlier, Novell NFAP is installed on the NetWare 6 server. Furthermore, it requires a Windows administrative workstation for specific configuration duties. Finally, to access NetWare servers running NFAP, your distributed workstations must be connected to the network and must support specific levels of their native operating systems including Windows, Macintosh, and/or Linux/Unix. To support Novell NFAP, the host NetWare server must meet the following minimum system requirements:
TIP When NMAS is automatically installed or upgraded, NFAP makes sure to match your existing edition. For example, NMAS Starter Pack 1.0 is upgraded to NMAS Starter Pack 2.0 and NMAS Enterprise Edition 1.0 is upgraded to NMAS Enterprise Edition 2.0. To install, configure, and manage NFAP, you must have at least one Windows administration workstation that meets these system requirements:
After you have installed the server and administrative workstation components, it's time to focus on users. To access a NetWare server running any version of NFAP, your distributed workstations must be connected to the network and support one of the following native operating systems:
After your Novell NFAP server and workstations have passed muster, it's time to install the software. Ready, set, go! Installing NFAPTo install Novell NFAP to your host NetWare 6 server, follow these simple steps:
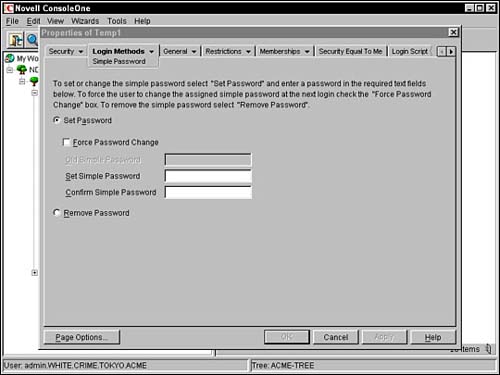
TIP The list of eDirectory users supported by Windows NFAP is maintained in a context list called CIFSCTXS.CFG. This file is created during NFAP installation and can be updated later with new user contexts. After you have completed Novell NFAP installation, you must select or create user objects and assign them simple passwords before they can access the host server. This task is accomplished during NFAP configuration. Configuring NFAPNovell NFAP incorporates the security of NetWare by using simple passwords. The simple password is required because it provides access to NetWare servers from workstations not running Novell Client software. Just like any NetWare password, the simple password is stored in eDirectory and each user must have one before they can access NetWare resources using native protocols. When users access a network resource by using their native protocol, they enter their NetWare username and simple password that is verified by NetWare. Then the user object reads eDirectory and controls the network resources the user can access. To create user objects and assign simple passwords for NFAP access, perform these steps:
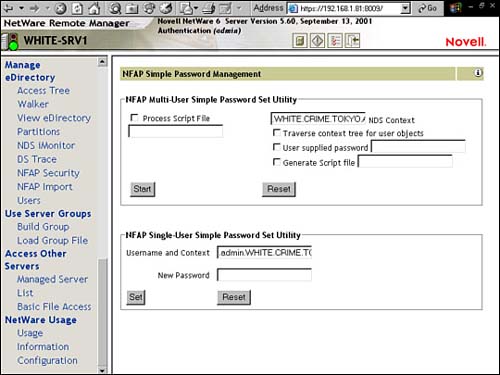
TIP If the simple password you configure is different from the user's NetWare password, the user must enter the simple password when accessing the network native protocols. However, users must also remember that their NetWare password is required when logging in from Novell Client-equipped workstations. You can create simple passwords for users one at a time by using ConsoleOne or you can automate the process for many users with the help of NORM (Novell Remote Manager). To create simple passwords for many users, select Manage eDirectory from the left frame of NetWare Remote Manager, and then click on the NFAP Security link. Next the NFAP Simple Password Management screen should appear (as shown in Figure 6.2). This web-based form includes these configuration fields:
Figure 6.2. Configuring simple passwords in NORM.
Finally select Start to begin the automatic simple password assignment process. All finished! And if you have learned anything in this section, I hope that it is that NFAP is your friend. This powerful NetWare 6 chameleon enables you to open the doors of NetWare filing to users of many different workstations, operating systems, and protocols. This is network diversification at its finest. In this section, we learned that Novell NFAP is a server-based solution that enables Windows, Macintosh, or Linux/Unix clients to securely access NetWare storage natively. Furthermore, NFAP allows these users to be managed through the central eDirectory tree. Now that we are armed with a truly diverse population of NetWare users, let's tackle the three most exciting features offered by NetWare 6:
Ready, set, go!! |
EAN: 2147483647
Pages: 128