| iManage; therefore, I am. Welcome to the future of Novell management. iManager is an anytime, anywhere advanced administration utility that allows you to perform almost all of the eDirectory management tasks typically handled by NetWare Administrator and/or ConsoleOne. iManager is platform independent and web browser-based. Furthermore, iManager allows you to customize its capabilities based on preassigned or customized admin roles. With iManager, the future is now. To run iManager, you must meet the following minimum system requirements: Browser iManager supports Internet Explorer 5 service pack 2 (or above) and Netscape 4.6 (or above). Platform iManager runs on these network platforms: NetWare 5 support pack 4 (or above), NetWare 5.1 (for secure SSL support), and NetWare 6. eDirectory iManager requires eDirectory version 8.5 (or above).
You can access iManager from the NetWare 5 Web Manager portal (shown in Figure 4.1). To access this page from a compatible browser, enter HTTPS://{server IP address}:2200 in the address field. The iManager Main Page (shown in Figure 4.6) consists of the following three functional frames: Header Frame Occupies the top center of Figure 4.6. The Header frame contains the following five buttons: Home (returns to the iManager home page), Exit (closes your iManager session and returns you to the iManager login page), Roles and Tasks (displays the roles and tasks that you have been assigned, and controls the links provided in the Navigation frame), Configure (allows you to set up RBS, manage administrative roles, and modify the owners of the rbsCollection container), and Help (provides access to general iManager online help). Navigation Frame Occupies the left side of Figure 4.6. The Navigation frame contains links that pertain to the button chosen in the Header frame. In Figure 4.6, for example, the Roles and Tasks button displays the following Navigation links: DHCP management, DNS management, eDirectory administration, iPrint management, and license management. Main Content Frame Occupies the right side of Figure 4.6. The Main Content frame is your advanced administration playground for eDirectory and server management.
Figure 4.6. NetWare 6 iManager main page.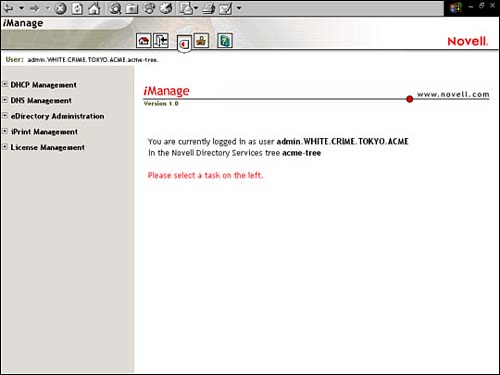
iManager depends on administrative roles to customize its interface. Furthermore, this facility is controlled by a new eDirectory feature called "Role-Based Services (RBS)." To prepare iManager for role-based administration, you must first accomplish these two configuration steps: Configure RBS. Assign iManager roles.
Let's take a closer look at these two steps and learn how to configure iManager for role-based administration. Remember that the future is now. REAL WORLD iManager and ZENWorks for Servers both use RBS. However, each utility's roles are exclusively available for its use. That is, iManager roles can only by used by iManager and ZENWorks for Servers roles can only be used by ZENWorks for Servers. Fortunately, you can tell the difference between these eDirectory objects by the case of "RBS" in each object name: iManager eDirectory objects are preceded by lowercase "rbs," whereas ZENWorks for Servers eDirectory objects are preceded by uppercase "RBS." |
Configure Role-Based Services iManager uses RBS to control administrative access to eDirectory and server functions. RBS is a special extension of the eDirectory schema that occurs automatically when you install NetWare 6. However, if you want to use iManager on an existing NetWare 5.x server, you must first extend the eDirectory schema to support RBS. Extend the eDirectory Schema The first task in configuring RBS is to extend the eDirectory Schema (this is done automatically during NetWare 6 installation). This Schema extension modifies eDirectory to support six new RBS objects (as shown in Figure 4.7). Figure 4.7. Extended Role-Based Services (RBS) objects in eDirectory.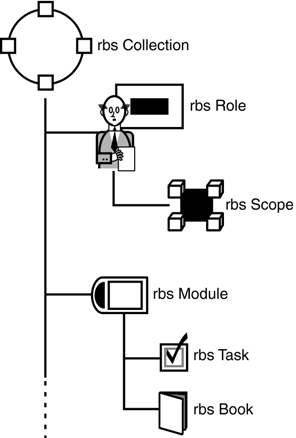
To extend an existing NetWare 5.x eDirectory Schema for RBS, launch iManager and authenticate as the admin user. From the Header frame, select Configure and from the Navigation frame, select Extend Schema from under the Role-Based Services setup link. At this point, iManager will automatically extend the schema for RBS. When the confirmation message appears, select OK to complete the extension. The new extended eDirectory supports six objects for RBS. Following is an explanation of the function of each of these new RBS objects (shown in Figure 4.7): rbsCollection This eDirectory container object holds all iManager RBS objects. Therefore, this container should be located at the highest possible point in the tree. By default, this container is named Role-Based Services. However, you can change the name during NetWare 6 installation or during the NetWare 5.x schema extension we just performed. TIP Only one rbsCollection container should be created per wide-area network (WAN) link because role assignments across WAN links create considerable bandwidth overhead. Furthermore, administrative users should be assigned to administrative roles that are stored in the rbsCollection container that is geographically closest to them.
rbsRole There is an rbsRole object for each administrative role added to eDirectory. The rbsRole object is also a container, stored in the rbsCollection container, and it holds the rbsScope object. rbsScope The rbsScope object is created and deleted dynamically by iManager. It describes how administrative role privileges will flow through the eDirectory tree. In summary, the rbsScope defines which portion of the tree a particular rbsRole can manage. Although this object appears in the tree, you should not modify it. rbsModule The rbsModule object is also a container, stored in the rbsCollection container, and it holds two RBS objects: rbsTask and rbsBook. rbsTask Each administrative role is made up of several tasks, and each task is represented by an rbsTask object. As a result, iManager task information is stored in eDirectory and is easily distributed. rbsBook The rbsBook object is a central administrative catalog for all roles and tasks assigned to a given user. Each rbsBook object is made up of several task pages that allow users to perform all assigned roles and tasks from one central place.
The second task is configuring RBS is to create the rbsCollection container. This will become the top level of your administrative hierarchy. From the iManager Configure page, select the Role-Based Service Setup link and choose Create rbsCollection. In the Name field, enter the name of the rbsCollection container. Remember that by default, it is called "Role Based Service." You may want to consider something more descriptive such as "RBS_WHITE". This naming syntax will enable you to track the host container for the beginning of RBS administrative hierarchy. Next, in the Container field, browse to and select the container where you would like it to be created. In our example, that would be the WHITE container. Create the container by selecting OK. When the object has been created, select OK to complete the rbsCollection creation process. After you have created the rbsCollection container, you must choose which administrative roles or plug-ins it will support. From the iManager Configure page, select the Role-Based Services Setup link and choose Install Plug-In. Next, choose from a list of five different administrative role categories: DHCP, DNS, eDirectory, iPrint, and Licensing. Now let's learn how to assign these new roles to administrative users. That's step 2 of iManager configuration. Assign iManager Roles The Roles and Tasks button in the iManager Header frame provides access to five administrative roles links in the Navigation frame. These five links hold seven default iManager roles. These seven roles are the cornerstone of Novell's new anytime, anywhere advanced administration strategy. Let's take a moment to explore the five iManager role categories listed on the left side of Figure 4.6: We will discuss these categories in alphabetical order, as they are listed in the iManager Navigation frame. DHCP Management iManager supports extensive DHCP configuration capabilities by using the DHCP management role. With this role, you can accomplish these DHCP management tasks: DNS/DHCP Scope Settings Create the DNS/DHCP Locator object and the Administrative scope. Global DHCP Configuration Set global DHCP prepreferences and import/export a DHCP configuration. DHCP Server Management Create, delete, and modify the DHCP Server object. You can also view the DHCP audit/event logs and start or stop DHCP services at the server level. Subnet Pool Management Create, delete, and modify the Subnet Pool object. Subnet Management Create, delete, and modify the Subnet object. Address Range Management Create, delete, and modify the SAR (Subnet Address Range) object. IP Address Management Create, delete, and modify IP addresses.
DNS Management iManager enables you to perform a number of DNS configuration tasks by using the DNS Management role. Following is a brief description of the DNS tasks you can perform by using this iManager role: DNS/DHCP Scope Settings Just as with the DHCP management role, you can create the DNS/DHCP Locator object and the Administrative scope. DNS Server Management You can create, delete, and modify the DNS Server object. In addition, you can import zone master files to eDirectory and export eDirectory data in to a master file. Finally, the DNS management role allows you to start and stop DNS services using iManager. Zone Management You can create, delete, and modify forward or reverse Zone objects. Resource Record Management You can create, delete, and modify RRSet objects.
TIP For more information regarding NetWare 6 DNS/DHCP management, refer to the next two lessons in this chapter: "Understanding NetWare 6 DNS/DHCP" and "Configuring NetWare 6 DNS/DHCP."
eDirectory Administration RBS supports three eDirectory management roles that you can use to customize iManager administration. Here is a brief description of each of these eDirectory roles: Container Management This eDirectory role allows users to create Organization and Organizational Unit containers in the eDirectory tree. Group Management This eDirectory role allows users to create Group objects in the eDirectory tree. Fortunately, this role does not allow users to modify existing Group objects. User Management This eDirectory role allows users to create other User objects in the eDirectory tree. Fortunately, this role does not allow users to modify existing User objects.
iPrint Management The iPrint management role in iManager enables you to perform nine tasks: Create Printer; Create Manager; Create Broker; Delete NDPS Object; Enable iPrint Access; Manage Printer; Manage Print Service Manager; Manage Broker; and Remote Print Manager Configuration. For more information about iPrint, see Chapter 6. License Management The Licensing role in iManager enables you to perform four tasks: Install License Enables users to add licenses to those areas of the tree for which they have administrative privileges. Move License Enables users to move licenses from one context or container to another. Delete License Enables users to remove licenses from the tree. This is a particularly dangerous task because it has far-reaching implications. Manage License Properties Enables users to view the number of installed licenses, monitor the licenses in use, determine when licenses were installed, and revoke license allocation to users who do not need network access. Again, a very dangerous capability if abused.
To assign any of these iManager roles to administrative users, select Configure from the Header frame in iManager. Next, expand the Role Manager link in the Navigation frame and choose Modify Role. The Modify Role window should appear in the Main Content frame (as shown in Figure 4.8). Choose a particular administrative role and select the Members icon. Then, in the Object name field, browse to and select an administrative user. Then choose Add. Mark the box next to the administrative user object. Figure 4.8. Assigning iManager roles.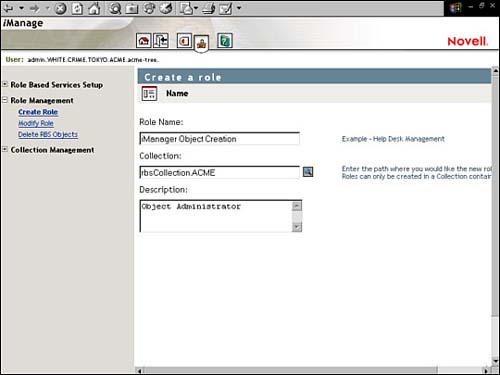
Next, in the Name field, browse to and select the user you will be assigning roles to. Then choose Add. Finally, in the Scope field, browse to and select the container where you want this administrative user to perform this role. Then choose Add. When the role assignment has been made, you can complete the process by clicking OK. Congratulations! You have successfully traversed NetWare 6's hot new anytime, anywhere advanced administration utilities. In this lesson, we learned all about Remote Manager (previously the NetWare Manager Portal), iMonitor (affectionately known as "Simon"), and iManager (the future of Novell management). Now you are well armed to tackle even the most perplexing advanced administration tasks. Be very careful how you wield such power. Now let's put our newly acquired skills to the ultimate test by configuring NetWare 6 DNS/DHCP Services. This is where the rubber literally meets the information superhighway. Lab Exercise 4.2: Advanced Administration with iMonitor and iManage In this lab exercise, you will perform these tasks: In this lab exercise, you will need these components: WHITE-SRV1 server created in Lab Exercise 2.2. Workstation running Windows 95/98 or Windows NT/2000. A NetWare 6 Operating System CD.
Monitor with iMonitor Perform the following tasks at your administrative workstation. Verify that NDSIMON.NLM is loaded on your server. Open Internet Explorer. In the address field, enter your server's IP address. If you are using the IP addresses in this book, enter https://192.168.1.81:2200 When the NetWare Web Manager window appears, in the NetWare Remote Manager field, select WHITE-SRV1. When the "Connect to" window appears, authenticate as Admin (using the full distinguished name). In the navigation frame on the left side of the screen, under Manage Server, select Console Screens. In the main content frame, under Current Screens, select Console Screens. TIP If an error occurs indicating that the page cannot be displayed, press the >> button near the top left of the screen until the console prompt appears. When the WHITE_SRV1 - NWScreen_Applet Microsoft Internet Explorer Window appears, select Screen List. When the Select Screen to View prompt appears, view the system console by entering 1. From your console screen applet, enter EDIT AUTOEXEC.NCF. Scroll down and verify that NDSIMON.NLM is present in the file and that it has not been commented out. Close the Console Screen applet.
To launch iMonitor, in the navigation frame on the left side of the screen, scroll to Manage eDirectory, and then select NDS iMonitor. Use the iMonitor TRACE feature. When the Agent Summary window appears, select Trace Configuration from the Assistant (left frame). When the Trace Configuration page appears, in the DS Trace Options field and in addition to those tasks already selected, select the following: From the top of the Trace Configuration page, select Submit. In the Trace History field, select the View icon (magnifying glass). Scroll down to the bottom of the DSTRACE output. TIP Because your home network has no production activity, DSTRACE output is limited in its usefulness. However, in a true production environment, DSTRACE is a valuable tool.
Use iMonitor to determine whether replicas are synchronized: From the Assistant frame on the left side of the screen, select Agent Health. In the Health Check field, select Partition/Replication. In the Health Check: Partition field, select Replica Synchronization. Note the Partition Synchronization Status and the Replica State.
Use iMonitor to view eDirectory background process schedules and run DSREPAIR. From the Navigation Frame (top of the page), select the Repair icon (the wrench icon). In the NDS Repair Switches section, select Run in Unattended Mode. Select Start Repair and wait a few seconds while DSREPAIR runs. Select the browser's Refresh option. Under Downloads at the top of the Assistant frame on the left side of the screen, select DSREPAIR.HTM. View the DSREPAIR log file, and then close your browser.
Create Users with iManage Perform the following tasks at your administrative workstation: Open NetWare 6 Web Manager. Open Internet Explorer. In the address field, enter your server's IP address. If you are using the IP addresses in this book, enter https://192.168.1.81:2200 When the NetWare Web Manager window appears, in the eDirectory iManage field, select WHITE-SRV1.
When the Login screen appears, authenticate as Admin. In the Navigation frame along the top of the screen, verify that the Roles and Tasks icon is selected. In the left frame, expand eDirectory Administration, and then select Create Object. In the Available Classes field, select User, and then select Next. In the Create User section, provide the following: In the UserName field, enter User2. In the Last Name field, enter User2. In the context field, browse to the WHITE container. Select OK container.
When a message appears indicating that the new user has been created, select OK.
Create Roles with iManage Perform the following tasks at your administrative workstation: Create an administration role. In the Header frame along the top of the screen, select the Configure icon (person sitting at desk). In the left frame, expand Role Management. Select Create Role. In the Role Name field, enter iManager Object Creation. To the right of the Search field, select the Search icon (magnifying glass). In the Start Search in field, enter ACME, and then select Search. In the Results field, select the Role Based Service.ACME object. The Create a Role section will reappear in the main content frame. In the Description field, enter Object Administrator and then select Next (lower right-hand corner). When the Tasks section appears in the main content frame In the All Tasks field, select Create Objects. Select the arrow pointing toward the Assigned Tasks field. Select Next.
When the Associate Object section appears in the main content frame, in the Object Name field, browse to User2 (which is located in White.Crime.Tokyo.ACME), and then select OK (upper-right corner). When the Associate Objects section reappears in the main con-tent frame, select Add, and then select Next. When the Set Scope section appears in the main content field: Mark the checkbox next to User2.WHITE.CRIME.TOKYO.acme. In the Scope Name field, browse to the WHITE container, select Add, and then select Next.
When the Summary section appears in the main content frame, note the Summary information and then select Done. In the Header frame on the top of the screen, select the Exit icon (open door). If an Autocomplete dialog box appears, select No. When the Login window appears, in the Login field, enter User2, and then select Login. In the left frame, expand iManager Object Creation and note that you can only create objects. In the Header frame along the top of the screen, select Exit and then log in as Admin.
Modify an existing iManager administrative role. In the Header frame along the top of the screen, select Configure. In the left frame, expand Role Management. Select Modify Role. In the right frame, a list of installed roles and tasks will appear. Scroll to the iManager Object Creation.Role-Based Service.ACME field, and select the first Tasks icon (magnifying glass). When the Modify Tasks section appears, in the All Tasks field, select Delete Objects; next, select the arrow pointing toward the Assigned Tasks field; then select OK. This gives all members of the Object Administrator role the ability to add and remove objects. In the header frame at the top of the screen, select Exit. When the Login screen appears, authenticate as User2 (no password). In the left frame, expand iManager Object Creation and note that this user can create and delete objects. In the header frame at top of the screen, select Exit.
|