Project 3. Hangin' Around (Fun with Skyscrapers, Bridges, Ladders, and Friends) Have you ever seen images or video of those guys who climb really tall buildings? You wonder, of course, if someone would actually be crazy enough to do that, and if someone was, would he possibly live around the corner from you? Unlikely. 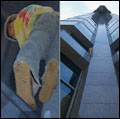 However, you might find a neighbor crazy enough to go three steps up a ladder while you take his photo from below. It's the head-scratching look afterward that always gets me, though. "You want to do what with the photo?" Life can certainly get interesting, even here in our little crescent. The ingredients for this project are as follows: A photo of a high-rise building. I'll be using one I shot with slide film a number of years ago. A photo of someone, probably a really good friend, perched up on a ladder. I'll use the one I shot this morning using a digital camera, but with the same lens as the shot of the high-rise.
It helps if the photos were taken with the same, or similar, lens and if they were taken from the same angle. I couldn't persuade my friend to climb a 40-foot ladder, though, so we'll let the magic of Paint Shop Pro give us a hand in fixing the small differences. 1. | If you have, or can take, photos like these, open them in Paint Shop Pro. If you don't have something like these, head over to this book's companion website, download the images (MikeOnLadder.tif and Skyscraper.tif) I'll be using, and open them in Paint Shop Pro.
You can see the photo of the building in Figure 9.19.
Figure 9.19. A fairly tall building. 
Note To get this shot I used a short lens, about 18mm, and stood really close to the building looking almost straight up. I had my wife stand behind me, which helped because it was a bit dizzying getting this shot. Much better, though, I would guess than the reversestanding at the top pointing my camera downward. Figure 9.20 is that of my friend standing on a ladder.
Figure 9.20. A friend helping with the project. 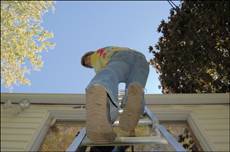
Note The photograph in Figure 9.20 was taken, as I mentioned earlier, with the same lens at the same focal length. You can see that it is a pretty extreme angle. I was kneeling on the ground and my friend was perched a few rungs up on the ladder looking down at me for his "portrait" shot. Ahhh, good friends…. |
A Background-ectomy, a Little Copy and Paste… 2. | Use your favorite method to remove the background portions of the image of the guy on the ladder. If you need some help with this, see Appendix B.
You can see my effort in Figure 9.21. Remember to look for areas within other areas. For example, if your photo has someone with his arm away from his body but his hand touching his hip, you'd need to remove the area created between his arm and body.
Figure 9.21. What appears to be a man hanging freely in space. 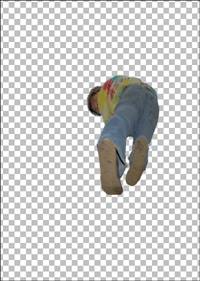
Looking at the end result, I bet I could do something cool with a trampoline. I wonder how I could convince my wife that it would be great for photos.
| 3. | With background and the ladder removed, choose Selections, Select All. Then select Edit, Copy. Make the image of the building active by clicking its title bar and then select Edit, Paste As New Layer.
| 4. | Select the Pick tool and move the image of the friend into place. You might also need to resize the pasted image. To do so, make sure you drag the corner handles, not the sides. Doing so preserves the width-to-height ratio and prevents distortion.
Figure 9.22 shows my friend perched precariously on the side of the building. I wonder if it's windy up there.
Figure 9.22. Man meets building. 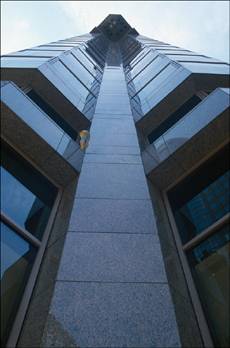
|
Solving a Couple of Small Problems Zooming in will, of course, reveal several small problems. The first is that my friend looks almost like a bug against the windshield (see Figure 9.23). Figure 9.23. This image needs more work to be believable. Maybe a Spiderman costume would help. 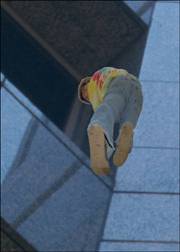
My friend definitely needs to be more integrated with the building and his new surroundings. A couple of things will help. For example, copying a portion of the ledge over the bottom of the foot on the left will make it appear more as though my friend is actually standing outside this building. 5. | Select the Freehand Selection tool and set the Selection type to Point to point. Then use the Freehand Selection tool to create a selection along the ledge (see Figure 9.24). Make sure you get enough to cover the bottom of his foot.
Figure 9.24. Select the ledge. 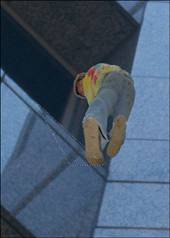
| 6. | Make sure the layer with the building is active; then select Edit, Copy.
Make the layer with my friend in it active, and then create a new raster layer by clicking the New Raster Layer icon in the Layers palette.
| 7. | Select Edit, Paste into Selection. Doing so pastes the selected part of the ledge over the bottom of the left foot (see Figure 9.25).
Figure 9.25. Copy and paste the ledge into place. 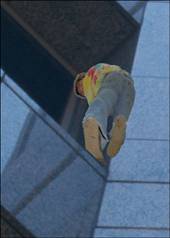
Note At this point, you can take a look to see how the person blends into the building. That is, if you missed some of the background when you selected him (or her if you're working with a female friend's photograph), you might want to use the eraser to help fix those areas. You might notice in Figure 9.25 that there's a bit of a halo around my friend's hair. I purposely left that there to help separate him from the new background a little. After all, he'll be quite small in the final image. |
Adding a Drop Shadow There are a number of ways to add a drop shadow in Paint Shop Pro. This time, we'll use the easiest way to help move this project along. Other projects will demonstrate other ways to go about adding shadows, including this chapter's earlier project, "Crazy Highway and Billboard Signs." 8. | Make the layer with my friend active by clicking it in the Layers palette.
| 9. | Select the Zoom tool and, in the Options area, click the rightmost icon to fit the image into the screen so you can see the entire image. This will help you choose the settings for the shadow effect.
| 10. | Select Effects, 3D Effects, Drop Shadow to bring up the Drop Shadow dialog box (see Figure 9.26).
Figure 9.26. Adding a drop shadow effect. 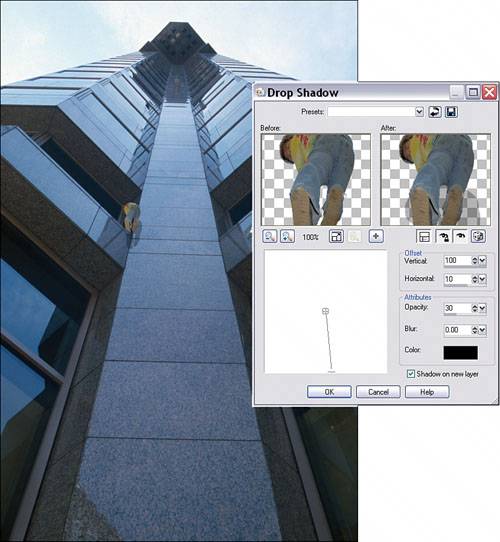
In Figure 9.26, you can see that having the entire image in view helps you choose the correct settings to help the new shadow mimic that of the upper part of the tower. If you're using these images, set the values as in the figure. Otherwise, play with the various settings until the shadow looks right.
|
Making Some Noise If you zoom in using the Zoom tool, you'll see that the shadow blends in quite well against its new background. You might notice, however, that the person doesn't quite match up. In the case of the two images I'm usingone shot on slide film and the other digitalthe trouble is that the digital image has no grain. Fixing that problem should be the last hurdle to making this image believable. 11. | Use the Zoom tool to zoom way in. I'll be near 400% so that my friend is completely visible.
| 12. | Select Adjust, Add/Remove Noise, Add Noise to bring up the Add Noise dialog box (see Figure 9.27).
Figure 9.27. Adding some noise. 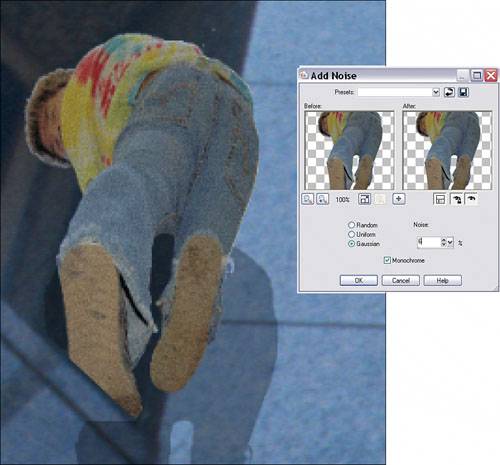
You can see in Figure 9.27 that I've added 6 percent noise and that I selected Gaussian and Monochrome. This works best for the images I'm using, but feel free to experiment with other settings. You can't break anything, so have some fun.
Figure 9.28 shows the final result with both a full-size image and a close-up view.
Figure 9.28. It's the amazing Multicolored Shirt Man. Watch him scale tall buildings. 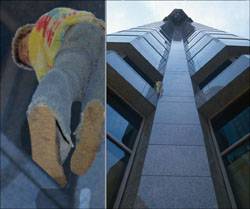
|
|