Project 3. Rainbows Ahh, rainbows; the prize after the storm. They are as fleeting as they are beautiful it seems, and by the time you fetch your camera from the hall closet, the darn rainbow, along with its pot of gold, has vanished until the next storm rolls through town. 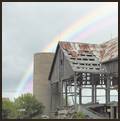 Never fear, though. Here is a solution that will give you a little practice with Paint Shop Pro's vector toolsnotably, the Bézier curve setting of the Pen tool. This project can be used to spice up some of the landscape shots you have lying around. You know the ones. They look like they'll be great shots until you get them out of the camera. It sometimes makes you wonder if the camera was even in the same location as you. If you don't have a photo to work with or simply want to follow along with the same photo I'm using, you can download it (CountyBarn.tif) from the companion website. 1. | Open an image to use. It should be some sort of landscape or a shot with a lot of sky showing. You can see the image I used for this project in Figure 6.10.
Figure 6.10. An ordinary barn in the country. 
| 2. | Begin building a rainbow by selecting the Pen tool and clicking in the lower-left corner just above the tree near the round tower. Make sure the Pen's mode is set to Draw Point to Point Bézier Curves.
Click once more near the top middle of the image and drag the handle to get a nice curved line (see Figure 6.11).
Figure 6.11. Creating a Bézier curve. 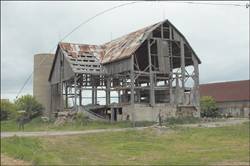
Don't worry if you don't get it quite right. The beauty of vectors, such as the Bézier curve you just created, is that they are totally malleable. You can drag either end around to reposition it, and the curve will redraw itself. The beauty of mathematics is made even better because we don't have to do the math ourselves to get the resulting beauty. We simply need to click and drag. We'll leave the math up to the wizards at Corel.
When you release the mouse and grab the Pick tool, you will see your vector shape (see Figure 6.12).
Figure 6.12. The Bézier curve in place. 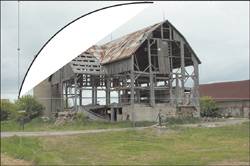
|
Adding the First Color of the Rainbow It doesn't seem to resemble a rainbow all that much, does it? Patience, Grasshopper. It will become a rainbow in time, and then we can collect the gold (phew, was that a weird mix of metaphors). 3. | Select the Pick tool and double-click the shape to bring up the Vector Property dialog box (see Figure 6.13).
Figure 6.13. Setting the fill and stroke of the first part of the rainbow. 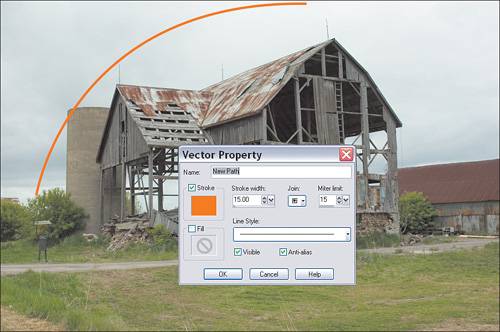
| 4. | Set the Stroke to a shade of orange and the Stroke Width to about 15. Set the Fill to None by removing the check mark next to the Fill icon. Click OK to apply the new settings.
If you glance at the Materials palette with the Rainbow tab active, you'll see the progression of the colors of a rainbow. Look down the middle to see orange, yellow, green, cyan, blue, violet, and red.These are the colors we'll need to use to build our own rainbow.
|
Filling in the Parts of the Rainbow With the first color of the rainbow created, it's fairly trivial to create the other colors. Along the way, you'll get a little practice with vector shapes. As Mom used to say, "Practice makes perfect." As you move the new lines into place, keep in mind that you are trying to create a rainbow shape. You'll find that you can, for example, keep the lines closer together at the bottom than at the top to help the rainbow fan out.
5. | Duplicate the layer with the first curve on it.
| 6. | Using the Pick tool, double-click the new line to bring up its Vector Property dialog box. Set the color to yellow.
| 7. | Use the Pick tool to move the yellow line to the right a little. You can have some space between the lines, but not too much.
Keep going until you have seven lines from orange through to red.
| 8. | With the lines in place, merge each of the rainbow layers down into each other, starting at the top. Right-click a layer and select Merge, Merge Down.
Repeat this process until all the rainbow lines are on one layer.
| 9. | Right-click the rainbow layer and select Convert to Raster Layer. This enables you to apply a softening blur.
|
Softening Up the Rainbow Although all the colors are now present, the rainbow is too sharp. Rainbows are always sort of misty looking and partly transparent. The next steps show you how to transform the vector lines into a convincing rainbow. 10. | Select Adjust, Blur Gaussian Blur and play with the settings until you get something that resembles a rainbow. I set the Radius to about 12.
| 11. | Set the Layers blending mode to Screen so the rainbow will blend with the underlying layer (see Figure 6.14).
Figure 6.14. The rainbow taking shape. 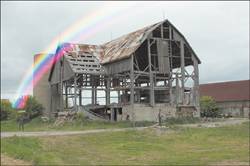
|
Adding the Rainbow's Final Touches All that's left is to remove the area of the rainbow that's in front of the tower and the roof. To do so, we'll add a layer mask and use that to help us hide the part of the rainbow we don't need to see. 12. | Right-click the rainbow layer and select New Mask Layer, Show All.
It won't appear as if anything has happened, but a white mask has been added to the rainbow layer. Wherever you paint on this mask with black, the underlying image will show through.
| 13. | Set the foreground color to black and select the Paint Brush tool.
Zoom in so you can see where you need to paint; then simply paint over the rainbow with black where you want it to disappear. If you go outside the lines, simply set the foreground color to white and paint over the mistake. It's like magic! Black erases the rainbow, and white brings it back.
Figure 6.15 shows the end result of building a vector rainbow.
Figure 6.15. The final rainbow image. 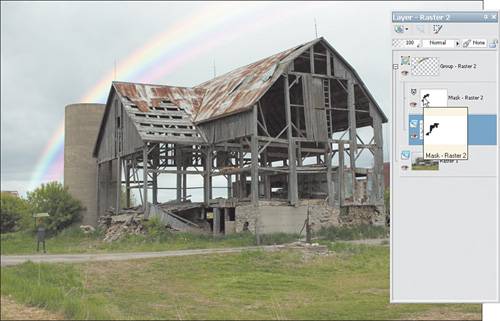
You can see that I've included the mask layer's thumbnail so you can get a better idea of what's involved in painting the mask. Basically, I painted over the corner of the tower and the roof of the barn in the mask to allow the underlying buildings to show through the rainbow. Doing it this way means that, if I decide to move the rainbow, I'll only have to re-create the mask, which took only a couple of minutes (versus re-creating the rainbow, which took a little longer). I think the final image looks pretty good. Imagine if the landscape was actually exciting to begin withthat photo would be worthy of a frame and a space on the wall.
|
|