Project 1. Planes/Birds in Front of the Moon If you're even a bit romantic, chances are you like photos of the moon. Even better would be a photo of the moon with something flying in front of it, such as a plane or a bird. The problem is that it's hard to get even one of those shots, never mind two or three. 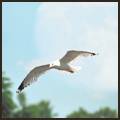 Actually, it's not as hard as it might seem. The moon can be photographed if you have a lens that's long enough. I've seen some done with telescopes, and they are awesome. I don't have a telescope, but I did manage to get a shot of the moon one afternoon when the sky was still blue. I'll be using that shot for this project, and you can get it (Blue Moon.tif) from the companion website if you don't have one of your own. As for the birds or other type of airborne phenomena, it's a matter of location and trial-and-error. Thankfully, the trial-and-error part is something that's easy with a digital camerayou just keep trying until you get the shot. You can get good shots of airplanes if you live near an airport, and you can get shots of birds at just about any park. With either, you might want to shoot in the best light and set the shutter speed fairly high to prevent a blurring of the subject, be it a bird, a plane, a meteor, or some stray part of Sputnik. Hey, it could happen. 1. | To get started with this project, open the file containing your bird or other airborne object and the file that contains your moon shot. If you want to work with the files I'm using (Blue Moon.tifand Seagull-Lasalle.tif), they can be downloaded from the companion website.
You can see the shot of a seagull that I'm using in Figure 6.1.
Figure 6.1. Is that you, Jonathan? 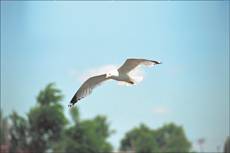
| 2. | Activate the image of the moon. Select the Selection tool and set the Selection Type to Circle. Click and drag from the middle of the moon toward the outside to select the moon itself.
|
Note Don't worry if you get some of the background. You'll notice in the following sidebar that the images have backgrounds that are quite similar. We'll use a couple of tricks to help the two images blend more.
You might have to press Ctrl+Z or select Edit, Undo a couple of times, but you'll get the hang of it and make a good selection.
Paste the moon in as a new layer.  One of the techniques we can use to help blend the moon into the underlying image is to feather the selection before we copy the moon. Here's how to do so: 1. | Choose Selections, Modify, Feather. For the selection with the moon, I set the Number of Pixels to 15.
| 2. | Select Edit, Copy.
| 3. | Activate the image of the bird by clicking its title bar.
| 4. | Select Edit, Paste As New Layer to paste the moon in over the image of the bird.
|
Notice how the sides of the moon are soft and blend into the sky in the underlying image. You can see that the sky was not exactly the same color, but these images were taken years apart and the photograph of the seagull was shot on (gasp!) slide film. It doesn't really matter what the source was after the image has been digitizedwhether a scanner or your digital camera does that. As for the difference in the sky, there's a trick for that, as well. Read on....
Stirring In One Mask Depending on the images you're using, you might have to do some type of corrections. You may, for example, have to resize the moon image or play with the color a little. 'We'll set the color of the moon layer in a bit, but first we have to create a mask to help blend the two layers. It will seem as if nothing has happenedthat is, nothing seems different with the image. If you look at the Layers palette, though, you'll see a layer above the moon layer that's completely filled with white. Painting on that mask with black allows the bird layer to show through. Follow along to see what I mean.
3. | Right-click the layer containing the moon in the Layers palette and select New Mask Layer, Show All.
| 4. | Select the Paint Brush tool and set the Foreground and Stroke Properties to black. One quick way to do so is to click the small double-triangle icon in the lower middle of the Materials palette. It's the icon that's half black and half white.
| 5. | To help you see where to paint, lower the opacity of the layer with the moon. Doing so enables you to see the underlying layer (see Figure 6.2).
Figure 6.2. Lower the moon layer's opacity to see through to the layer below and get the job done. 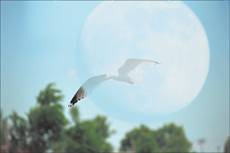
| 6. | Make sure the Mask layer is active by clicking its layer in the Layers palette.
| 7. | Zoom in, if necessary. You need to paint over the area of the mask that's hiding the bird itself. By painting the mask layer with black, the bird shows through and appears in front of the moon, while the moon appears to be in the background sky.
Another technique to pay attention to is the size and hardness of the brush. While painting over the seagull, for example, you might need a fairly small brush with a medium-hard setting. The settings you choose will help determine how believable the outcome is.
| 8. | After painting out the seagull, set the brush size to a fairly high setting and set the hardness way down so the brush is very large and soft. With those settings, paint around the area of the moon where some of its sky is still showing. If you take a swipe at it and you're not happy with the results, select Edit, Redo and try again. Figure 6.3 shows my effort at masking the two layers together.
Figure 6.3. Masking the moon to let Jonathan shine through. 
I've included the Layers palette in Figure 6.3 with my mouse hovering over my mask layer so you can see what I painted. I know it's small, but it will give you an idea of what my mask looks like.
|
Baking at 350° for 15 Minutes Details, details. It's the small things that can make or break a composite image. The next couple of steps demonstrate how to blend the two images together so they appear to be one single image. 9. | Finally, to help blend the colors a little better, activate the layer with the moon by clicking its layer in the Layers palette. Then select Adjust, Color, Red/Green/Blue.
Set the red, green, and blue to 6, 4, and 3, respectively. This small change helps the moon blend in even further. My final image is shown in Figure 6.4.
Figure 6.4. Jonathan in the moon. 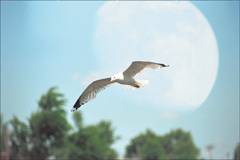
This is one of those images that would be almost impossible to shoot. Getting the moon that size in the frame would require a huge telephoto lens. With that type of lens in place, you'd pretty much have to guess when a bird might be coming into range. In the digital darkroom, though, you can create this type of image. Now go out and shoot a couple of photos to play with. Go on, get some fresh airit'll do you good, and the book will still be waiting here for you when you get back.
|
|