Project1.Picturesque 18-Wheelers
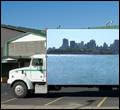
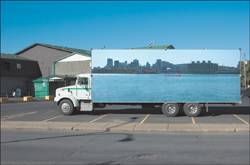
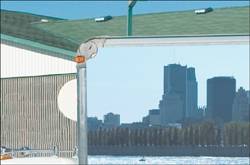
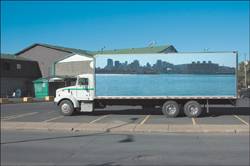

Project 1. Picturesque 18-Wheelers

Many summers ago I was traveling across the country with my youngest brother. We were heading off to some rock concert. It was quite a show. The traveling was great fun, as well, and it was a great chance for my baby brother and me to get to know each other better without all the trappings of daily life. There was one moment on the highway neither of us will forget. No, not the time the horse carriage almost ran us overthat's another story altogether.

We were near an underpass and the weather was a little dismal when this large 18-wheeler went roaring past us. My brother and I both saw the truck, went silent for a moment, stared at each other, and then both said, "Did you see that?" What we were referring to was the painting on the side of the trailer; it was an amazing desert scene in bold reds and oranges featuring a larger-than-life Yosemite Sam. I tell you, it was a sight.

As I sit in traffic, I often wish that more tractor-trailers were done up with artwork of some kind. I mean, wouldn't it be awesome to see a truck with a giant Mona Lisa painted on its side? Much better than some of the boring panels seen on many of the trucks that currently inhabit the highways and byways.

I think it's time to digitally alter a truck to see how it can have an effect on its surroundings. Follow along to see how much fun this can be and how easy it can be to "paint" a truck.

Two files are needed for this project. First, you need a shot of a large truck, then you need to open another image to be painted onto the truck's side. I'll use the panoramic image that you can create in one of the projects in Chapter 8,"Messin' with Mother Nature." This image will work well because of the shape of the truck's side. As you can see in Figure 3.1, the truck's side is a long rectangle. If you haven't created the panoramic image yet, you can grab a copy of the completed project from the website.

Figure 3.1. A large truck just begging for some digital airbrushing.


1.

With both files open, activate the image you want to paint onto the truck's side by clicking its title bar.

With the image copied to the clipboard, you can close the second image to free up some memory for Paint Shop Pro. These are pretty large files we're working with, even from a 3MP or 4MP camera (not to mention 5MP, 6MP, or even 7MP cameras). For example, the images in this chapter can weigh in at as much as 40MB.


2.

Choose Selections, Select All to select the entire image.

3.

Select Edit, Copy or Edit, Copy Merged if the image has extra layers so that you'll get the entire image.

4.

Activate the image with the truck by clicking its title bar. If your image is hidden behind a number of others, you can also activate it by selecting Window, filename, where filename is the name of the image you want to have activated.

5.

Select Edit, Paste As New Layer to paste the second image's contents into a new layer in the truck image.

Places Everyone, Places

You may notice when you paste the new layer in that it's way too large, or even way too small. In any event it will need to be resized and moved into place.

6.

With the newly pasted layer active, select the Pick tool and resize the image in the new layer so that it just covers the portion of the trailer that needs to be covered (see Figure 3.2).

Figure 3.2. Moving and resizing the truck's new digitally painted side.


When resizing the image with the Pick tool, grab a corner of the image and drag it to preserve the height and width ratio of the image.


7.

Toggle off the visibility of the new layer so you can see the truck clearly.

Creating a Mask to Add the Digital Artwork to the Truck

We could, of course, move the pasted image around and get it exactly into place, erasing some of it as necessary. A better method, though, is to use a mask with the new layer to allow only enough of the image to show through to cover that part of the trailer. This method is also pretty cool in that you can easily reopen the file and simply paste in another image. With the mask there, it will be just that easy to change artwork on the side of the truck.

8.

Select the Freehand Selection tool; set the Selection type to Point; and use the Freehand Selection tool to draw a selection around the truck's side, zooming in as necessary to see where you're selecting (see Figure 3.3)

Figure 3.3. Creating a selection of the truck's side with the Freehand Selection tool.


You'll note in Figure 3.3 that I have ignored the small curve in the upper-left corner of the truck's side. This can easily be dealt with later. For now, it's more important to get a decent selection around the area of the truck's side.


9.

With the selection made, activate the layer with the image that will be painted onto the truck's side by clicking its layer in the Layers palette.

10.

Right-click the layer in the Layers palette and select New Mask Layer, Show Selection. Doing so allows the image to show through the mask and be painted on the truck's side. It masks off only those areas that are outside the side of the truck. Pretty cool stuff.

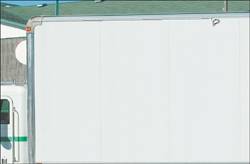
Creating a Mask to Help with Final Touches

At this point, you can clean up any areas of the mask that might need a little help. For example, I'll clean up the area where the truck's side has a rounded corner.

11.

If necessary, activate the mask layer and use the Paint Brush tool with either white or black as the painting color. Painting with black masks out an area, and painting with white lets the image show through. In Figure 3.4, I'm using a black brush to restore the rounded area of the truck side's frame.

Figure 3.4. Fixing the mask.


Adding the Final Touches

When you're satisfied with the mask, it's time for the crowning touch. That is a small change to the blending mode to help bring out any details in the original truck's side. Note that this setting works for the (mostly) white truck and the color photo I'm using. Your mileage might vary if you're using two completely different images.

12.

Activate the Group layer that holds the photo layer and the mask layer.

13.

Change the Blending mode to Multiply. You can see my final digital photo in Figure 3.5.

Figure 3.5. The beautified truck ready to make deliveries in style.


That's much better. I think we should start a "beautify that truck" movement. At least there would be something nicer to look at while we're stuck in traffic.


Corel Paint Shop Pro X Digital Darkroom
ISBN: 0672328607
EAN: 2147483647
Year: 2004
Pages: 109

flylib.com © 2008-2017.
If you may any questions please contact us: flylib@qtcs.net