Project 1. Digital Wrinkle Cream The years aren't always kind. Those crow's feet at the corners of the eyes are eventually accompanied by frown lines, blemishes, and leathery skin. Wrinkles add character, but they can sometimes be too much of a good thing. You can take off years of sun damage and stress in the digital darkroom.  As with the other projects in this book, you can follow along either using your own images or by downloading the ones I'm using here from the book's website. In Figure 2.1, you can see I'm using an image of a businessman, which is available from www.shutterstock.com (image 188638). He may be smiling in the photo, but he's clearly had his share of rough days. Here's how we take away stress, Paint Shop Pro-style. Figure 2.1. A photo of a businessman. 
You'll notice that, whereas other projects have started with making a selection to separate part of a photo from its background, we don't need to do that here. The setting of this image is just fine. It's the subject himself we're retouching. 1. | Start by making a duplicate of the background layer. This allows you to easily start over if you make a mistake. To do this, right-click the layer in the Layer palette and then select Duplicate. You can keep the default name for the new layer, but it's a good habit to give your layers meaningful names.
| 2. | Zoom in on the subject's face. This gives you a good look at the wrinkles on his forehead and around his eyes. You'll also notice a blemish on his right cheek, which we can fix later.
|
Smoothing the Forehead As with most digital darkroom projects, there are several ways to do the same thing. In this case, we're going to remove wrinkles. If your subject has a few light crow's feet in the corners of his eyes, the Dodge or Smudge brush is just subtle enough to smooth them away. The Clone Brush is another option. In the case of our current subject, however, we need heavier artillerythe Scratch Remover tool. 3. | Click the down arrow to the right of the Clone Brush, and select the Scratch Remover tool. Change the selection box option to the beveled edge. Set the width to grab some of the smooth skin on either side of the wrinkle without enclosing neighboring wrinkles. In this example, I used a width of 12.
| 4. | Click and drag the tool from one end of a wrinkle to the other (see Figure 2.2).
Figure 2.2. Positioning the Scratch Remover tool. 
Tip Don't feel pressured to capture a complete wrinkle or scratch within one stroke of the Scratch Remover tool. Sometimes correcting smaller sections works better than attempting the whole thing at once. This is particularly true for some of the deepest wrinkles, where trying to eliminate it all in one pass leaves behind the appearance of scar tissue. | 5. | When you release the mouse button, the wrinkle essentially disappears, leaving smoother skin behind (see Figure 2.3). Continue applying the Scratch Remover to other wrinkles on the forehead. Don't go overboard, though (see Figure 2.4)! Newborn skin only looks natural on a newborn. If you do go a bit too far, though, don't panic just yet. You can bring back some of those distinguishing features later.
Figure 2.3. The wrinkle disappears. 
Figure 2.4. Too much of a good thing? 
|
Pecking Away at the Crow's Feet Crow's feet, those wrinkles that form at the outside corners of the eyes, are often deeper than those on the forehead. Using the Scratch Remover tool on deep folds, particularly those near the subject's right eye, will leave behind what appears to be a poorly healed scar on the skin. We'll need to use other techniques around the eyes. 6. | Let's start with the left eye (the one on the right side of your image). The light from the window makes the skin around this eye appear very bright and soft, and we're going to use this to our advantage. Click the down arrow to the right of the Lighten/Darken brush, and select the Soften brush. You can experiment with the settings for this brush, but what you're looking for is a stroke that will soften the fine lines without obliterating the detail of the eye. I set the brush for Size 10, Hardness 10, and Opacity 75 and left the other setting at the defaults.
| 7. | Apply the Soften brush to the underside of the left eye, stroking from the inner corner to the outside corner following the shape of the eye. Be careful not to use the brush inside the eye itselfyou don't want to distort the eyeball. As you stroke, the lines are smoothed out (see Figure 2.5).
Figure 2.5. Softening the lines around the left eye. 
| 8. | For the upper lid of the left eye, simply decrease the size of the brush. Again, follow the shape of the eye for a natural look. If you go overboard, you can undo a step and try again.
|
Cloning Away the Deepest Wrinkles The right eye requires yet a third technique. If you smooth it, it takes on an unfocused appearance, and we don't want that. A better choice in this instance is the Clone brush. 9. | You need to click the down arrow next to the Scratch Removal tool we used earlier to switch to the Clone brush. Modify the settings so you have a small, soft brush that can capture the smooth skin between the folds of the image.
| 10. | Zoom in on the right eye so you can easily get into the nooks and crannies.
| 11. | To apply the Clone brush, center the brush over an area of smooth skin near a wrinkle. Right-click the smooth skin; this is the area that will be cloned. Now left-click to apply the brush to the first wrinkled area (see Figure 2.6).
Figure 2.6. Applying the Clone brush to the right eye. 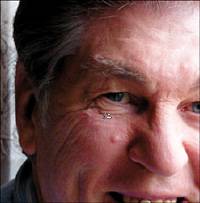
Tip In a small area such as the one here, you might have to take small steps, smoothing over one area at a time, adjusting the size of the Clone brush as necessary, right-clicking a new area near a wrinkle, and then applying it. | 12. | Continue applying the Clone brush under the right eye and down the cheek.
Again, don't get too carried away because you're just trying to take off a few years rather than completely reconstruct the subject's face. You can see where I called a halt in Figure 2.7.
Figure 2.7. The area around the right eye has been smoothed out a bit. 
|
Finding a Balance Remember when I said not to worry if you go a bit too far? Here's where you can bring back a hint of what you just took away. This is also where working on a new layer and leaving the original image in the background comes in handy. 13. | On the Layers palette, adjust the Opacity on the layer you just retouched. This allows a bit of the background layer to show through, giving just the hint of the original wrinkles (see Figure 2.8).
Figure 2.8. Looking younger, but not too young. 
|
Note This is purely a matter of personal taste. I found an Opacity of about 83 allowed just a hint of the original to show through without undoing all my hard work.
Our subject is looking much younger. Erasing the wrinkles, however, has enhanced the prominence of another flaw. See the blemish on the right cheek? Let's see what we can do about it. Click the Makeover tool and then select the Blemish Fixer from the tool options. Choose a size that's just a bit larger than the blemish. Center the Blemish Fixer over the blemish on the cheek, and then click. That's it! The blemish blends into the surrounding skin. As you can see in Figure 2.9, that last little touch-up has enhanced the final result. Figure 2.9. Our final image. 
|