Using 3D Tracking Data
| 2D tracking is, of course, only the beginning of the story. After Effects added tracking prior to adding 3D layers, but as of yet it has not included dedicated 3D tracking, in which the entire scene is tracked to match a virtual 3D camera, rather than individual 2D layers. Fortunately, you can easily work with data from 3D tracking programs, such as 2D3's Boujou and RealViz MatchMover Pro. Early in this chapter, I told you about a cheat for 3D tracking in certain situations, but that wouldn't help you at all if you were trying to integrate a rendered 3D object in your scene. After Effects does not work with 3D mesh objects, of course, so the workflow with true 3D tracking usually goes like this:
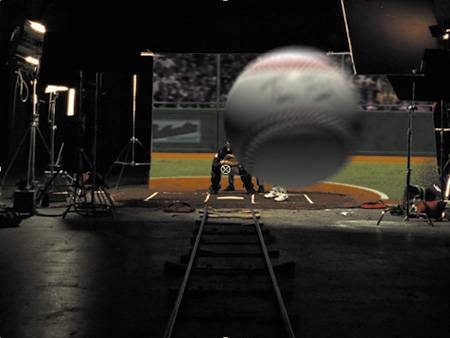
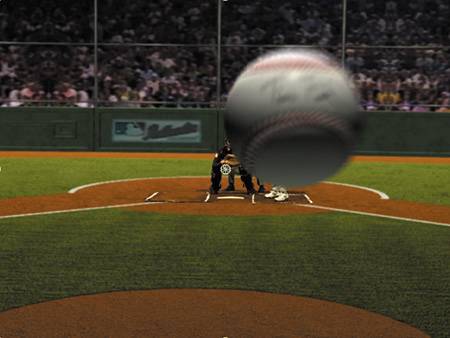
Figure 8.37 shows the final shot that resulted from the baseball plate; the camera follows the pitch all the way to the plate, where the batter hits it out of the park (of course). This shot is a complete mishmash of 2D and 3D elements. The ball, field, and front of the stands are computer generated, but the crowd was lifted from a videotape of an actual game. Figure 8.37. True 3D tracking (done in 2D3's Boujou for this shot) was essential here because the feet of the characters had to be completely locked to the computer-generated ground, and even a camera on dolly tracks wobbles and bounces quite a bit. The full shot follows the ball to the plate.
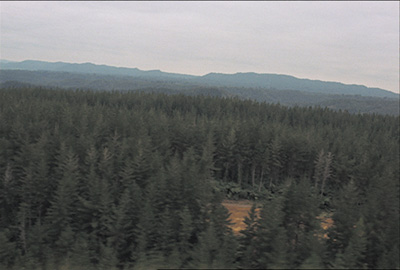
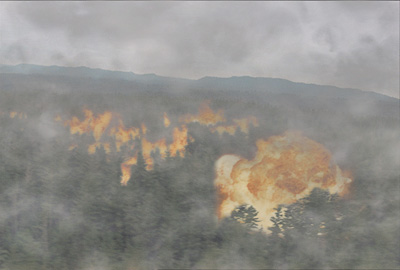
Figure 8.38 shows a completely different type of shot that also began with a 3D track in Boujou. The fires that you see in the after shot are actually dozens of individual 2D fire and smoke layers, staggered and angled in 3D space as the camera flies over to give the sense of perspective. You'll find more on this shot and how it was set up in Chapter 14, "Fire and Explosions." Figure 8.38. Just because you're placing elements in a supposedly "2D" program like After Effects doesn't mean you can't stagger them all over 3D space to give the illusion of depth, as was done on this fly-by shot. Tracking nulls from Boujou helped get the relative scale of the scene, important because the depth of the elements had to be to exact scale for the parallax illusion to work. (Final fire image courtesy of ABC-TV.)
Working with 3D Tracking DataMany people don't realize that After Effects is able to import Maya scenes (.ma files). The only elements that are imported are the rendering cameras, including all translation and lens data (even animated zooms) and nulls that are in the scene. The camera data should be "baked," which is Maya parlance meaning that it should have a keyframe at every frame (search on "baking Maya camera data" in the online help for specifics on this). 3D trackers tend not to require (or even easily allow) you to set track points manually; they create a swarm of hundreds of points that come and go throughout the shot, and they choose the ones that seem most consistent. These points can be saved with the resulting scene as nulls. If you're working with Boujou (among others), the camera solve can contain literally hundreds of nulls. This may be overkill, but some of these nulls will be very useful because they give you the exact 3D coordinates of something in the scene that Boujou decided to trackoften a clear detail on an object or the object's boundary. After Effects has the huge disadvantage of not displaying 3D grids, and these nulls can be invaluable for getting your bearings as to the proper scale and positioning of layers that you will insert into the scene.
Besides Position and Rotation data, the Camera may also have keyframes for Zoom. Keep in mind that, unless Sergio Leone has started making spaghetti westerns again, zoom shots will be the exception rather than the norm and any zoom data that you get from the 3D tracker should be checked against your camera report (or any other data you have indicating whether there was, in fact, a zoom in the shot, including your own observations). Most 3D trackers will be helped out a lot if you can tell them whether the shot was taken with a prime lens, in which case zoom is out of the question.
Importing a Maya SceneSo, how do you import a .ma scene containing 3D camera data? Just look for the file with the .ma extension. After Effects will import it and set it up either as one or two compositions: one if the Maya project has a square pixel aspect ratio and two for nonsquare (so that a square pixel version is still available as a child composition of the nonsquare one). Your camera may be single-node (in which case the camera holds all of the animation data) or targeted, in which case the transformation data resides in a parent node to which the camera is attached. Depending on your tracker and your scene, you may get too many nulls with the scene. A composition with 500 layers, even if they are only nulls, becomes quickly unwieldy, so assuming you have software (such as Alias Maya or the tracker itself) in which you can weed out the useless nulls and keep only the ones that correspond to points where you want to place objects in the scene, you can pare it down to a couple dozen (and maybe even give them descriptive names). You can usually easily make out what the nulls correspond to in the scene if you watch them over the background plate; they tend to cluster around certain objects. Keeping some of the nulls is essential because not only does After Effects not even have such basic viewport orientation tools as a visible grid, but the scale of the scene relative to the real world is quite arbitrary, as is the placement of the ground plane unless you have been careful to set it up in the tracker. Try It Out for YourselfIf you'd like to try out a 3D tracker, look no further than the book's CD-ROM. It includes a demo of SynthEyes, a reasonably priced 3D tracker from Andersson Technologies that has been used on feature films (Figure 8.39). For about the cost of a typical After Effects plug-in set, you can have your own 3D tracking software for either Mac or Windows. The demo is the full version but with a time limit, and you will not be able to save your SynthEyes projects, so you must perform and export your track start to finish before quitting. But the output data will be fully usable. Figure 8.39. This composition began as a Maya (.ma) scene file created by SynthEyes 3D tracker. The squares are nulls that were track points and that now serve as handy references for layer placement. The camera includes a keyframe on every frame (the Maya camera was baked) but only a static value for Zoom (because this flyover shot was taken with a prime lens). This scene is available for download from www.ssontech.com if you want to try it yourself.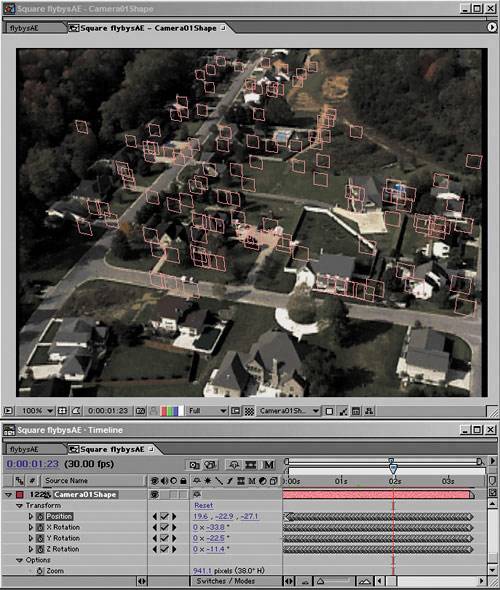 There are also sample files to try out before you create a scene of your own. You may have luck simply importing your shot into Syntheyes, clicking Full Automatic, and exporting the result as AfterEffects via .ma. If there's more involved in getting a good track, however, you will need to learn a bit more about how the software works, and it's beyond the scope of this chapter to document it. Instead, I highly recommend you take a good look at the Syntheyes online documentation, which is available from the Help menu.
|
EAN: 2147483647
Pages: 156