| It used to be that if you wanted to go beyond the rather pedestrian Color Difference Key in After Effects you had to invest in a third-party keyer, and for a few years you had two choices: Ultimatte for After Effects (now AdvantEdge, Ultimate Corporation) and Primatte Keyer (Red Giant Software, formerly Pinnacle Systems, and before that, Puffin Designs). Then with version 6.0, Adobe licensed a custom version of Keylight, a third well-known software keyer popular among Shake users, for After Effects Professional. It is still bundled with After Effects 6.5 Professional. Use of the other keyers has by no means disappeared. Personally I'm still a fan of Primatte for film keying, simply because I've been using it for so many years, and Ultimatte was a breakthrough when it was first released. Primatte is particularly valuable for situations in which preserving transparency and edge detail is critical, because it allows direct selection of edge colors to be included and excluded from the key. Keylight allows direct selection only oncewhen picking the initial color to be keyed. But Keylight has other particular strengths, such as the ability to work with poorly lit mattes, and I have known fewer users to become frustrated with it than with Primatte. Therefore, I will focus on Keylight.  | When I refer to Color Difference Key as pedestrian, I speak as someone who matted a feature's worth of footage with it, back before there were alternatives in After Effects. Its methodology is tried and true and can be replicated using channel math and Levels controls. In fact, the same basic methodology was used on some of the earliest digital composites in such blockbuster films as Terminator 2, and it's based on the optical compositing method that is as old as color film compositing itself. |
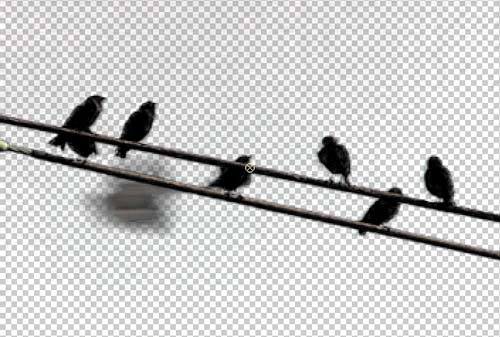
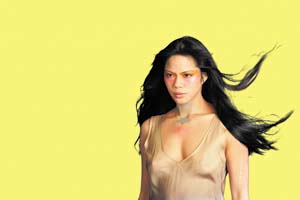
Keylight is useful in many keying situations, not just studio-optimized blue- or green- screen shots. For example, you can use Keylight for removal of a murky blue sky (Figure 6.11). You would not want to use Keylight when pulling a luminance key, however, or when simply trying to isolate a certain color range within the shot. Figure 6.11. In one pass, with no adjustments other than selecting the sky color, Keylight does a fairly effective job of knocking out the background even around the motion blurred bird in flight. The sky is nowhere near a perfect blue screen in this case, other than it's uniformity: blue saturation is around 50% and only about double the amount of red. 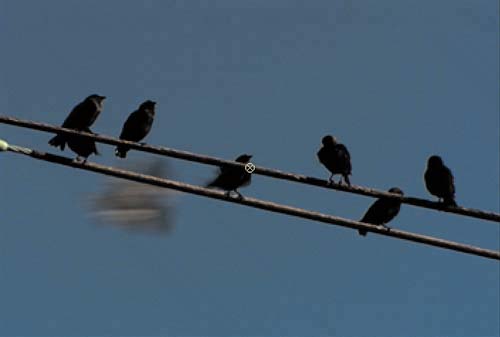
So when do you use Keylight? When your footage was shot against a uniform, saturated color background and when preserving edges is of utmost importancein other words, most typically (but not exclusively) when working with footage that was specifically shot to be keyed, against a screen of blue or green. General Methodology: Keying No two artists follow the exact same steps to key a complex shot, and no two complex shots are the same, but from all the variations you can distill a rough order of common steps for pulling a good matte, regardless of which tools you use. In the next section I'll show you how to apply some of these steps specifically using Keylight. | The gauntlet I'm throwing down is that you make a habit of breaking down your footage into separate passes. The first pass can be a hard "core" matte that fills any holes you might have in your foreground without regard to the edge, the second is an overlaid edge matte to focus on edge detail only, without having to worry about those holes. Extra passes would be masked out to work on specific problem areas. |
Don't worry about details until you get to the next section. For now, the basic steps, no matter what keyer you use, are 1. | Garbage matte any areas of the background that can easily be masked out. By easily I mean, without needing to articulate the matte and animating individual mask points or without masking the whole shotunless it's really a gnarly onefor more than about 20 minutes (Figure 6.12).
Figure 6.12. The quick-and-dirty garbage matte is your friend for eliminating unwanted parts of the stage. 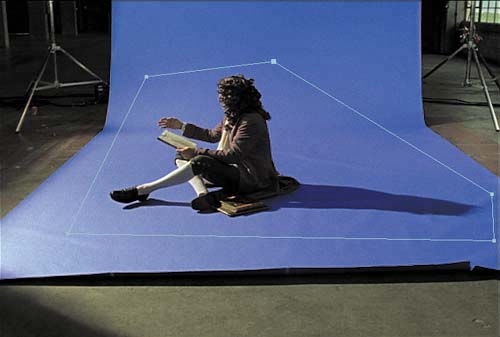
| 2. | Attempt a first pass key quickly, keeping this matte on the loose side, keeping as much edge detail as possible, with the idea that you'll be refining it later. Preview this at full resolution, in full motion, against a bright primary color. In rare cases, you will be done at this step.
| 3. | Examine the alpha channel. Switch to a view that clearly displays the alpha channel (Keylight has several ways of doing this). Note any obvious holes in the foreground or areas of the background that have failed to key out, note any noise where the foreground or background areas should be solid (Figure 6.13), and move on to Step 4.
Figure 6.13. A quick diagnosis of Keylight's first pass at this shot: A separate matte will be required to key out the underside of the leg, where there is evidently substantial reflected blue. The shadows will require separate mattes of their own if they are to be included in the key. The hair may have to be separated to retain softness and detail. 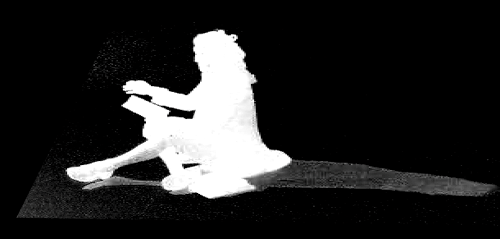
If things look too noisy and chaotic in the alpha channel or too clamped down on the edges, consider these strategies:
Start over and try again from scratch with the basic key. Apply noise reduction to the foreground image and start over (there is a section called "Noise Suppression" later in this chapter). Use articulated or tracked garbage/holdout mattes to isolate one problem portion of the footage (discussed in the section called "Fixing Typical Problems").
| 4. | Decision time about separating the core and edge mattes. If your foreground has transparent areas that should be opaque and closing them in affects the edges adversely, duplicate the foreground and solo the duplicated layer. Push the settings further to create a hard core matte, and choke it far enough in that it does not affect the edges of the other foreground layer whatsoever.
| 5. | Refine the edge. Focusing now on the edge matte, zoom in on a challenging area of the foreground edge (200% to 400%), and refine the key to try to accommodate it, using strategies outlined in the following sections. Challenging areas of the foreground whose edges you may need to carefully preserve include
Watch out for, and consider rotoscoping, foreground features that can threaten an effective key, such as
| 6. | Preview the shot in full motion. Again, note holes and noise, and now work on strategies (outlined in the "Fixing Typical Problems" section) to overcome these problems. Approaches you may employ at this stage are
Using masks to create holdout mattes, either for the purpose of keying them individually or rotoscoping them out of the shot (Figure 6.14) Figure 6.14. This is the step too many artists aren't willing to take. Most of the problems with keying this figure stem from the fact that he's seated on the floor, but that is also to your advantage, because he's not going to move much. Therefore, you could create holdout masks for separate areas to key, working individually on the body and the shadow-casting areas. In a closeup, it can be helpful to mask the hair, refining that separately. 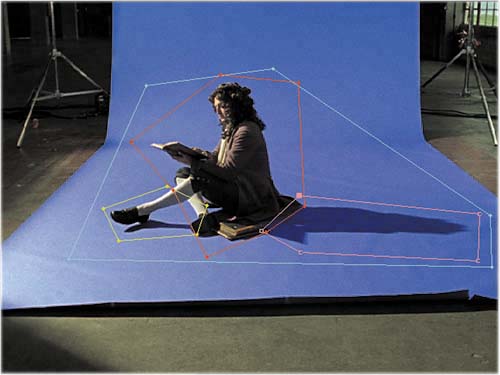
Holding out the matte edge only, for the purpose of refining or blurring it (see the section called "Edge Matting" later in this chapter)
|
That's the general approach with any keyer; the point I want to hammer home here is that trying to key a clip in a single pass is often too lazy an approach that, ironically, results in more work as you struggle to make all areas of your shot accommodate unified settings. Using Keylight Now take a look at some specifics when working with Keylight. The very most important of the Keylight parameters, in all cases, is the Screen Colour selection (Keylight reveals its UK origins with that u). Choose wisely, and you have a shot at getting your footage to key in one pass. Choose poorly, and you'll be fighting an uphill battle from here onward. More about what this selection does appears in "The Inner Workings of Keylight," later in this chapter. In the best case scenario, after creating any basic garbage mattes as usual, your steps will be 1. | Use the eyedropper to sample a pixel in your background that you believe is roughly the median of the background. The view defaults to Final Result, so you can immediately examine the result of this one choice. (Remember to set your background to a bright color and solo the layer.)
| 2. | If you think there is any chance of getting a better initial result, switch to the alpha channel (Alt+4/Option+4), reset Keylight (do not undo) or switch the view to Source, and select again. Repeat again if you like. Now you have as many as three attempts saved in your undo buffer. If you're getting a pretty good result, you can accept a loose matte, but if not, look for the one that seems to have eliminated the most unwanted background (Figures 6.15a, b, and c). If necessary, examine the alpha channel of the soloed layer (Alt+4/Option+4).
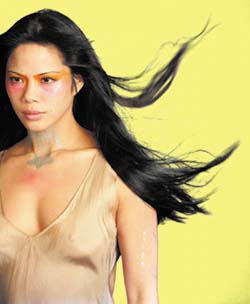
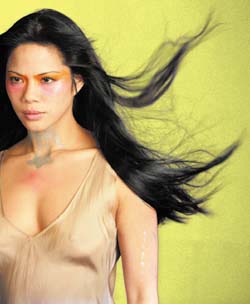
Figure 6.15a, b, and c. Even with source footage as well shot as this (6.15a), you will get very different initial results depending on whether you use the eyedropper to sample color at the low-lit edges (6.15b) or in the well-lit center of the image (6.15c). Zooming in on the wispy hair over a bright color shows the difference clearly: You want that extra detail, but you don't want that matte line along the arm. (Source image courtesy of The Foundry UK.) 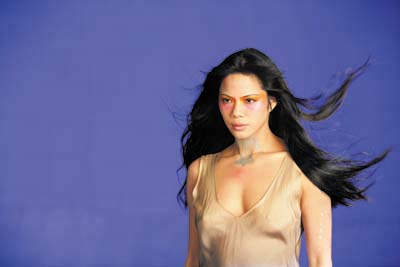
|
| Why not take snapshots of each attempt? You can (Shift+F5 to F8 to take snapshots, hold down F5 to F8 to see them), but the method described holds each pass in your undo buffer; the idea is to be able to recover the one you like. |
Now, as needed, you look for areas that could use refining: 1. | Switch the view to Status in the View pull-down menu. This reveals the pixels that are fully opaque as white, those that are fully transparent as black, and those that are in-between as gray (Figure 6.16). It's like an exaggerated version of a normal alpha channel view. Try Screen Balance at settings of 5.0, the default 50.0, and 95.0, and choose whichever one yields improvement (more on this in the next section).
Figure 6.16. Moving forward with the matte from Figure 6.15c, Status view shows lots of gray areas, with semitransparent pixels, in the background, but not many on the foreground figure other than where you want them (in the hair). This is a good initial result. 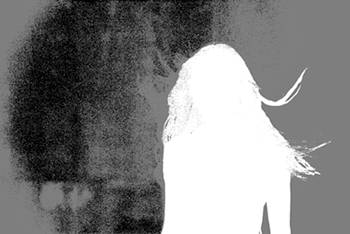
| 2. | If there are gray semitransparent pixels in your background, boost the Screen Strength setting until the gray is mostly gone in Status view. Try to preserve any gray that is at the edges of your foreground. If gray remains in the background, but away from the edges of your figure such that you can easily garbage matte it, do that (Figures 6.17a, b, and c) if you want to preserve maximum edge detail, or if it's not costly to do so, tighten the matte at this point by raising screen strength.
Figure 6.17a, b, and c. Screen Strength has been raised to remove the gray. At this point it's an artistic decision whether to go with the loose matte (6.17a) and garbage matte out the noise in the corner, which doesn't affect the edge, or go for the tighter matte (6.17b), which still gives a very good result with lots of wispy hair preserved (6.17c). 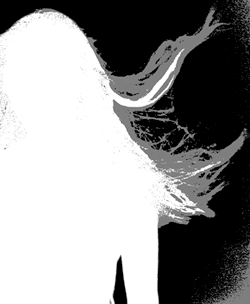
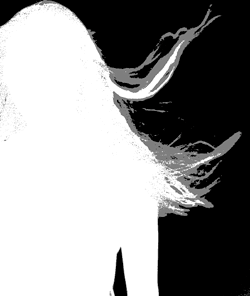
The footage used in Figures 6.15 through 6.17 was nearly perfectly shot, and although the footage includes flowing hair, which is a challenge, it does not include the floor, which is usually more of a challenge. The final step for this image is to raise the Despill Bias and with it, the Alpha Bias, which affects the matte, so recheck Status for holes. Raising it slightly reduces the blue matte line on the arm. In this ideal scenario, you are done without ever having gone beyond the first five controls at the heart of Keylight (Figure 6.18).
Figure 6.18. These controls make up the core of Keylight. Everything else is there only to compensate for footage that was not well lit, shot, recorded, or transferred. 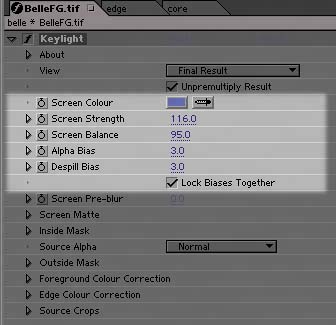
At the opposite extreme is the nightmare scenario of Newton seated directly on the blue stage in his white stockings, whose Status setting with a high Screen Strength boost reveals quite a few more problems (Figure 6.19).
Figure 6.19. Ouch. All of those grays in the foreground figure are the result of reflected blue, due to the actor being seated on the floor. Why didn't Newton pack a picnic blanket? 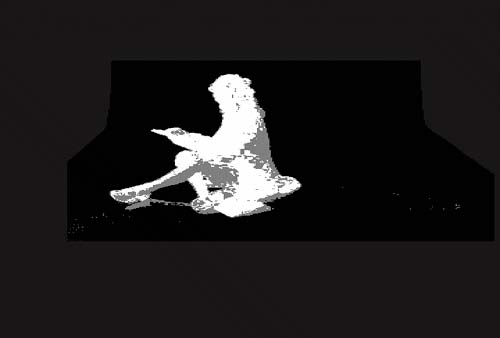
If your shot also now contains some unwanted transparent areas in the foreground areagray pixels amongst the white in Status viewthis is an opportunity to shortcut the process by creating one or several core mattes. The Newton example is complicated by the shadows on the floor, so concentrate first only on the main body holdout area (from Figure 6.14).
| 3. | Duplicate the layer with Keylight applied, so that the initial settings are now held by two layers, and solo the duplicate. You can rename the new layer core and the original layer edge. Press F3 to make sure the core Keylight effect is displayed in the Effect controlsyou don't want to adjust the wrong one!
| 4. | On the core layer and still in Status view, twirl down the Screen Matte parameters. Adjust the Clip White value down until you start to see a matte that consists of entirely black pixels in the background, fully white pixels in the foreground, and gray pixels at the edges of the foreground. You may see some green coloration appear as well, which indicates pixels that had some of the background color in them that Keylight will replace (Figure 6.20). If areas of gray have reappeared in the background, raise Clip Black to eliminate them.
Figure 6.20. Even with the problematic shadow and leg areas held out, the figure's torso requires a fairly heavy Clip White adjustment, resulting in a lot of green areas. These are warning you that the color in these areas may be contaminated by the background, which can be remedied with the Replace Colour control. 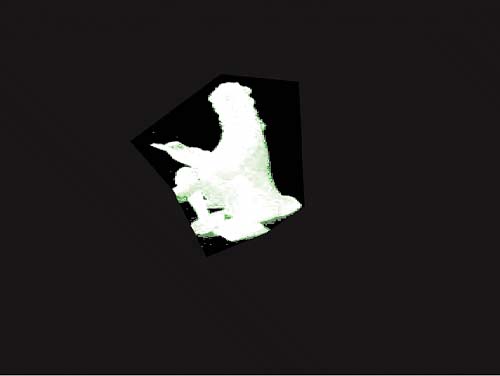
| 5. | Choke the core matte. Turn on soloing for the edge matte as well, set both to Final Result, and toggle the core matte on and off in RGB and Alpha view. You will probably notice that it changes the appearance of the edge, thickening it in an undesirable way. Use the Screen Grow/Shrink control in Keylight to shrink the matte (using positive values) until you can toggle the core matte on and off and see no effect on the edges whatsoever; only the holes fill in. Be liberal here: Make sure that your core matte has no edge data in it anywhere; it's not atypical to have a setting of 2.0 or more.
| 6. | Preview the clip in motion over the bright background. Note any problems you see with the edges; the next section focuses on methods to refine them.
|
| Keylight includes its own controls for adding holdout areas to mattes via the Inside Mask and Outside Mask controls. The way it works is that you draw a mask, set it to None, and then select it under Inside Mask or Outside Mask. It's an optional replacement for doing fills and garbage mattes on a separate layer. |
At this point, you should have succeeded in eliminating any holes in your foreground. If you divided your image into separate holdout areas, as in the Newton example, you repeat the same process for setting up a core and edge matte for those layers. From that point, all the work left to do is on your edges alone, which is where you want to be able to focus your efforts. |