| Before I get into detail about specific keying methods and when to use them, I want to mention some useful bits of advice that apply no matter which technique you choose: Get used to soloing your foreground against a brightly colored background as you work in After Effects. This will generally mean setting the background of the composition (Ctrl+Shift+B/Cmd+Shift+B) to a saturated yellow, red, orange, or purple (Figure 6.1). Choose a color that is distinct from both the foreground you are keying and the shot's existing background. If the foreground is going to be matted into a dark scene, you can use a dark shade, but in most cases you'll want it fairly bright to contrast with your foreground, showing any holes in the matte, or edge problems and noise in the background (Figure 6.2). Figure 6.1. Your choice of background influences what you see. Against the default black, almost no detail is visible. With the checkerboard turned on, you can begin to see some flaws with the shadow. These flaws become clearer with a bright, solid, contrasting background. (Newton source images courtesy of Tim Fink Productions.) 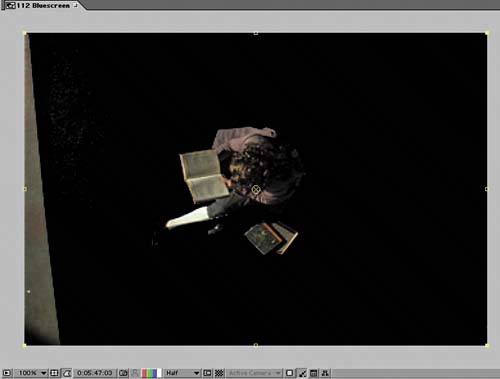 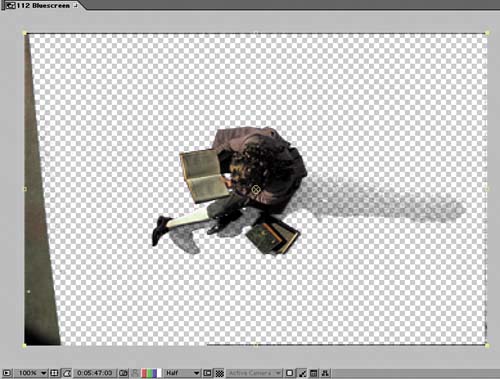 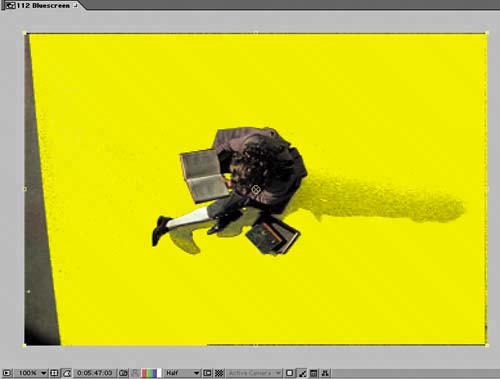
Figure 6.2. The keyed layer can be soloed at any time, revealing it against the background of your choice. 
When isolating a foreground, protect edge detail at all costs. Unless you're in a situation where your edges won't show up clearly, the game here is basically the same whatever tool you use: Solidify the opaque areas of the foreground, erase the background areas, but don't overdo either or your edge will suffer. Pushing edge pixels too far makes crunchy, chewy mattes (Figure 6.3). Figure 6.3. Attempts to firm up the edges of the shadow result in a matte so crunchy, you'd think it was still set to Draft quality. 
Keep it simple, and don't be afraid to start over. Particularly with the more sophisticated keyers, such as Primatte and Keylight, there are enough variables that you can easily overadjust your image to the point where you can't bring back detail that is already lost, try as you might, because too many different adjustments are fighting one another. As with rotoscoping (Chapter 7, "Rotoscoping and Paint"), there is something very Zen about keying: You can only explain so much before intuition and common sense about what you're dealing with have to kick in, or you'll fight endlessly with your shot. This is one case where throwing in the towel and starting over can save you an hour or two. Get used to zooming in and looking hard for problems. Don't spend all of your time on a single frame of the shot, and if possible, find a difficult frame to start onone that has motion blur or one in which a little gust caught the character's wispy hair. That way you'll avoid nasty surprises after a lot of hard work. Also, even when you're on a single frame, use different methods to keep looking around the frame. Keep the Info window prominent as you scan around the background, noting whether the alpha values of the background are truly at zero, zoom in and out, and flip between the alpha and color channels (Figure 6.4). Figure 6.4. Enabling the alpha channel can reveal all kinds of other problems. The settings here are the same as in Figure 6.1. 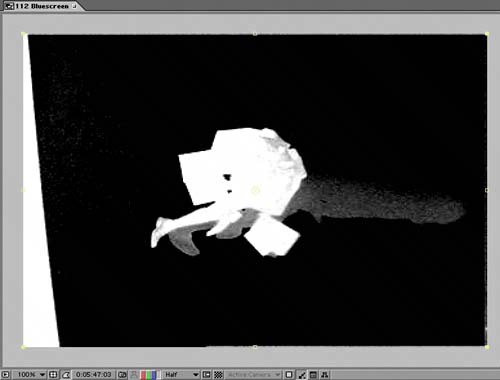
Be prepared to combine multiple passes. This is probably the most important step that too many artists try to skip, thinking it's simpler to get everything in one pass. One common misconception with keying is that it's an automated process: You click a couple of buttons, and you're done. That can be true, on the rare occasions when the source footage is perfectly shot for keying. Even on a big-budget blockbuster, however, this happens only on the most straightforward of medium close-ups. In many cases, it is useful to create a core matte whose foreground is 100% opaque before refining the edges on a second pass. I'll describe this is in detail later in the Keylight section.
With these basics in mind, read on to learn about the various strengths of your keying options. I also urge you to revisit this list of best practices when it comes time to apply a key to your own shot, especially if you're new to keying. |