Adjustment and Guide Layers
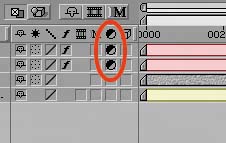
| As you may already know, versions 6.0 and 6.5 of After Effects introduced two new layer formsadjustment layers and guide layersthat are easy to use and seem simple enough on the surface. Each has vitally useful applications, however, that might not occur to you immediately. They deserve a second look. Adjustment LayersAny layer in your timeline can become an adjustment layer. An adjustment layer is itself invisible, but the effects applied to it affect all layers below it in the stack. This an elegant, profound feature too often overlooked, perhaps because it is fundamentally so simple, yet it can be employed for many uses. To convert a layer to an adjustment layer, toggle the feature in the Switches column (Figure 4.9). The best approach, however, is usually to create a new layer specified as an adjustment layer from the get-go. Simply add a solid set to the size and duration of the comp, and toggle it to be an adjustment layer. Figure 4.9. You can convert any layer, except a camera, to an adjustment layer by toggling this switch. Creating a new adjustment layer simply creates a white solid the size of the comp with this switch toggled on.
That's easy enough. So what's so cool? What can you do with Adjustment layers that you can't with normal effects? For one thing, you can dial them back using Opacity. An effective quick fix, this is the equivalent of a dissolve operation in a node-based compositing application. Most effects do not include the ability to be dialed back, even though it makes intuitive sense to do so. For example, you colorize footage with the Hue/Saturation effect. You are then asked to dial back the color 50%. What could be simpler than setting the Opacity for an adjustment layer with this effect to 50%?
You can also matte or mask adjustment layers, delineating specific areas for the layer's effects. This often enables you to avoid pre-composing, which would otherwise be the only way to apply an effect to selected layers of a composition. Instead, you only need a track matte layer that contains the necessary transparency information; it could be a separate composition containing only those layers (Figure 4.10). Figure 4.10. The split image shows the result of pulling out luminance highlights by applying a contrasty layer as a luma matte of itself and adjusting Levels on the matte layer to get the right density. This technique is also effective for pulling out the highlights of a layer to emphasize, colorize, or soften and bloom them.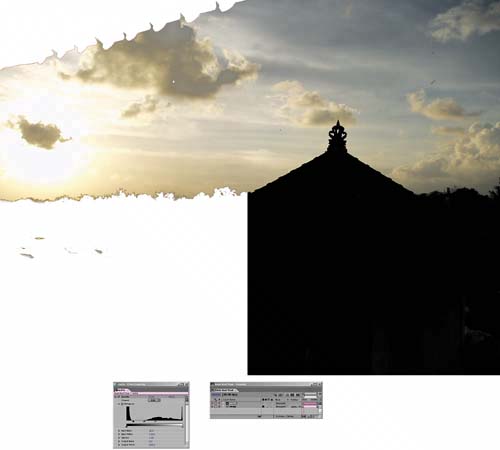 Guide LayersLike adjustment layers, guide layers are normal layers that have been toggled to behave differently. In this case, guide layers appear in the current composition but disappear in any compositions into which their original comp is nested. They, therefore, remain invisible in the final render (unless you specify otherwise). The most common use for this feature is when you want to see an element against the final background footage in a subcomp, but you don't want to have to worry about whether you'll remember to turn off the background when you're done using it. You can toggle any type of layer into a guide layer either by context-clicking it or by choosing Guide Layer from the Layer menu. Within the current comp, you'll notice no difference (Figure 4.11). You can still apply effects to this layer or have other layers refer to it, and it is fully visible. Nest this composition in another composition, however, and the guide layer disappears. If you decide you want guide layers to appear at render time, there is an option to do so in the Render Settings. Figure 4.11. Don't let your take be ruined by careless errors! Setting a checklist as a guide layer that blocks your render comp guarantees that it won't show up in your final render, but helps you to remember what to double-check. This is just one of the many creative uses for guide layers.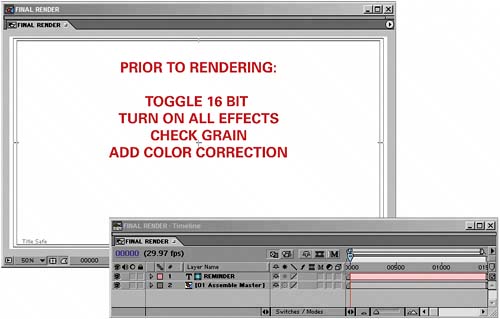
|
EAN: 2147483647
Pages: 156