Sci-Fi Weaponry
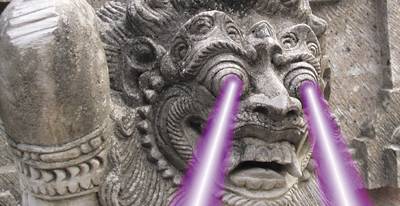
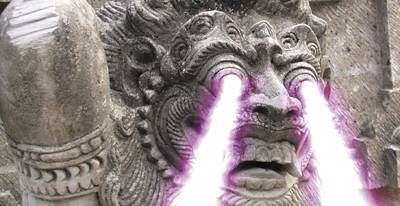
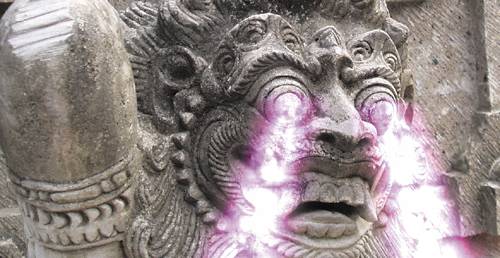
| Science fiction has long foreshadowed reality, so no one should be surprised if we eventually have weapons that resemble the blasters and lightsabers in Star Wars or the phasers and photon torpedoes in Star Trek (and as an ex-Lucas employee, I'm highly attuned to the distinctions among these). In these weapons of pure energy there are recognizable resemblances to phenomena from our own world: high-powered lasers and high-voltage electrical arcs. The basic effect is so easy and well known that I almost hesitate to include it, but in the spirit of creating your own effects rather than relying on plug-ins, I'll give it a brief nod. At this point these are virtual clichés of science fiction, but you certainly can customize them with your own additions to the basic formula of a hot white core surrounded by a luminescent glow. Full ControlA couple of effects in the Render category of the Effects menu automatically create an element with a core and a surrounding glow. For your basic blaster or lightsaber effect, you might be tempted to reach for Beam. And why not? As usual, with a canned effect you are surrendering artistic control for convenience, letting go of an opportunity to stand out a little bit with your attention to detail. In this case, it's things like the shape of the element and the softness of the glow that you can't customize. The result doesn't even look as good as the originals from almost 30-year-old movies, probably because those were done painstakingly by artists by hand. Anything you do in After Effects is going to be a lot easier than hand-rotoscoping lightsabers, I can almost guarantee it. Figures 14.11a, b, and c compare the limits of Beam with a simple method that gives you more control. The steps are
Figure 14.11a, b, and c. Using the Beam effect at anything like its default is a straight-up no-no (14.11a)it's cheesy. The same settings with Add mode at least give the right feel (14.11b), but you have no control over the look of the core or the glowit's WYSIWIG. Turn the white core and purple glow into separate elements, combined in Add mode, and you start to get a look you can actually dial in how you like (14.11c).
It's what you do next that makes it cool, and you have more options than you might think:
Of course, I'm assuming you have free reign to do whatever you want. Even if you don't, you can still make suggestions. You never know, sometimes you might try something, and it sparks more ideas and gets other people excited. Full DimensionalityThere is one way in which poor Beam does trump the approach of making your own effect in After Effects: It can approximate perspective (as shown back in Figure 14.11a). It's a total cheat that doesn't respect After Effects' 3D space at all. It's just a by-product of changing the start and end points to an angle, but it was done to offer a cheap way to send a blaster shot across the room. So take the good and leave the bad. Use Beam as your core generatorjust turn off its outer glow and make your own. Or add your own in addition to Beam's, like a triple-layer glow. There's no reason to abandon ship and head for the nearest 3D package simply because you couldn't see a way to do what you wanted with the default plug-ins, now is there? Or why knock 3D animation software if you've got it? Create the craziest, most dynamic animated core effect you can devise in Maya (Alias) or 3ds max (Discreet), render it in a couple of passes for the core and glow layers and integrate it with your scene. Or use one of the lightning effects in After Effects as the basis for your energy bolt. Lightning is cruder but animates automatically. Advanced Lightning requires you to keyframe it to animate, but it has many controls and can even wrap around matte areas using the rather tricky Alpha Obstacle feature. The point is this: No one is asking you to be clichéd. Even if you're doing a straight parody, the world wants to see something new and interesting. The way to get there in After Effects is to keep thinking of fresh ways to combine the tools you've got. |

EAN: 2147483647
Pages: 156