Showing the Life of an Object
Your objects are not just some data combined with a few functions that use the data. They are so much more—an object has life. For example, an order entry system has accounts that customers use to pay for the products they order. In this system you create an object such as CustomerAccount and then invoke operations like open to open the account. Sometime later you may have to remove that object. (For example, when a customer account is no longer active it gets deleted.)
The values for each attribute of an object are hidden inside the object. So, your objects have a memory. When you invoke a function in a programming language that isn’t object-oriented, the function remembers nothing about the last time you called it. You must feed it all the data it needs to do its job. On the other hand, an object can remember what has gone before in its life. You cannot (for example) invoke the withdraw operation on CustomerAccount before you invoke the open operation. The CustomerAccount object must remember whether it’s open or not before the withdrawal can be performed. Because a thorough modeling of your system should take this memory capability into account, you need a way to show the life of an object.
Documenting object behavior and events
We recommend that you use UML’s state-diagram notation to keep track of what your objects are doing over time. A state is some major behavior that an object performs while time passes. A state diagram depicts the proper sequence of an object’s behavior that result from some event over time. With UML, you use states to show what an object is doing and when it is doing it.
There’s more to an object, however, than just the behavior it performs while in a state. You stimulate your objects’ behavior with events. In general terms, of course, an event is a moment in time when something of importance happens. In UML, you use event notation to describe that important moment. When you stimulate an object by notifying it of an event, the object reacts to that notification according to its current state. For example, a customer account responds to the open event by validating its associated credit card. But it only does this when the object is first initialized—not at any other time. If you try to open an account after it’s already open, nothing happens.
Remember An event describes a moment in time. From an object’s point of view, an event is a stimulus that causes a change of behavior. A state (by contrast) describes some major behavior an object performs in response to an event. Time passes when an object is in a state, but events take no time at all.
As your objects become more complex, you describe their states—and the events that affect them—by using state diagrams. The notation is pretty simple:
-
States: States are shown as rounded rectangles. Take a rectangle, round off its corners, and you have depicted a state. Place the name of the state in the middle of the top part of the rounded rectangle.
-
Events: Any event that causes an object to make a transition from one state to the next is shown as a line with an arrow connecting the two states. Place the name of the event close to the line that represents the transition. The arrow on the line shows the direction of transition, from the original state to the next state. The line that connects two states as a result of an event is called an event transition.
You will almost always have to include a couple of other specialized states—the initial state (your object’s starting point in life) and the final state (your object’s final resting point).
Constructing state diagrams
Building state diagrams is all about considering when behavior happens within an object. State diagrams—including events that indicate the arrival of important moments and states that indicate what happens as a result of those moments—show the flow of control within your objects.
Here are the steps we use when building a state diagram:
-
Choose one class and focus on the life cycle for all objects of that one class.
For example, choose CustomerAccount.
-
Start your state diagram with an initial state in the upper-left corner of the state diagram.
Show an initial state as a large solid dot with an event transition coming from it. After you identify the first major state of your class you can connect the event transition from the initial state to that first major state.
-
Identify events.
Think about what causes your object to change its behavior—to stop doing one thing and start doing another. You’re looking for important moments in the life of your object.
The CustomerAccount example has the following events: open (open an account), validated (the account has been checked to make sure everything is okay), passed (the trial period for the account is finished), renew (it’s time to renew the account), and close (the account needs to be closed).
-
Think of what the object spends its time doing in response to the events you identified in Step 3.
Develop a list of these major chunks of behavior (that is, put a name to these states) where time passes for your object.
The CustomerAccount spends its time doing the following:
-
Validating its credit card.
-
Staying OnTrial while the customer maintains a positive balance and pays their bills on time.
-
Staying Established while the customer may have momentary negative balances and stretch out the payment of bills.
-
Renewing the customer’s account on a regular basis.
-
Archiving all information associated with an account that is closed.
-
-
Order the list of states:
-
Initial state: Ask yourself if there is a state that must come first before any others, such as Validating in the CustomerAccount example.
-
Intermediate states: Look at the other states and see which ones must come before or after other states. In the CustomerAccount example, OnTrial comes after Validating and before Established. Renewing comes after Established. Established comes after OnTrial and before Archiving.
-
Final state: Check to see whether there is a state that must come last, such as—Archiving in the CustomerAccount example.
-
-
Place your states in the diagram, ordering them from top (initial state) to bottom (final state) as developed in Step 5.
-
Add the events identified in Step 3 as lines that connect the states.
Use arrowheads on the lines to indicate the directions of the transitions from one state to another.
-
Determine when the object is removed from your system.
-
Ask yourself, What state your object must be in before you can delete it? What event occurs to tell your object that it’s time to go?
-
Our CustomerAccount must be Archiving before it can be deleted. When the account is saved, then the account can be deleted from the system.
-
Place a final state on your diagram and show the transition that brings an object from other states to this final state.
Show the final state as a large bull’s eye symbol. Draw event transition arrows from all the states where the object can be deleted (determined in Step 8) to the final state’s bull’s eye symbol.
A state diagram does not have to have a final state. So, you may not have to perform Step 9 for your state diagram.
-
Abnormal events: After you have a basic state diagram for your object, think about the times when things go wrong.
Ask yourself whether your object is notified, at some points in time, of any cancel, abort, or error events. Add the states that result from these abnormal events and provide the appropriate event transition. For example, while our CustomerAccount is OnTrial, the account may fail and have to make the transition to the Canceling state. After it’s canceled, the account must move on to the Archiving state.
-
Step back from your diagram and check to make sure it makes sense.
This is the life cycle of your object. Verify that the object performs its behaviors in the right order.
Remember You use a state diagram for all the objects that belong to one class. So when you are building a state diagram for a class, consider the behavior of all possible objects of that class.
Figure 16-1 illustrates a simple state diagram for the CustomerAccount object. The following steps will help you trace through and understand the diagram:
-
We start off with a large dot known as the initial state.
-
When the open event happens, the CustomerAccount goes into the Validating state.
-
After the account is validated, then the object transitions to the OnTrial state.
-
At this point, if the passed event happens, the CustomerAccount becomes Established. However, if instead the fail event happens the CustomerAccount goes into the Canceling state.
-
If the CustomerAccount finds itself in the Established state, it can be renewed or archived.
-
Only when the renew event happens can the object then perform the Renewing behavior.
-
The renewed event is the only event that makes the CustomerAccount transition out of the Renewing state.
-
If the close event happens while the CustomerAccount is Renewing, then that event is ignored. The CustomerAccount will not transition to another state; it will continue doing the behavior of the Renewing state.
-
If the account is in the Established state and it receives the close event, the account performs the behavior associated with the Archiving state.
-
If the object is in the Canceling state and it receives the canceled event then the account will transition to the Archiving state and perform the archive behavior.
-
When the saved event occurs while the CustomerAccount is in the Archiving state, then the object moves to its final state. (The final state is shown as a bull’s-eye at the bottom of Figure 16-1.)
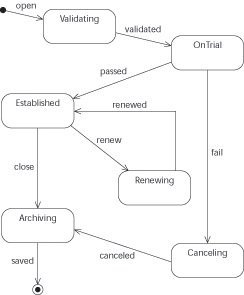
Figure 16-1: Simple state diagram.
Exploring different types of states
The states you use for your objects come in several flavors—wait states, constraint-based states, ongoing-process states, initial states, and final states. Earlier in this chapter, we told you about a couple of especially important states—the initial state and final state, the starting and stopping points in an object’s life.
The other three important kinds of states are:
-
Wait states: In these states, an object simply waits for an event to happen. The object doesn’t do anything really important while it’s waiting for something to happen. A credit-card object (for example) waits until it’s asked to either validate itself or handle a charge against itself.
-
Constraint-based states: In these states, an object behaves in a certain way according to the values of its own attributes—or according to the links it maintains with other objects. The credit card is in the expired state when the value for its expired-date attribute is earlier than today’s date.
-
Ongoing-process state: This type of state occurs when your object is performing some behavior that is ongoing. The object leaves this state when some other significant event occurs. Otherwise, the object will continue doing this ongoing process. The credit card remains in the validating state until it’s validated.
After your object has entered a particular state, it may perform some behavior that takes time. Such behaviors are known as activities. In UML, you show an activity inside a state with the word do, followed by a slash (/), which is in turn followed by the operation that denotes the behavior being done while in the state. For example, when an instance of the CreditCard class goes into the Expired state, the card must notify the bank that it has expired. The notation for this activity is do / notify(Bank).
Name your states by using either an adjective phrase or a verb phrase. If your state is constraint-based, give it a name that describes the values for the required attribute and/or links. (Expired is just such a name—it describes the value for the validDate attribute.) For states that represent ongoing processing, use a phrase that has an “ing” verb in it. (Debiting and Validating describe ongoing processes for the credit card.)
Tip Objects wait a lot. You will have objects that just wait around for some event to happen. After the event occurs, the object makes a transition to a separate state, performs some important job, and then makes the transition back to a state of waiting.
Transitioning from state to state
An event stimulates your object to make a transition from one state to another. When you show a transition, you can also specify some details as part of the event:
-
Information: Sometimes, when your object is notified of an event, you also have to pass some information to the object as part of the event. You show this in UML by following the name of the event with the information being passed (and enclosing the information in parentheses).
For example, suppose a credit card is told it’s time to make a charge to the card. At the same time the card must be told the amount to charge. The notation would look like charge(amount), as shown in Figure 16-2.
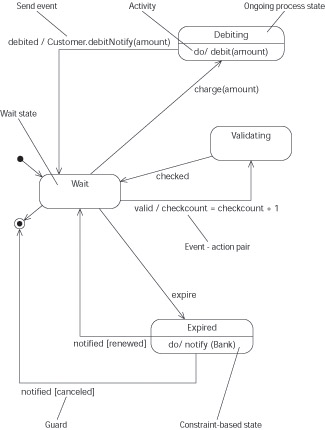
Figure 16-2: Object with three types of states. -
Actions: If you want your object to perform some very small operation when it receives an event, you can show that procedure on the event’s transition line. Such a simple procedure is called an action. We use actions for simple counting, resetting variables, initializing some value, sending a message to another object, or performing a quick calculation. Use a slash (/) after the event’s name and just before the action to indicate your procedure.
For example, suppose that when a credit card is checked to see whether it’s valid, the card must keep track of how many times it has been checked. The notation for this example of an event/action pair looks like this:
valid / checkcount = checkcount + 1 -
Guards: A guard is used to check some condition when an event happens. If the event happens and the condition is true, then the object transitions to the next state. However, if the event happens and the condition isn’t true, then the object doesn’t make the transition. Show guard conditions in square brackets on the respective event transition line right after the event name.
When the credit card notifies the bank that it has expired, the bank notifies the card of its status. If the status is renewed, the card goes back to a wait state. If the card status is canceled, then the card makes the transition to its final state. The UML notation that describes these two guard conditions looks like notified[renewed] and notified[canceled].
Often your object sends an event to another object to notify it that some important moment has arrived. The sending of events is treated just like any action that takes place during a transition: You show the event’s name followed by a slash (/), and then follow that with the name of the class and the operation taking place in that class. For example, after the an instance of the CreditCard class receives the event that tells it an amount is successfully debited, the card must tell the Customer how much was debited. The UML notation for sending this event looks like this: debited / Customer.debitNotify(amount).
Remember Events take no time. Therefore actions trigged by events take no time.
Technical Stuff You might be thinking, How can an event take no time when everything on a computer takes at least a little time? Well, in practical terms, events do take a negligible amount of time. However, even if events (and their corresponding actions) take measurable time on some clock somewhere, they are not interruptible. No ongoing process or incoming event can occur that prevents these events/actions from completing. If, at some lower scale of the system, interruptions (such as clock ticks or screen refreshes) are going on, they are not noticeable, nor do they prevent the events/actions from completing.
EAN: 2147483647
Pages: 193