| A container class is one that can host other graphical objects. In this chapter, you will learn how to use the major AWT containers. (You will learn how to use the other major container classes, the Swing containers, in Chapter 16, "Swing.") Containers are interesting because they can be placed inside other containers recursively. The primary container classes are Applet An applet is a container that runs Java in a browser. Frame A frame is a top-level window with a title and a border. Panel A panel is a rectangular space where you can attach other components, including other panels. ScrollPane This is a Panel class that automatically implements both a horizontal and a vertical scrollbar. Dialog A dialog is a window that pops up and enables the user to receive a warning or confirm an action such as an exit.
We will cover these containers first, and then use them in later examples to learn about the components that they can host. Applets In the age of Web Services and Java 2 Enterprise Edition (J2EE), it is hard to remember that Java was originally intended to be an applet-centric language. The ability to create applets using Java was not nearly as interesting to the developer community as some of Java's other qualities. Java is a simple, portable, object-oriented programming language. These features appealed to programmers who were tired of having to make major modifications to their programs when porting them to another platform. In the last few years, server-side Java development has grown so much that there are many Java developers who have never written a production applet. There are some good things about applets though. For example, they are more powerful than HTML alone. In addition, they are distributed automatically with the HTML document, so there is no need to store them on a client machine. On the downside, the security manager that ships with the JVM limits applet access to the user's machine severely. This reduces the number of useful things that an applet can do on the client machine. In addition, because applets are downloaded every time the HTML is downloaded, they must be kept fairly small in size to keep from slowing the user's download time too much. Applet development might seem a little strange to you at first because you don't actually write applets; you extend them. The java.applet.Applet class provides all the functionality necessary to communicate with the browser's Java Virtual Machine (JVM). Your job is to override certain key methods to add behavior that meets your requirements. The combination of these parts is shown if Figure 13.1. Figure 13.1. The Applet class provides all the communication between the applet code, the JVM, and the browser. 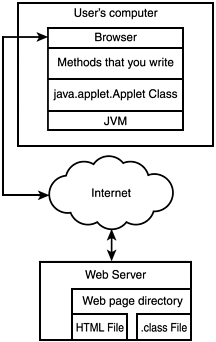 The java.applet.Applet class is installed in the JVM, which is part of the browser. When the browser receives the HTML file from your Web server, it notices the applet tag and downloads the .class file for your applet also. Your applet will contain one or more overrides to the Applet class's method calls. The JVM will call your versions of these methods instead of the Applet class versions while it is loading and running your applet. Running Applets It is possible to write a simple applet in a very few lines of code. Listing 13.1 shows a trivial example. Listing 13.1 13.1 The HelloApplet Class import java.awt.*; import java.applet.Applet; public class HelloApplet extends Applet { public void paint(Graphics g) { g.drawString("Hello, Applet", 10, 10); } } import java.applet.Applet; Caution  | Some versions of the JDK can cause conflicts with some versions of Microsoft's Internet Explorer. If you experience difficulty, try downloading the latest released versions of both the JDK and IE or alternatively, you can run the applet in Netscape. |
This is about as simple as an applet can be while still doing something. The only instruction that we are giving it is to place the string "Hello, Applet" in the applet. Browsers expect to run HTML files, not applets. To run this applet, we need to provide an HTML file that contains a reference to this applet. Listing 13.2 shows an HTML file that contains a reference to this applet. Listing 13.2 The runHelloApplet.html File This is the Hello Applet <applet code=HelloApplet width=200 height=200> </applet> The applet tag tells the HTML processor in the browser that an applet has to be downloaded from the same place the HTML file came from. The width and height determine the boundary for the applet. To run an HTML file that contains an applet you have several choices. The first is to open a browser and type the full path and filename in the address line like this: C:\com\samspublishing\jpp\ch13\runHelloApplet.html Alternatively, if your computer has a Web server running on it, you can place both the HTML and the applet's class file in the special directory that your Web server documentation specifies and type the following in your browser's address line: http://127.0.0.1/runHelloApplet.html In either case, the result of running the runHelloApplet.html file in a browser is shown in Figure 13.2. Figure 13.2. The HTML file downloads the applet automatically. 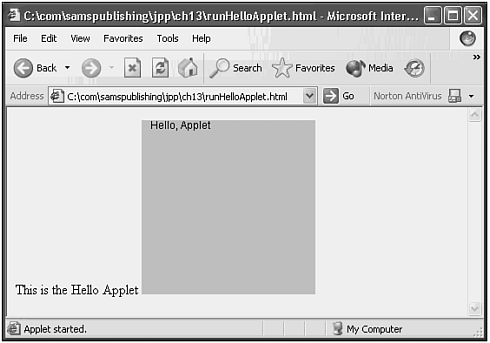 The gray section is the area covered by the applet. Gray is the default color for applets. The phrase "This is the Hello Applet" is placed in the browser window by the HTML code. The other phrase "Hello, Applet" is written in the applet area of the browser window by the applet code. Caution  | Many browser versions cache old HTML pages and applets in mysterious ways. If you make a change to an applet and recompile it, you might not see the new version of the applet when you click the refresh button. If you still see the old version, close all instances of that browser and open it again. When you type the filename or URL, the new, changed version should appear. |
Although applets are not the primary focus of Java's direction at present, they can be used to create some interesting looking Web pages. Frames The Frame class is the container most used when creating Java applications. Even when we create Panels and ScrollPanes, we typically place them inside a Frame for display. A Frame is an extension of the Window class that adds a title and a border for resizing. There are two ways to create a Frame object from your Java class. You can extend the Frame class, or you can declare a Frame in the main() method. Listing 13.3 shows how to create a Java application by extending the Frame class. Listing 13.3 The FrameExtender.java File /* * FrameExtender.java * * Created on July 29, 2002, 3:15 PM */ package com.samspublishing.jpp.ch13; import java.awt.*; import java.awt.event.*; /** * * @author Stephen Potts * @version */ public class FrameExtender extends Frame { /** Creates new FrameExtender */ public FrameExtender() { addWindowListener(new WinCloser()); setTitle("Just a Frame"); setBounds( 100, 100, 200, 200); setVisible(true); } public static void main(String args[]) { FrameExtender fe = new FrameExtender(); } } class WinCloser extends WindowAdapter { public void windowClosing(WindowEvent e) { System.exit(0); } } The key to creating this window on the screen is extending the Frame class. The strength of object-oriented programming is that you can borrow, or inherit, functionality that performs a lot of work for you by adding the word "extends", and the name of the class that you want to borrow from. public class FrameExtender extends Frame Unlike an applet, applications have no init() method. The constructor is very similar in its function, however, and gets run when the object is created. public FrameExtender() Windows can close without properly cleaning up the processes that are running. To solve this problem, we have to add a Window Listener class to do this cleanup. Swing provides a more elegant solution that you will learn when we cover that GUI toolkit. addWindowListener(new WinCloser()); The title can be set with a method call: setTitle("Just a Frame"); The bounds are set which establish the initial size of the window. setBounds( 100, 100, 200, 200); Finally, we tell the window to display itself. setVisible(true); The main() method instantiates an instance of the class itself, which triggers the execution of the constructor. public static void main(String args[]) { FrameExtender fe = new FrameExtender(); } } The WinCloser class extends the WindowApapter class. The WindowAdapter class is an abstract class that provides a set of no-op methods. As the programmer, you then provide your own implementation by overriding the methods that you want to handle. If your program extends the WindowListener interface, an error will be thrown for every method that you don't provide an implementation for. Most programmers prefer the WindowAdapter approach. The only service that we need it to perform here is to exit the application when the window closes. We will cover events in more detail in Chapter 14, "Event Delegation Model." class WinCloser extends WindowAdapter { public void windowClosing(WindowEvent e) The exit() method of the System class instructs the JVM to destroy the process and recover the resources whenever it chooses to. System.exit(0); To run this example, compile it, and then move to the root directory of your file system (in Windows, this is most likely c:\) and type the following command: C:\>java com.samspublishing.jpp.ch13.FrameExtender This will open a window that looks like the one in Figure 13.3: Figure 13.3. Extending the Frame class can create a window. 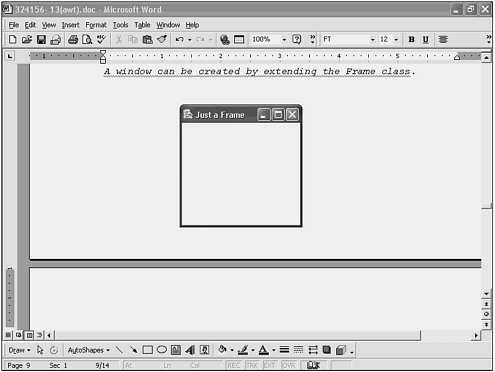 An alternative to extending the Frame class is to declare it in the main() method of the class that you are creating. Listing 13.4 shows the FrameInstantiater class that creates a Frame object in the main() method. Listing 13.4 The FrameInstantiater.java File /* * FrameInstantiater.java * * Created on July 29, 2002, 4:13 PM */ package com.samspublishing.jpp.ch13; import java.awt.*; import java.awt.event.*; /** * * @author Stephen Potts * @version */ public class FrameInstantiater { public FrameInstantiater() { } public static void main(String[] args) { Frame frame1 = new Frame(); frame1.addWindowListener(new WinCloser()); frame1.setTitle("An Instantiated Frame"); frame1.setBounds( 100, 100, 300, 300); frame1.setVisible(true); } } class WinCloser extends WindowAdapter { public void windowClosing(WindowEvent e) { System.exit(0); } } This time the class is created without extending any other classes. public class FrameInstantiater The constructor is also empty. public FrameInstantiater() { } All the work is done in the main method. The Frame object is created by hand. Frame frame1 = new Frame(); The window listener is added here. frame1.addWindowListener(new WinCloser()); We add a title, set the bounds, and make it visible using the instance variable frame1. frame1.setTitle("An Instantiated Frame"); frame1.setBounds( 100, 100, 300, 300); frame1.setVisible(true); } } You compile and run this example in exactly the same way as you did with Listing 13.3, except for the class name, of course. The result of running this example is shown in Figure 13.4. Figure 13.4. A window can be created by instantiating a Frame object. 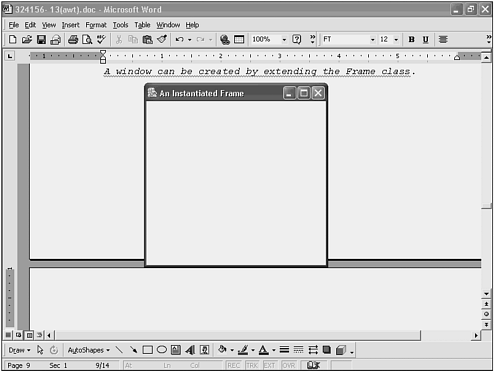 Frames would be pretty useless unless you could place objects on them. Fortunately, this is possible. The simplest way to place objects on a form is to use the Frame's add() method to attach GUI objects to the Frame that have been created by hand. Listing 13.5 shows this technique. Listing 13.5 The TextFieldInstantiater.java File /* * TextFieldInstantiater.java * * Created on July 29, 2002, 4:13 PM */ package com.samspublishing.jpp.ch13; import java.awt.*; import java.awt.event.*; /** * * @author Stephen Potts * @version */ public class TextFieldInstantiater { public TextFieldInstantiater() { } public static void main(String[] args) { Frame frame1 = new Frame(); TextField tf1 = new TextField("Directly on the Frame"); TextField tf2 = new TextField("On top of the old text"); frame1.add(tf1); frame1.add(tf2); frame1.addWindowListener(new WinCloser()); frame1.setTitle("An Instantiated Frame"); frame1.setBounds( 100, 100, 300, 300); frame1.setVisible(true); } } class WinCloser extends WindowAdapter { public void windowClosing(WindowEvent e) { System.exit(0); } } The unique part of this example is the creation and insertion of the text fields. TextField tf1 = new TextField("Directly on the Frame"); TextField tf2 = new TextField("On top of the old text"); frame1.add(tf1); frame1.add(tf2); Notice that there are no locations on either the TextField constructors or on the Frame.add() method. This means that the field will be placed at the top line of the frame. When we add the second TextField object, it overlays the first one, as shown in Figure 13.5. Figure 13.5. A text field can be added directly to the frame, but it cannot be positioned in the window. 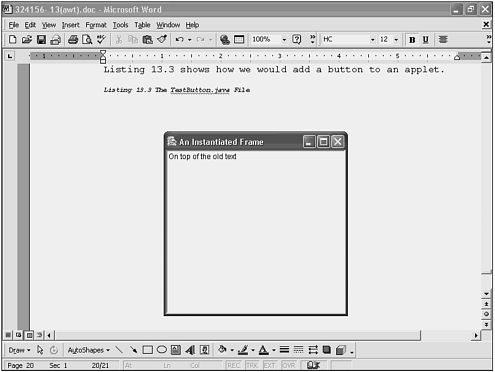 This behavior is not likely to be what you had envisioned. Normally, you don't want GUI objects to overwrite each other. This lack of control over the placement of objects in a frame is a primary motivation to use the Panel class and Layout managers to provide more control over the appearance of your objects. Panels are the subject of the following section. We will introduce layout managers later in the chapter. Panels The java.awt.Panel class is a generic container that is rectangular, but lacks the title and border of a Frame. Its default behavior is to implement a flow of controls from left to right with wrapping. This behavior is identical to a FlowLayout that you will learn about later in this chapter. Primarily, panels are used to provide several containers within a frame. This allows you greater flexibility when laying out a screen. Listing 13.6 shows how adding a panel can change the behavior of the layout of objects. Listing 13.6 The PanelTest.java File /* * TestPanel.java * * Created on July 30, 2002, 11:35 AM */ package com.samspublishing.jpp.ch13; import java.awt.*; import java.awt.event.*; /** * * @author Stephen Potts * @version */ public class TestPanel extends Frame { TextField tf1; TextField tf2; /** Creates new TestPanel */ public TestPanel() { tf1 = new TextField("Directly on the Panel"); tf2 = new TextField("Following the first TextField"); Panel p1 = new Panel(); p1.add(tf1); p1.add(tf2); add(p1); addWindowListener(new WinCloser()); setTitle("Using a Panel"); setBounds( 100, 100, 300, 300); setVisible(true); } public static void main(String[] args) { TestPanel tp = new TestPanel(); } } class WinCloser extends WindowAdapter { public void windowClosing(WindowEvent e) { System.exit(0); } } The important difference between this example and Listing 13.5 is that the two text fields are added to a panel, which is added to a frame, instead of being attached to the frame directly. Two text fields are instantiated with strings. tf1 = new TextField("Directly on the Panel"); tf2 = new TextField("Following the first TextField"); A new panel is createdand the two text strings are attached to it. Panel p1 = new Panel(); p1.add(tf1); p1.add(tf2); The panel is added to the frame. add(p1); Running this example produces the result shown in Figure 13.6. Figure 13.6. Text fields added to frames can be added directly to the panel, which lays them out flowing from left to right with line wrapping. 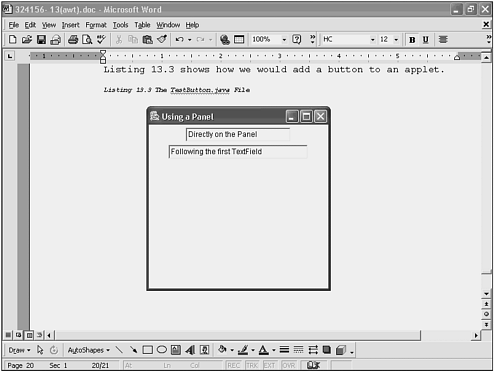 Notice the different behavior that comes from using a panel. Laying objects one after the other with wrapping is farmore intuitive than overwriting one with the other. ScrollPane Another useful containeris the java.awt.ScrollPane class. This container is unique in that it only allows for one object to be placed on it. This seems limiting until you realize that the object can be a panel, which can hold an arbitrary number of objects. The big attraction of the ScrollPane is the optional presence of both a horizontal and a vertical scrollbar. There are three possible values that can be passed to one of the constructors: ScrollPane.SCROLLBARS_AS_NEEDED ScrollPane.SCROLLBARS_ALWAYS ScrollPane.SCROLLBARS_NEVER
The default is ScrollPane.SCROLLBARS_AS_NEEDED. If you create a ScrollPane using the default constructor, you will get scrollbars only if the size of the panel exceeds the size of the ScrollPane. Note  | In Java, constants are defined in the following way: public static final int SCROLLBARS_AS_NEEDED = 0 The word public indicates a visibility outside the declaring class. The word static means that it can be referenced using the class name such as ScrollPane, instead of requiring an instance variable. final means that when set, the value can never change. Writing the name of the constant in all uppercase letters is a convention that makes constants easier to pick out in text. |
Listing 13.7 shows a Panel that is added to a ScrollPane. Listing 13.7 The TestScrollPane.java File /* * TestScrollPane.java * * Created on July 30, 2002, 11:35 AM */ package com.samspublishing.jpp.ch13; import java.awt.*; import java.awt.event.*; /** * * @author Stephen Potts * @version */ public class TestScrollPane extends Frame { ScrollPane sp; TextField tf1; TextField tf2; TextField tf3; TextField tf4; TextField tf5; TextField tf6; TextField tf7; TextField tf8; /** Creates new TestScrollPane */ public TestScrollPane() { //create eight text fields tf1 = new TextField("Text Field Number 1 "); tf2 = new TextField("Text Field Number 2 "); tf3 = new TextField("Text Field Number 3 "); tf4 = new TextField("Text Field Number 4 "); tf5 = new TextField("Text Field Number 5 "); tf6 = new TextField("Text Field Number 6 "); tf7 = new TextField("Text Field Number 7 "); tf8 = new TextField("Text Field Number 8 "); //add the panel Panel p1 = new Panel(); p1.add(tf1); p1.add(tf2); p1.add(tf3); p1.add(tf4); p1.add(tf5); p1.add(tf6); p1.add(tf7); p1.add(tf8); //create the scroll pane sp = new ScrollPane(); sp.add(p1); add(sp); addWindowListener(new WinCloser()); setTitle("Using a ScrollPane"); setBounds( 100, 100, 300, 300); setVisible(true); } public static void main(String[] args) { TestScrollPane tsp = new TestScrollPane(); } } class WinCloser extends WindowAdapter { public void windowClosing(WindowEvent e) { System.exit(0); } } All the magic in this example takes place in just a few lines of code. First, we instantiate the ScrollPane. sp = new ScrollPane(); Next, we add the panel to the ScrollPane. sp.add(p1); Finally, we add the ScrollPane, not the Panel object, to the Frame. add(sp); The result of running this example is shown in Figure 13.7. Figure 13.7. Panels added to Scroll Panes can be accessed using scrollbars. 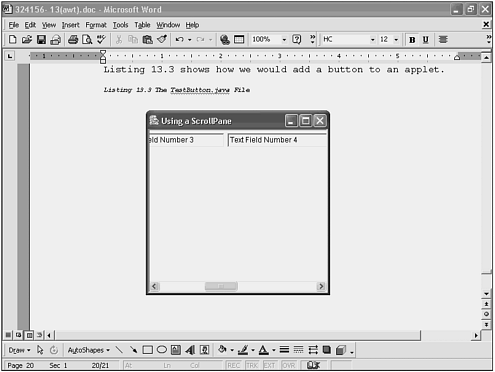 Notice that no wrapping took place, after we placed the panel in the ScrollPane. This gives us two choices when choosing a look and feel: a panel that wraps and one that scrolls. The reason for this is that the layout behavior of the panel is altered by the existence of the scrollbar. Instead of wrapping, the controls are placed side-by-side. Layout managers, which are covered later in this chapter, can be used to control the look and feel of the GUI. |