Connecting with PHP
| Before we get started we will need to create the database that will be used for this example and ultimately in our final sample project. The SQL code for creating the table is shown in Listing 20.1. Listing 20.1. The SQL File for Creating the Email Database Table (awad_email.sql)
PHP is a great language to combine with Ajax. First of all, it is open source, and second, it is very flexible and easy to learn. Because all the samples in this book have already been written, we will continue to use strict typing with PHP 5.0. Therefore, the server that the sample is running on must have PHP 5.0 or above. Let's get started by learning how to bridge the gap between the client side and back end by creating a file that simply delegates requests and returns responses as XML. Bridging the GapConnecting to a database with PHP is simple after we create a file that specifically enables the connection via XHR. In the sample, I have named this file serviceConnector.php, but it can be named anything we want because the only requirement for this example is that it be PHP and that we request it by the appropriate name in the XHR. Listing 20.2 shows the file contents. Listing 20.2. The File Is the Bridge Between the Client Side and the Database (serviceConnector.php)
This listing is the key that will help us make all of our connections. The code begins with the PHP declaration tags (as all of the PHP examples will from this point forward) so that the server knows how to process it. The first line of code is a header, which defines the content type of the returned data as XML. This means that any file that requests it will receive the data back as XML. Of course, this is extremely useful when using Ajax because we want the response to be XML in this case. The next two lines of code are types of include statements unique to PHP, which require these two files to be included in order to compile the rest of the code in the file. There is also a require statement that is unique to PHP, but the require_once statement has additional logic to make sure that if a required class is included twice in the same document, only one is required. We can continue to add new PHP classes to this file if we want to call a new object method at some later point. After we have all our required files set up, we will instantiate a new object, which will be defined in the query as object. This is an extremely powerful statement because it allows us to instantiate objects from the client side by simply passing the correct query variables. After we have the correct object instantiated, we can fire a method within that object and pass parameters that we define on the client side in the XHR. After the method has been called, we write its return value to the page so that when the server has completed writing the file, it will return an XML file with the value that was returned from the object. In our case, this value will be data represented by database values, or success or failure messages for database inserts or deletions, but the return value can be anything that you can dream of returning from a server-side object. Of course, with the great power this solution presents come great security risks. Therefore, we will focus on creating a secure way to make these server-side requests from Ajax by password protecting them when we reach Chapter 23, "Securing Your Application." Making the RequestsWe now understand how to bridge the gap between the front end and the database; now we need to focus on how to make the XHR from the front side. Making the connection to the connector file we created in the last section is as easy as requesting static XML files. It is really just a matter of understanding what parameters to pass it and how it will return that data so you can anticipate dynamic responses. Listing 20.3 shows how to make an XHR from our Email JavaScript object on the client side to our serviceConnector.php file. Listing 20.3. Connecting to the Database to Retrieve a User's Email Folders (Email.js)
The Email object is what combines and connects all the components from the book to the database via the Ajax engine. The first method to be called from the index PHP file is the display method. This method takes a username, which is passed from the login PHP page when a user logs in to the application. After the method has been fired, it sets the username to an object property and proceeds to define a url variable to use as an XHR. As you can see, this URL consists of the serviceConnector.php plus the object, method, and additional parameters that need to be passed, which in this case is simply the username. After the URL is defined, it is added to the AjaxUpdater Update method and sent to the server via the GET method. The Update method also tells the Ajax object to return the response to the TReeManager's display method. If you look closely at the URL, we are calling a PHP object called Email and firing a method called getFolders, which gets all the folders that are necessary for creating the tree view for the specific user we are requesting. The rest of this method consists of a setTimeout call that delays another Email object method call to the getMail method. The delay is set because each method makes an XHR. If they fire at the same time, they will cross requests and we will end up with unexpected results. The last line is the data reflection, which we already covered in Chapter 17. Figure 20.1 shows the email application with all the components as they appear with data from the database. Figure 20.1. A preview of the completed email application with all the components from the book.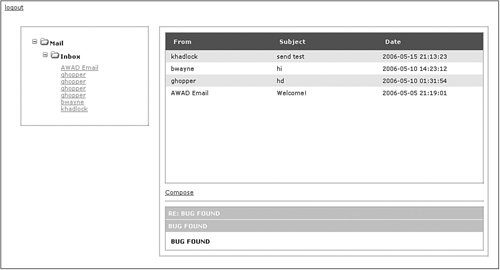 The getMail and showThread methods in the Email JavaScript object are very similar to the display method in the way that they make an XHR and delegate the response to the appropriate components. Listing 20.4 shows the getMail method as it makes a request to the serviceConnector.php in order to get the data that is necessary to display all of a user's mail from a specified folder. Listing 20.4. Connecting to the Database to Retrieve Mail (Email.js)
As I mentioned, the getMail method makes a request to the server to get a user's mail from a specified folder. If we take a look at the setTimeout in the display method, we are passing the current user's username and inbox as the specific folder to retrieve mail from. These parameters will be used in the XHR URL. Before we make the request, there are two lines of code that are required to re-create the DataGrid component with the new data we will be delegating to it from the server response. Within these two lines of code, we first remove any of the previously instantiated DataGrid elements and then initialize a new one to replenish its default values and prepare it for the new data from the response. We use the removeChildren method from the Utilities object to remove all the nested (children) elements in the list element, which is the element the DataGrid gets written to when it is created. Finally, we make the request via the GET method and delegate the response to the display method of the new DataGrid. Figure 20.2 features the DataGrid component with inbox data that has been saved to the server. Figure 20.2. A populated DataGrid component integrated with the application.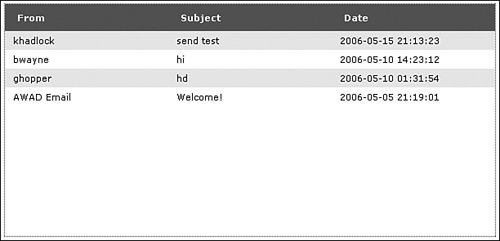 The showThread method occurs when a user selects an email from the DataGrid component. Listing 20.5 shows the code for this method. Listing 20.5. Retrieving Mail Threads from the Database (Email.js)
This method takes an id, which is a number that represents a thread of emails, and a sender, which represents the username of the person who sent the email. These parameters are first used to set object properties for the Email object, which include the currentThread as the id parameter and the currentSender as the sender parameter. Both of these properties will be used throughout the object in various ways. Next, we remove the children of the parent HTML element that may contain previously retrieved threads. We then initialize the Accordion, and instantiate or re-instantiate any properties in the object. After we have a fresh Accordion, we make a request with the AjaxUpdater via the GET method and pass a custom url variable as we have in the previous examples. The url variable is made up of the serviceConnector.php file followed by a query string that consists of the Email object, a method called getMessage, and two parameters: the thread id and the current user. When the request is made, we delegate the response to the display method in the Accordion object and a new Accordion is displayed with the thread that was selected. This thread is representative of all the different emails that were sent back and forth between two users as a single thread. Figure 20.3 shows an example of how the Accordion looks with a threaded email. Figure 20.3. A threaded email populating the Accordion component in the final application. Now that we have all the methods for displaying various types of data, such as the folders, emails, and threads, we can focus on how to send a new email or a response to another user in the system. The method we will use for both of these different types of functionality is called compose. Listing 20.6 shows this method. Listing 20.6. Sending Mail to Other Users (Email.js)
This method is a bit larger than the previous and it takes quite a few more parameters. The four parameters it takes are
We start by checking to see whether the action is a reply or a new email. Depending on the result, we create a local param variable to a colon-delimited string, which will represent the parameters for the email. After we have the necessary parameters for the request, we will append them to a url variable that consists of a string. This string will call the serviceConnector.php file, pass the Email object, call a method named sendMail, and pass the parameters we set previously. We then fire the Update method for the AjaxUpdater object and pass the url parameter with the GET method. The difference in this call is that we do not pass a callback method in which to delegate the response. This is because we will simply refresh the current Accordion or DataGrid object by firing either the showThread or getMail method in the setTimeout method. This will create a delay in the call so that the data has been updated. Then, when the method is called, it will make another XHR for the new data, which will either replenish the Accordion with the reply thread or the DataGrid with the default inbox view. Figure 20.4 shows the Compose or Reply form as it appears in the application. Figure 20.4. New and reply messages are sent from this form in the application.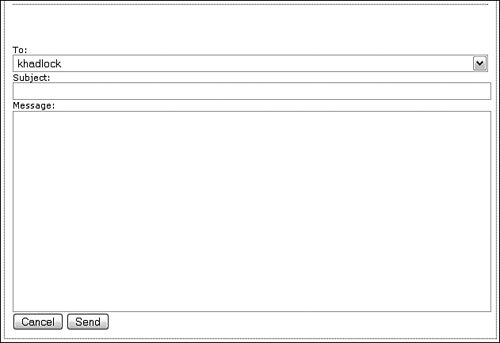 Making the ConnectionNow that we understand how to make requests to the PHP file that will receive server-side method calls and return responses as valid XML, we can focus on the database interaction. The one object that we connect with throughout this chapter is the Email object. This file is named Email.class.php and resides in the classes folder in the application structure. This object contains a lot of functionality that I will not cover in detail because I want to provide the knowledge to understand how the database data is formatted into useable XML on the client side by the Ajax object or the objects that receive the delegated responses. Therefore, we will see all the code that is involved, but we will focus on the Ajax-oriented part of it. Let's start by requiring the necessary classes to make a database connection, declaring the Email object, and creating its constructor. Listing 20.7 shows the code to make this happen. Listing 20.7. Getting Started with the Email Class (Email.class.php)
The two classes we must require are the DatabaseConnector and the Constants class. The DatabaseConnector will contain all the methods for making the connection to your database as we already covered in Chapter 12, "Client-Side Validation." The Constants file contains all the reusable data we will need throughout the application. We will cover the Constants class next before moving on to the Email object's methods. After we declare the Email object, we define a property that will represent the DatabaseConnector object throughout the class. The constructor function takes this property and sets it to an instance of the DatabaseConnector, which is a Singleton object. After we have set the object to the property, we fire the init method within it. Let's briefly take a look at the Constants class to see how it will be used moving forward. Remember that the class will represent some of your server data and will have to be changed when you upload the files. Listing 20.8 shows the complete class. Listing 20.8. The Constants Object (Constants.class.php)
This class is full of static properties, which can be accessed by any object that has included it. The first set of properties we need to create depends on the server in which we are using. These properties represent the database information for our server. These will need to be changed by you in order to run the sample on your server. The next two properties are the database tables with which we will be interacting throughout the sample code. They are the awad_email table, which consists of all the email information that has been passed back and forth between users, and the awad_users table, which consists of the user data for the application. This database has been created already in Chapter 12, where we learned how to validate user information in the database via the Ajax object. The next property is called password and will be used in Chapter 23 where we learn how to secure the application with password-protected Ajax requests. The last two properties are the success and failure messages that will be returned as responses to the Ajax requests when no data is required to be sent back. For example, if a user deletes an email, we will not need to return any data as a response; instead, we will return whether or not the deletion was a success and act on the response based on the result. Now that we understand how this file will be used throughout the Email object, we will cover the rest of its objects. The first method we will focus on is called sendMail and is shown in Listing 20.9. Listing 20.9. Sending Mail (Email.class.php)
This method receives the colon-delimited list of parameters that were sent from the Email object. This parameter string is first split at the colons and then set to local method variables. After we have the local variables, we check to see whether the thread id is null. If so, we know that the email belongs in a new thread. If this is true, we make a database selection to get the highest thread id and set a local variable to its value. After we have the value, we increment the local variable and use it in the two default queries. These queries insert the email into the receiving user's inbox and the sending user's sent folder. After the queries have been made, we return a value stating whether or not the insertion was a success. The next method is used to get a user's folders for the treeView component. It takes a parameter that tells it which user to retrieve folders for. After it receives the data from the database, it compiles an XML string that is structured as the treeview.xml file was in Chapter 11, "Tree View." The structure that is created takes a fairly complicated algorithm because we want any data that belongs to specific folders to display in those folders. If we did not use this algorithm, the structure would simply represent a tree with duplicate folders for each item, which wouldn't be very functional. The method featured in Listing 20.10 contains comments that explain the algorithm. Listing 20.10. Getting a User's Folders (Email.class.php)
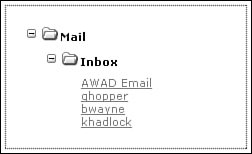
After the XML tree structure has been created, it is returned to the serviceConnector.php class. Its content type is set to XML to make it valid and accessible through the DOM via the Ajax engine (or the method the response is delegated to), which happens to be the display method of treeManager in this case. Figure 20.5 shows the tree view as it renders in the application. Figure 20.5. The treeView component renders folders and the usernames of the senders for certain threads. The next method we will cover is less complicated than the previous one. It is called getMail and is featured in Listing 20.11. This method receives a single parameter, which is a colon-delimited string of values in which we define this method. This means we need to know the parameters this method expects when we call it. After we split and set the local variables, we make a connection to the database and select the mail for a specific user from a specified folder and order it by thread id. After we receive the results, we create an XML string, which is structured the same as the sample for the DataGrid in Chapter 13, "Data Grid." Listing 20.11. Getting User Mail (Email.class.php)
After we have created the structure as the DataGrid component expects it, we will return it as the response to the XHR. When the engine receives the response, it will then delegate it to the DataGrid component and display the user mail from the specified folder. The last method in this class is called getMessage (Listing 20.12). Like the other methods in this object, this method also accepts a string of colon-delimited parameters, which are split and set to local variables. After the variables are set, a database connection is made and we select the thread that was requested from the client side. These threads are gathered in descending order based on their id in the database. Therefore, the Accordion object will display the email threads in the order they were created. Listing 20.12. Retrieving User Messages (Email.class.php)
After the XML structure is concatenated, we return it to the serviceConnector.php file, which provides a valid XML file to the requesting object. As the engine does in all the other cases, it delegates the response to another object (in this case, the Accordion). The Accordion object receives the response through its display method and creates an accordion from the response data. You can take a look back at Figure 20.3 to see an example of the accordion as it looks with a thread of emails in the application. This chapter has quite a bit of information in it that is completely unique to Ajax, but if you understand the server side of things, it is not hard to pick up on the request model we are producing in this application. When you have a solid understanding of the logic behind these requests, you can basically accomplish anything you see today on the Web in terms of Ajax database interactions. Who knowsmaybe you'll create some of your own standards. |
EAN: 2147483647
Pages: 129