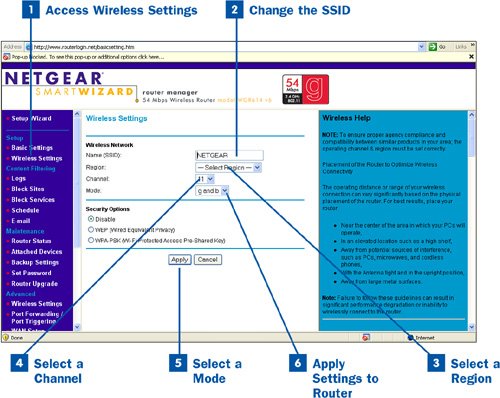
Access Wireless Settings
Connect to the wireless router using your computer's web browser (enter the URL for the router and provide the login ID and password for the router's administrative accountmy Netgear router uses Admin and password). In the browser window, select the settings category that allows you to configure the wireless settings for the router (such as Wireless Settings on a Netgear router).
Note
Some wireless routers such as those made by Netgear provide a Test button, located on the various configuration screens. Click the Test button to test the settings you've entered to see whether they work before you apply and save them to the router.
 Change the SSID
Enter the new name for your wireless network in the SSID box. The name can be up to 32 characters. Network names are case sensitive, so keep this in mind when creating the new name. To easily identify the network for your users (and not to be confused by someone in your neighborhood who happens to detect your WiFi network), select a name that is descriptive. For example, for my home WiFi network, I might want to use the SSID habrakenwifi or habraken-family. If you feel that you need a more "cryptic" name to avoid the possibility of an outsider guessing the SSID and connecting to your network, create an appropriate name as needed.
Note
SSID broadcasts from the WiFi router's access point can be turned off. The SSID broadcast is nothing more than the router announcing over the configured radio channel that your WiFi network exists. Turning off the broadcast negates other folks, such as nearby neighbors or someone parked on the street, from scanning for your network. See  Configure Turn Off Set IDs (SSIDs) Broadcasts for information on how to turn off SSID broadcasts.
 Select a Region
You must specify a region for the router. Click the Region drop-down list and select the appropriate region (for example, I selected United States). Selecting a region does not actually have any functional purpose (the router's access point will work even if you choose the wrong region). However, it is required by law in the United States that you specify your region as United States. In the United States, even the "public" spectrum of radio signals is controlled and regulated by the Federal Communication Commission (FCC) and federal law. Outside the United States, laws vary, so selecting the appropriate region such as Mexico or South America is really just verification by you that you understand that the public radio spectrum may or may not be managed by a governmental agency in your region.
 Select a Channel
The channel is the frequency range that the wireless router uses to communicate with wireless-enabled computers. A default value is typically provided by the router's manufacturer. Change the value as needed using the Channel drop-down list, particularly if you are experiencing interference with home telephones or other wireless digital devices. In most cases, you can go with the default. Remember that all WiFi-enabled computers must be configured to use the same radio signal channel that you set on the router. See  Configure Adapter and Connect to the Wireless Router for more information.
Note
When you scan for available WiFi networks using a WiFi-enabled computer, the computer cycles through all the available radio channels looking for SSIDs or WiFi network names. When you connect to the WiFi network using the SSID (or name), the channel is set automatically on the WiFi network adapter on the computer. When you turn off SSID broadcasts, you can't connect to the WiFi access point by scanning for the SSID. In that case, WiFi network adapters on network computers must be configured with the same SSID and radio channel that was configured on the WiFi router.
 Select a Mode
Click the Mode drop-down list (or a similar option name on your router's configuration screen) to set the modes your router will support. In most cases, the setting of g and b is the default and supports both 802.11g and 802.11b devices.
 Apply Settings to Router
After configuring the wireless settings for the router, click the Apply button to save the router's configuration.
When you have finished configuring the router, you should log off the router. Select the Logoff link on your router's configuration screen (the name of this link varies from router to router). On my Netgear WiFi router configuration screen, I must scroll all the way to the bottom of the browser window and then select Logoff on the left side of the screen. Logging off is better than just closing the browser window.