| In a self-running show, the slide show runs itself. Each slide advances after a specified period of time. This allows you to concentrate on the narrative aspects of the presentation as you use the slide show for a speech or classroom presentation. For a self-running show, you must set timings. You can set the same timing for all slides (for example, a 20-second delay between each slide), or you can set a separate timing for each slide individually. When you set up a self-running show, you can also select different slide transitions. A slide transition is a special effect that is executed when the slide appears during the slide show. For example, you can have a slide dissolve onto the screen, or you can have the slide appear on the screen using a checkerboard effect. To configure the show to use timings and transitions, follow these steps: -
Open the presentation you want to view. -
Select the slide to which you would like to apply a timing or transition so that it appears in the Slides pane in the Normal view. -
Select Slide Show and click Slide Transition . The Slide Transition task pane opens containing controls for the type of transition you want to use, the speed with which that transition executes, and the length of time the slide should remain onscreen (see Figure 12.3). Figure 12.3. The Slide Transition task pane houses the controls necessary for tailoring the way a slide transitions onto the screen during a presentation. 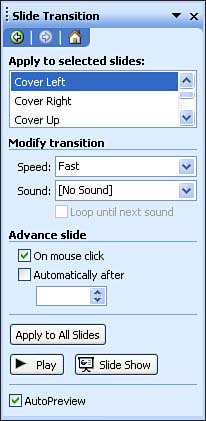 -
To select a transition for the slide, select one of the transitions supplied in the Apply to Selected Slides box. -
To test the transition, click the Play button. -
If you want to change the speed of the transition, click the Speed drop-down list and select Slow, Medium , or Fast (Fast is the default). -
(Optional) If you want to select a sound to accompany the slide transition (such as Applause, Drum Roll, or Laser), click the Sound drop-down list and select one of the supplied sounds. -
To set the timing for the slide in the Advance Slide section of the task pane, click the Automatically After check box. Use the click box below the check box to enter the number of seconds for the slide's automatic timing. -
If you want to apply the selected transition and the timing to all the slides in the presentation, click the Apply to All Slides button.  | My Slides Don't Advance Using the Timings If you find when you run the slide show that the slides don't advance using the timings that you have set, select Slide Show, Set Up Show. In the Set Up Show dialog box, be sure that the Using Timings, If Present option button is selected. Then click OK. |
When you run the slide show, the slides advance according to the timings that you have set. The slides also use any transitions that you have selected for them. Take the time to run the slide show several times so that you can gauge whether the transitions and timings work well. Remember that the slide must be onscreen long enough for your audience to read and understand the text on the slide.  | Assign Transitions and Timings to Selected Slides You can select several slides in the Slide Sorter view and then use the Slide Transition task pane to assign the same transition and/or timing to the selected slides. |
| | Don't Get Too Fancy! If you are going to use slide transitions and animation schemes on each and every slide, you might find that your slide show is becoming "too exciting," like a film with too many explosions, car chases, and other special effects. Viewers of the slide show will probably have trouble concentrating on the text on the slides if too many things are going on at once. Remember, everything in moderation . |
|