| The Table Wizard can save you a lot of time by supplying you with all the needed fields and field formats for entering your database information. Access provides a large number of different kinds of tables that you can create with the wizard. The wizard is also fairly flexible, allowing you to select the fields the table will contain and the way in which they will be arranged. You can also change the name of a field during the process. If the wizard doesn't provide a particular field, you can always add it to the table later, as discussed in Lesson 5, "Editing a Table's Structure." To create a table using the Table Wizard, make sure you've opened a database as described in Lesson 2 and then follow these steps: -
In the database window, click the Tables object icon, and then double-click the Create Table by Using Wizard icon. The Table Wizard opens.  | Alternative Routes You can also start the Table Wizard by clicking the New button in the database window or choosing Insert , Table . In both cases, the New Table dialog box opens. Then, choose Table Wizard and click OK . |
-
On the first Table Wizard screen, you can select from two categories of table types: Business or Personal . Your choice determines the list of sample tables that appears (see Figure 3.1). Figure 3.1. Select either the Business or Personal category to view a list of tables. 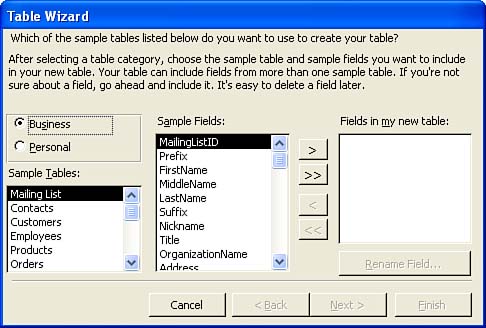 -
Select a table in the Sample Tables list; its fields appear in the Sample Fields list. -
To include a field from the Sample Fields list in the table, select the field and click the Add ( > ) button to move it to the Fields in My New Table list. You can include all the fields in the Sample Fields list by clicking the Add All ( >> ) button. -
If you want to rename a field that you have added, click the Rename Field button, type a new name into the Rename Field box, and then click OK . | | Remove Unwanted Fields If you add a field that you don't want in the table, select the field in the Fields in My New Table list and click the Remove ( < ) button. To remove all the fields and start over, click Remove All ( << ). |
-
Repeat steps 3 and 4 as needed to select more fields for the table. You can select fields from more than one of the sample tables for the table that you are creating (remember that you want fields in the table related only to a particular theme, such as customer information). When you're finished adding fields, click Next to continue. -
The next screen asks you to provide a name for the table (see Figure 3.2). Type a more descriptive name if necessary to replace the default name. Figure 3.2. Provide a name for the table and allow the wizard to select a primary key for the table. 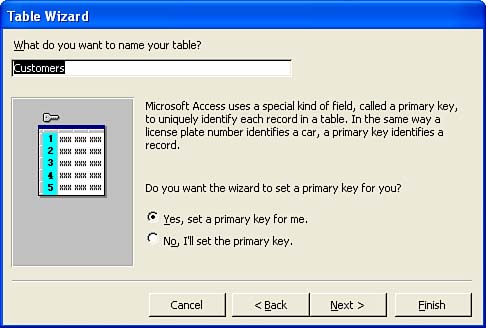 -
This dialog box also asks whether you want the wizard to create a primary key for the table or allow you to select the primary key yourself. For example, CustomerID is an excellent primary key because each customer is assigned a different ID number. In this case, click Yes, Set a Primary Key for Me to have the wizard choose your primary key field. You can learn to set your own primary keys in Lesson 4, "Creating a Table from Scratch."  | Primary Key The field that uniquely identifies each record in the table. Every table must have a primary key. This is usually an ID number because most other fields could conceivably hold the same data for more than one record (for example, you might have several people with the last name of Smith). |
-
Click Next to continue. Because you're allowing the wizard to select the primary key, you are taken to the last wizard screen. On the last wizard screen, you have the options of modifying the table's design, entering data directly into the new table, or having the wizard create a data entry form for you. To see the table the wizard created, go with the default: Enter Data Directly into the Table (see Figure 3.3). Figure 3.3. After completing the table, you can have the wizard open it so that you can enter data. 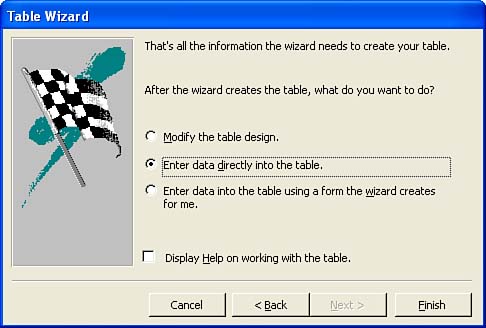 -
Click Finish . The new table appears in the Access workspace (see Figure 3.4). From here you can enter data into the table, the specifics of which are discussed in Lesson 6, "Entering Data into a Table." When you close the table, it appears in the Object pane of the database window (you must also select the Tables object icon). Figure 3.4. Your new table appears in the Access workspace when you close the Table Wizard. 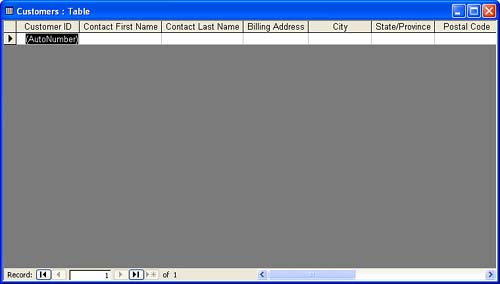  |