| The next step in the process is to open or create a data source document. This document not only provides the names and addresses that will be merged into your form letter, but it also dictates the merge fields that are placed in the main document (as placeholders for the actual data that will be placed in the form letters during the merge). Creating a data source during the Mail Merge process is very straightforward because the Mail Merge Wizard provides you with a form that you use to enter people's names, addresses, and other information. When you enter the information for a particular person, you are creating a record. Each record pertains to one person. However, you also can use existing data sources for the merge. For example, you can use Access database tables (see Part VI, "Access," for information on creating databases in Access), your Outlook Contacts list, or any Word data source document that you created for a previous merge. To provide you with a complete, from-scratch look at the merge process, we will create a new data source document in this section of the lesson. The following steps pick up from the preceding section, where we specified the main document for the merge.  | Record Information in the data source that contains information about a particular person (or place or thing). |
| | Merge Field A code that tells Word to automatically insert information into your main document during the merge. For example, the Last Name field inserts your letter recipient's last name. |
 | Using Your Outlook Contacts As a Data Source The Word Mail Merge Wizard also enables you to use information from your Outlook Contacts list as the data source for a mail merge. For more about the Outlook Contacts list, see Lesson 11, "Creating a Contacts List," in Part III of this book. |
-
In the Mail Merge task pane (which currently shows Step 3 of 6, as shown in Figure 19.2), choose one of the following options to specify the data source for the merge: -
Use an Existing List This option is selected by default. If you have a Word document that contains a table or an Access table that contains the name and address information you want to use for the merge, select the Browse button in the task pane. This opens the Select Data Source dialog box. Locate your data source file, select it, and then click Open to return to the Word window and the Mail Merge task pane. The Mail Merge Recipients dialog box appears in the Word window, providing a data source list based on the source file (it will look the same as the Mail Merge Recipients dialog box shown later in Figure 19.4). Figure 19.4. Use the Mail Merge Recipients dialog box to sort or select the recipients of the form letter.  -
Select from Outlook Contacts This option enables you to select the names and addresses for the merge from your Outlook Contacts. When this option is selected, a Choose Contacts Folder link appears in the task pane. Click the link and specify the location of your Contacts folder in the Select Contact List Folder dialog box that opens (in almost all cases it finds your Contacts folder for you). Click OK to return to Word and the task pane. The Mail Merge Recipients dialog box appears containing a list of your contacts (it is the same as the dialog box shown later in Figure 19.4). -
Type a New List This option enables you to create a new data source (you will use this option to explore how you create a new data source). After selecting this option, click the Create button in the task pane to open the New Address List dialog box (you explore this dialog box in step 2). Figure 19.2. You can use an existing document or your Outlook Contacts list as the data source, or you can create a new data source from scratch. 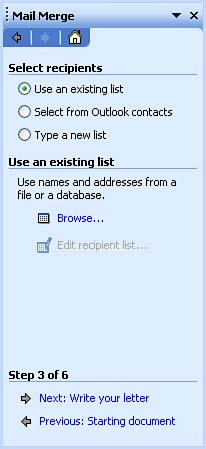 -
After selecting one of the options listed in step 1 and clicking the Create link, either the Mail Merge Recipients dialog box appears (when you select either the existing list or Outlook Contacts list options; we discuss the Mail Merge Recipients dialog box in step 5) or, in the case of the Type a New List option (which we select here as we explore this feature), the New Address List dialog box appears (see Figure 19.3). Figure 19.3. Use the New Address List dialog box to create the new data source for the merge. 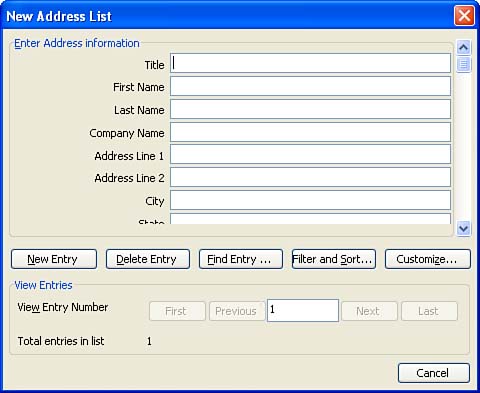 -
Enter the name, address, and other information that you want to place in the record for the first recipient. When you have finished entering the data, click the New Entry button on the New Address List dialog box to enter the next record. -
Enter additional records as needed. When you have finished entering your records, click the Close button on the New Address List dialog box. The Save Address List dialog box opens. -
Enter a name for the file and specify a location (if necessaryby default, the address list is saved in a special My Data Sources folder that was created when you installed Office). Click Save to save the data source file. -
The Mail Merge Recipients list appears (see Figure 19.4). If you used your Outlook Contacts list or an existing data source, this dialog box appears after you completed step 1 in this section. -
If you want to deselect any of the recipients in the Mail Merge Recipients dialog box, clear the check box to the left of their records. If you want to sort the list by a particular field (such as last name), click that column's heading. | | Editing Recipient Information If you want to edit one of the records in the Mail Merge Recipients dialog box, select the record and click the Edit button. To add a new record, open an existing record using the Edit button and click New Entry . |
-
After selecting recipients or sorting the recipient list, click OK to close the Mail Merge Recipients dialog box. After creating your recipient list as discussed in this section, you are ready to complete the main document and enter the merge fields. These topics are discussed in the next section.  |