| In addition to Outlook's many precompiled views (for each folder type), you can also create custom views of the information in your Outlook folders. To create a custom view for one of your Outlook folders, follow these steps: -
Click the View menu, point at Arrange By , and then point at Current View . Select Define Views . The Custom View Organizer dialog box for the currently selected folder opens. -
Click the New button in the Custom View Organizer dialog box. The Create a New View dialog box appears, as shown in Figure 3.5. Figure 3.5. You can create custom views for your Outlook folders. 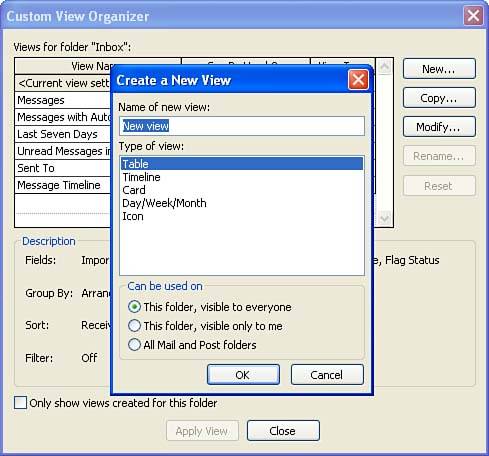 -
Enter a name for your new view and select a view type from the list in the Type of View box. You can select different view types for a custom view: -
Table Presents items in a grid of sorts in rows and columns . Use this view type to view mail messages, tasks , and details about any item. -
Timeline Displays items as icons arranged in chronological order from left to right on a time scale. Use this to view journal entries and other items in this type of view. -
Card Presents items such as cards in a card file. Use this to view contacts. -
Day/Week/Month Displays items in a calendar view in blocks of time. Use this type for meetings and scheduled tasks. -
Icon Provides graphical icons to represent tasks, notes, calendars, and so on.  | Using the Create a New View Option Buttons If you work on a network where Outlook folders are shared on an Exchange Server, you can create your new view so that you see only the information in the view. Alternatively, you can share the view with other users who access the information. The default option in the Create a New View dialog box is This Folder, Visible to Everyone . To reserve the custom view for yourself, click the This Folder, Visible Only to Me option button. |
-
After you've selected the type of view you want to create, click the OK button. A View Settings dialog box appears based on your selection. In this box, you determine which fields you want to have in the view and the fonts and other view settings you want to use. -
After you've selected the fields and view settings, click Apply View . The items in the current folder appear in the new view.  | Fields A specific type of information that you want to appear in your custom view. For a custom Inbox view using the Timeline view type, the fields include Received (when the message was received), Created (when the message was created), and Sent (when the message was sent). |
Your newly created view appears on the Current View list on the Advanced toolbar. You can select it by clicking the list's drop-down arrow and then clicking the custom view's name.  | Should I Design My Own Views? Designing your own views can be complicated. Outlook provides several views for each folder on the Navigation pane. You might want to explore all these possibilities before you begin to create your own views. |
|