| The Settings dialog provides access to the Printers window, which is launched using the Printer icon in the Hardware pane. The Printers window allows you to add a printer, change a printer's settings, and open a printer's queue to view pending print jobs.  Before You Begin Before You Begin
32 About Configuring Hardware and System Settings in NLD 35 About Printing and NLD |
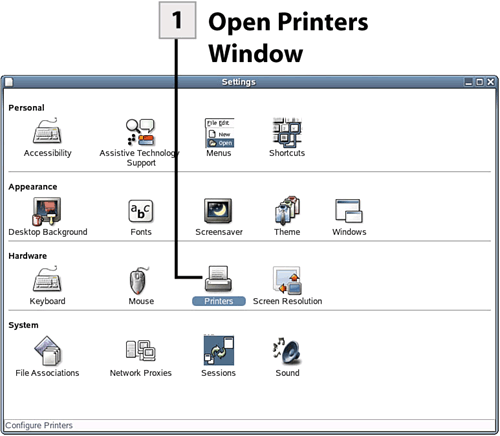     
 Open Printers Window Open Printers Window
In the Settings dialog box (select System, Personal Settings) double-click the Printers icon. The Printer window opens.
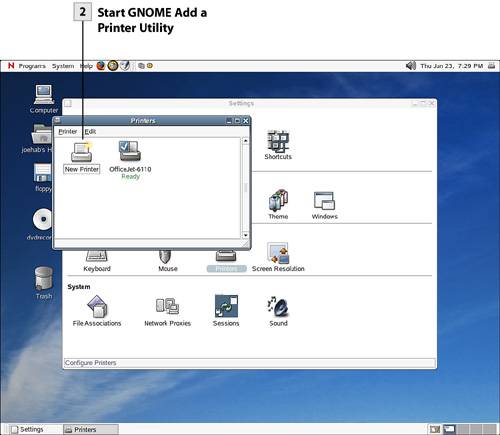
 Start GNOME Add a Printer Utility Start GNOME Add a Printer Utility
The Printers window shows currently installed printers. To add a printer with the GNOME Add a Printer Utility, double-click the New Printer icon.
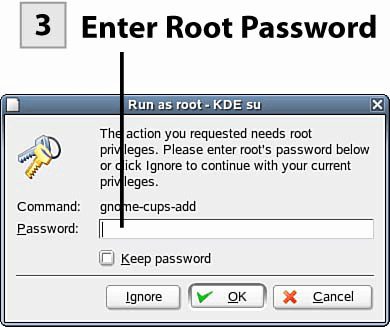
 Enter Root Password Enter Root Password
The Run as Root dialog box opens. Enter the root password and then click OK. The GNOME Add a Printer utility opens.
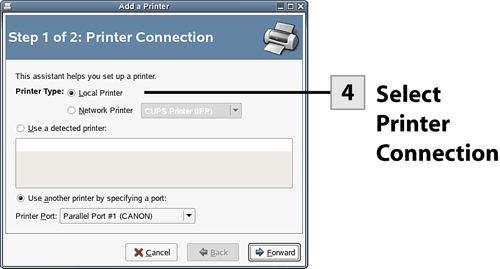
 Select Printer Connection Select Printer Connection
On the Step 1 screen specify the connection for the printer. If the printer is a local printer, use the Printer Port drop-down list to choose the port type (parallel, serial, or USB). In cases where you have just attached a new printer and the printer is listed in the detected printer list, select the Use a Detected Printer option button and then select the printer in the list.
Tip If you just connected a new plug-and-play printer to your computer and you don't see it listed in the detected printer list, try rebooting the system and see whether the printer shows up on the list after rebooting.
If you are installing a network printer, select the Network Printer option button. Then use the drop-down list to select the connection type for the network printer: CUPS Printer (IPP) Use this connection for network printers connected to other NLD or Linux systems on the network. If you select this connection type, you need the URI for the computer hosting the printer. Windows Printer (SMB) Use this connection for network printers attached to PCs (or servers) running the Microsoft Windows operating system. You need the Windows computer name, the workgroup (or domain) name for the computer, and a username and password configured on the Windows computer. Unix Printer (LPD) Use this connection to connect to UNIX systems or Linux systems on a network that is using the TCP/IP protocol stack (nearly every network you can think of). You connect to the remote printer via the hostname (or the IP address) and print queue name (of the remote system). HP JetDirect Printer Most HP Laserjet printers designed for network printing use a HP DirectJet card that allows them to be directly connected to the network. To use this connection type, you need to know the hostname or IP address of the printer.
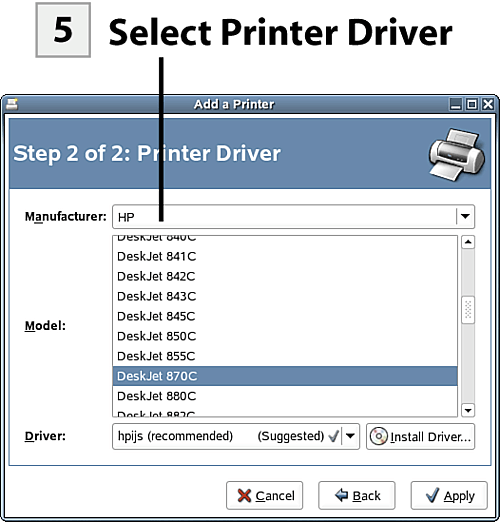
After selecting the connection type and providing any other information required, click the Forward button.  Select Printer Driver Select Printer Driver
On the Step 2 screen, select the Manufacturer drop-down list and select the manufacturer of your printer. Then scroll through the Model list and select your printer's model. The driver for the printer appears in the Driver box. Click the Apply button to accept the print driver.
Tip If you don't see your printer on the Printer Driver list, you can download new print drivers from http://www.cups.org. You can then install them from your hard drive or removable media using the Install Driver button on the Step 2 screen of the Add a Printer utility.
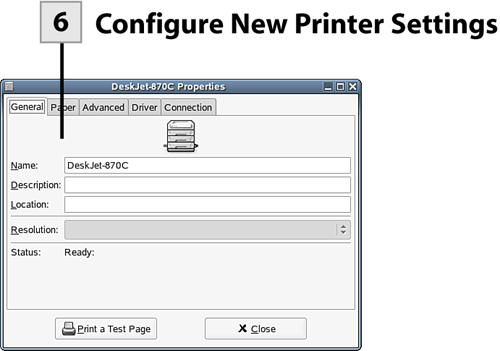
 Configure New Printer Settings Configure New Printer Settings
The Properties dialog box opens for your newly installed printer. It contains five tabs: General, Paper, Advanced, Driver, and Connection. On the General tab, change the name of the printer, add a description, or add a location for the printer. On the Paper tab, select the paper size, paper type, and source. On the Advanced tab, set the printout mode. On the Driver tab, select a different driver for the printer. On the Connection tab, modify the connection information (for a network printer).
Tip You can print a test page from the printer's Properties dialog box. It is probably a good idea to print a test page before changing any of the default properties. If the test page does not print, check the driver information on the Driver tab and the connection information (that you supplied during the installation), which appears on the Connection tab.
When you have completed viewing and configuring the printer's settings, select Close. This returns you to the Printers window. Your printer is now ready for use. Tip You can access the properties of any installed printer. In the Printers window, right-click on the printer and select Properties from the menu. You will have access to the General, Paper, and Advanced tabs of any printer as a regular user. If you want to access the Driver and Connection tabs for the printer, select the Become Administrator button and enter the root password. The Driver and Connection tabs are added to the printer's properties dialog.
|