| The first group of icons in the Settings dialog box is categorized as Personal settings. These settings relate to special accessibility features and also provide control over the items on the Programs menus and the settings for keyboard shortcuts.  Before You Begin Before You Begin
22 About GNOME Personal Settings |
Web Resource http://www.novell.com/documentation/nld/index.html Go to this website to access documentation provided by Novell for NLD.
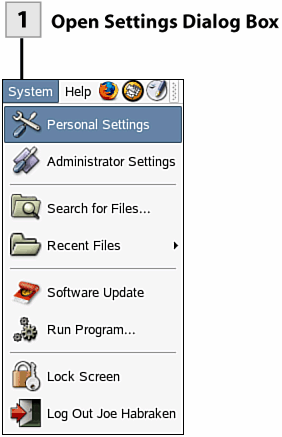
 Open Settings Dialog Box Open Settings Dialog Box
To open the Settings dialog box select the System menu and then select Personal Settings.
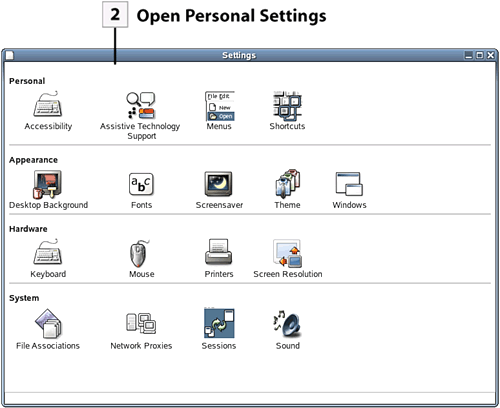
 Open Personal Settings Open Personal Settings
To open one of the Personal Settings dialog boxes, double-click the appropriate icon.
 Change Accessibility Settings Change Accessibility Settings
If you do not want to configure keyboard accessibility settings, you can skip this step. Double-click the Accessibility icon to open the Accessibility dialog. On the Basic tab, select Enable Keyboard Accessibility Features (to enable accessibility). You can then enable sticky keys (helper keys such as Alt and Ctrl that only have to be tapped rather than held down when used for shortcuts) and repeat keys (the delay set for a key before it repeats) on this tab. Select the Filters tab. On this tab you can configure slow keys (key must be pressed for certain duration) and bounce keys (prevents double typing by setting a time limit for consecutive uses of a single key). Select the Mouse Keys tab. This tab allows you to configure the arrow keys on the number as a keyboard mouse. You can configure items such as the speed and acceleration for the keyboard mouse. After you have finished configuring the Accessibility settings select Close to close the dialog box.
Tip If you want to use the Assistive Technology Support features, which provide onscreen keyboard support and special screen magnifiers, you must install four additional packages (which are not installed as part of the typical NLD installation): dasher, gok, gnopernicus, and gnome-mag. You can install these packages if you have access to the root password. These packages are available on either CD 2 of the NLD CD set or on the DVD. Open the Administrator Settings dialog (from the System menu). Then select Install and Remove Software. On the Filter drop-down list, select Selections. Then click the Accessibility check box. The four accessibility packages should be selected on the right of the YaST window. Place the appropriate CD or DVD in your drive. Then click Accept to install these packages.
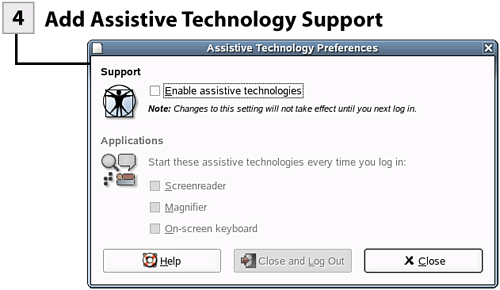
 Add Assistive Technology Support Add Assistive Technology Support
If you do not want to take advantage of the Assistive Technology Support features, skip this step. Double-click the Assistive Technology Support icon in the Settings dialog. Select the Enable Assistive Technologies check box. Then select the settings you want to use: Screenreader, Magnifier, On-screen Keyboard. To enable the settings, you must log off the system. Click the Close and Log Out button. When you log on to the system, the assistive tools that you selected will be enabled. The screenreader/magnifier divides the screen into two sections: The normal desktop is on the left, and on the right is a magnified version of the mouse pointer's position on the desktop. The onscreen keyboard (GOK) allows you to use the mouse to launch programs, manipulate windows, and compose from a keyboard using the mouse.
Tip To close the screenreader/magnifier, close the Gnopernicus window (which allows you to configure the screenreader/magnifier). You can relaunch any of your assistive tools using the Accessories submenu on the Programs menu. To deactivate all the assistive tools, return to the Assistive Technologies Preferences dialog and clear the Enable Assistive Technologies check box.
 Modify Programs Menu Modify Programs Menu
You can modify the Programs menu by adding new folders and program launcher icons. Double-click the Menus icon in the Settings dialog. To create a new folder on the Programs menu or in any of the subfolders (double-click a subfolder to open it), select File and then select New Folder. Type a name for the new folder. To add a program icon, Select File and then select Create Launcher. In the Create Launcher dialog provide a name and a command that starts the program (you can also browse for the program command). Click OK to create the launcher icon. After you have finished adding items to the Programs menu (or submenus), close the Programs window.
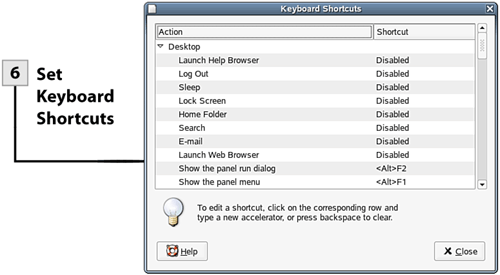
 Set Keyboard Shortcuts Set Keyboard Shortcuts
Keyboard shortcuts (a combination of a helper key such as Alt or Shift and another keystroke) allow you to quickly perform a particular task such as open your web browser, log out, or change the system sound volume. Double-click the Shortcuts icon to open the Keyboard Shortcuts dialog box. To set the shortcut for a particular action, select that action in the Action list (actions without shortcuts are marked disabled). To create the shortcut, press the key combination on the keyboard. The shortcut key combination appears in the Shortcut list to the left of the selected action. After you have completed setting your keyboard shortcuts, select Close.
|