Chapter 7. Utilizing Head Content
| CONTENTS |
| |
|

- How Head Content Works
- Interview: Lisa Tannenbaum
- Working with Head Content in Dreamweaver
- Working with <meta> Tags
- Dynamic Tables
- Working with Other Head Content
- Summary
In your frenzied rush to create the best, most beautiful, knock-their-socks-off web page, don't overlook the unglamorous but entirely practical world that lives inside your document head. This chapter discusses what goes into the head. You'll also see how Dreamweaver handles head elements such as search keywords, page refreshes, and document encoding. And you'll see how you can use these and other tools to maximize your working efficiency and web presence.
How Head Content Works
A standard HTML page contains a <head> tag and a <body> tag. The body contains all the page content that will actually display in the browser window. The head contains a variety of information that won't display (at least, not directly), although it can be accessed to determine how the page will be handled. Some head content will be accessed by the browser; some will be accessed by other programs, such as server software, search engines, and validation software; some might not be accessed at all, except by humans who might view or edit the code. The W3C specifies several elements that a well-formed head section could use. Unfortunately, the browsers have not yet fully implemented them all, so we can't take full advantage of the head.
Table 7.1 lists the standard head elements, along with a brief description of each.
| Tag | Purpose | Browser Support | Example(s) |
|---|---|---|---|
| <title> | Contains the page title, to be displayed in the browser window title bar and user bookmark menu. (See Chapter 3, "Creating and Working with Documents.") | Yes | <title>Webley's Web Widgets</title> |
| <link> | Specifies a relationship between the current document and another document. (See 13, "Using Cascading Style Sheets.") | Only for use with style sheets | <link rel="stylesheet" href= "widgetstyles.css" type="text/css"> |
| <base> | Specifies a URL and/or target, to which all document links will be relative. | Yes | <base href="http://www. webwidgets.com/"> <base target="_top"> |
| <basefont> | Specifies default font and/or type size settings for the current document. (See Chapter 4, "Working with Text.") | Yes (deprecated, in favor of CSS) | <basefont face="Georgia, New York, Book Antiqua"> <basefont size="2"> |
| <meta> | A generic tag for adding miscellaneous information to the document (for example, keywords, character encoding). | Yes | <meta name= "generator" content="BBEdit 6.1.2"> <meta http-equiv= "Content-Type" content="text/html; charset=iso-8859-1"> |
| <script> | Encloses JavaScript or other script statements for the browser to execute, or links to an external script file. (See Chapter 11, "Working with Forms.") | Yes | <script language="JavaScript"> function helloWorld() {window.alert("Hello, world!");}</script> <script src="widgets.js"> </script> |
| <style> | Encloses CSS style sheet information to affect the display of the current document. (See Chapter 13.) | Yes | <style type="text/css">a { font-weight: bold; text-decoration: none}</style |
Interview: Lisa Tannenbaum
Business Name: Grass Roots Consulting
URL: www.compugoddess.com
Lisa Tannenbaum
Lisa Tannenbaum is Internet Program Coordinator for the University of New Mexico's IT Training Center. She teaches all aspects of online development, focusing on online marketing and business practices. Her web site includes various tutorials and helpful links.
How important do you think search engines are in the overall marketing strategy for a web site?
They're hugely important. Even if you think you don't want to put a lot of energy into promoting your web site through the search engines, people must be able to find your site if they search for it.
An example: I had oral surgery a while ago with a doctor who had a beautiful web site and was actively using it to pre-register his patients (for example, new patients could go online to fill out their medical history, so it would be available for their first appointment). Several months later, I tried to find his web site, using a number of search engines, to no avail I had to call his office to find the URL. As it turned out, there were no meta tags whatsoever in his pages, nor had the site ever been submitted to any of the search engines.
That's an example of the very least visibility a site must have on the search engines. And although some of the search engines have started to charge for submissions, a search engine presence is still one of the least expensive and potentially most powerful ways to market a web site.
Just think about how you use the search engines yourself: when you want to learn about something new, what do you do? Chances are that you look at the first page or two of results returned to you by a search engine, and sample some sites from that list. That's exactly the way everyone else does it, too. Why not get some of those people to your web site?
Can you share any tips or tricks for creating lists of searchable keywords?
Let's imagine you're marketing a new brand of potato chips. Here are some of the techniques you might consider using:
-
Make use of all the most obvious keywords and phrases. In this example, your list might include "potato chips, snacks, chips."
-
Use both plural and singular forms of keywords and phrases. Thus, you'd also add "potato chip, snack, chip" to your list.
-
Add common misspellings to the list, such as "potatoe chips" and "patato chips."
-
Considering using either Initial Caps or ALL CAPS in your list, for the benefit of case-sensitive search engines (AltaVista is one). A search for "potato chips" (lower case) in a case-sensitive search engine will return all pages with the phrase "potato chips" in them, regardless of case; while a search for "POTATO CHIPS" (all caps) will return only those pages where the phrase exists in all caps. That might not be a good search technique for the searcher, but that's not the point don't you want to show up in a searcher's results, regardless?
-
Be alert to the keywords/phrases that competing sites use you might pick up some relevant words that you never would have thought of on your own.
Do you focus on a few popular search engines? If so, which ones?
I normally submit to only a few search engines. However, as pay-to-play is becoming more prevalent on the web, the no-cost choices have narrowed considerably. However, I still always submit to Lycos, HotBot, and AltaVista (at the time of this writing, all still allow free submissions, although you might have to work to find them). I also sometimes submit to Google and AskJeeves.
Open Directory (www.dmoz.org) is also free, although I wait until I have a site full of content before I submit to them. Actual human beings, as opposed to robots, index their pages and I basically submit to them (at the most) once a year. This is the same technique I use with Yahoo! and LookSmart (which generally are not free).
What head content do you typically use in your web pages? Do you stick with the basics (keywords and description), or do you take advantage of any of the other meta tags?
I just stick to keywords and description. However, I should mention that meta tags are becoming quite a bit less important in most search engines' algorithms probably because misleading tags have duped so many robots. For example, as far as the search engine observers can tell, Google doesn't use meta tags at all, either in their algorithms or site descriptions.
The description tag is still very important, in spite of this trend, because many search engines still use it in their site descriptions, if not in the search algorithms. It's a great 25-word opportunity to get people interested enough in your web site that they click on the link.
How often do you recommend updating the keywords or other head elements, for better search engine results?
Whenever you think of a new one.
How important is it to register with the search engines?
It's absolutely essential. There's no point in having a web site if no one can get to it.
Working with Head Content in Dreamweaver
Dreamweaver provides two main interfaces for dealing with head content: the category of Head objects in the Insert bar, for adding content to the head; and the Head Content view option, along with Property inspectors for each kind of content, for examining and editing head content.
Viewing and Examining Head Content
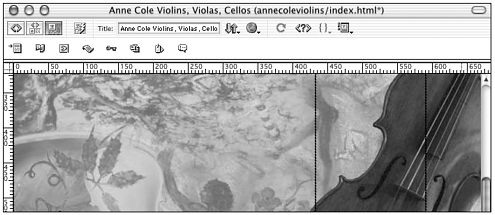
Head content cannot be dealt with directly in Dreamweaver Design view, because the Design view only shows the content that will display in a browser (<body> content, in other words). Although you're always free to access head elements directly through Code view, the Code inspector, or Tag Inspector, Dreamweaver also provides a visual interface that shows an icon for each element present in the head (see Figure 7.1).
Figure 7.1. Displaying head content as icons in Design view.
View/Hide Head Content
To view/hide head content, choose View > Head Content to toggle the head content display on/off. Alternatively, use the View Options pop-up menu in the Document window's toolbar, and choose Head Content for the same result. (Note that Head Content won't show up as an option in the pop-up menu unless you're in Design view/Code and Design view.) A gray bar appears, at the top of the Design View window, showing an icon for each head element (see Figure 7.1).
Examine/Edit a Head Element
To examine/edit a head element, click its icon in the display bar, and use the Property inspector to view and change the element's attributes.
Rearrange Head Elements
In most cases, the order of elements in the head doesn't matter, because each element serves a different function, and is called on when needed regardless of position. In some situations, however when linking multiple external style sheets to one document, for instance the order can be very significant. In these cases, just drag and drop the icons in the gray display bar to rearrange the items in the code.
Adding Head Content
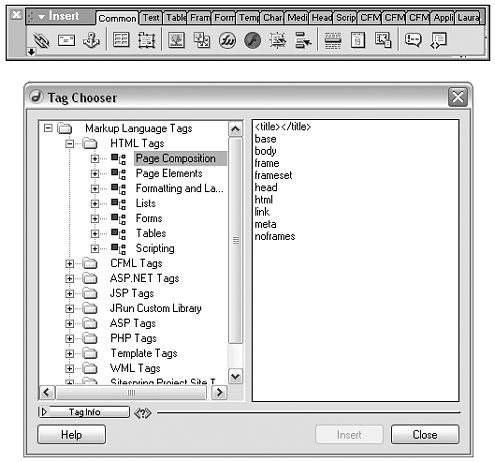
Dreamweaver inserts some head elements automatically as you create and edit pages (title, script, and style, for instance). Other commonly used head elements have corresponding objects in the Head tab of the Insert bar (see Figure 7.2). If you want to add an element that isn't in the Insert bar, you must enter it in Code view, either by typing it in yourself or using the Tag Chooser (see Figure 7.3).
Figure 7.2. The Head tab of the Insert bar.
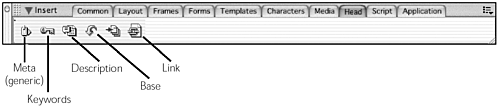
Figure 7.3. Using the Tag Chooser to insert head content not represented in the Insert bar.
Note
| | You can also increase your <head> content options by searching the Macromedia Exchange for Dreamweaver for an extension that does what you want. Alternatively, you can create your own Head object extension; read all about custom objects in Chapter 36, "Creating Extensions." |
To insert a head element, click one of the Head objects in the Insert bar (see Figure 7.2) or choose from the Insert > Head Tags submenu.
You can insert head elements from either Design or Code view, but with a few important differences. If you're working in Design view, placement of the insertion point isn't crucial when working with head content. No matter what element in the <body> you might have selected when you insert, Dreamweaver knows to put head content in the head. If you have one of the icons in the head element display selected when you insert, Dreamweaver will place the new element immediately after the selected element. If no head elements are selected when you insert, Dreamweaver will insert the new head element at the end of all other head content.
If you're working in Code view when you insert a Head object, the code for the object will be inserted wherever the insertion point is even if that means inserting it outside the <head> section entirely, or even inserting it within another HTML tag. (Obviously, unless you know your way around HTML tag syntax, it's safer to use Design view for adding your Head objects.)
Note
| | If you like working in Code and Design view, remember that either the Design or Code portion of the Document window must always have focus. If you insert Head objects while the Code portion has focus, your insertion point must be in a proper location within the <head> tags for the object to be correctly inserted. |
Working with <meta> Tags
Meta means "about." The purpose of the <meta> tag is to store information about the current document for possible processing by browsers, servers, search engines, or even lowly humans viewing the source code. For each different kind of information you want to store, you use a different <meta> tag. HTML documents can have as many <meta> tags as needed, all stored in the head.
How <meta> Tags Store Information
Information is generally stored in the <meta> tag as a name/value pair, using the name and content attributes. Like this:
<meta name="generator" content="Dreamweaver">
Over time, certain name/value pairs such as keywords, description, and refresh have become standard in HTML use, and are collected and processed by browsers and/or search engines. However, web authors also are free to create any desired name/value pairs to store other document-related information. Many popular HTML editing programs, for instance, use a "generator" <meta> tag when generating code, to sneak some free advertising into user documents. Some web authors let potential code-borrowers know whom they're borrowing from with an "author" tag, as follows:
<meta name="author" content="Julius Marx">
The various <meta> tags are useful enough that Dreamweaver supplies several objects representing different kinds of meta information. The following paragraphs examine these.
The Character-Encoding <meta> Tag
This kind of <meta> tag isn't in the Insert bar. Dreamweaver inserts it automatically into every HTML document it generates. The code looks like this:
<meta http-equiv="Content-Type" content="text/html; charset=iso-8859-1">
(See the following section for more on http-equiv, which is used here in place of name.)
This standard <meta> tag tells the browser what character set to use in representing the text portions of the page. ISO-8859-1 refers to Latin-1 encoding, used for most western European languages. Examples of other encodings include ISO-8859-5 (Cyrillic) and SHIFT_JIS (Japanese). Unless you know what you're doing, don't mess with this tag.
<meta> Tags and the Generic Meta Object
Because, ultimately, every <meta> tag consists of a name and some content, the Dreamweaver generic Meta object is the perfect bare-bones tool for inserting custom meta information. Figure 7.4 shows the generic <meta> tag being inserted.
Figure 7.4. Inserting meta content with the generic meta object.
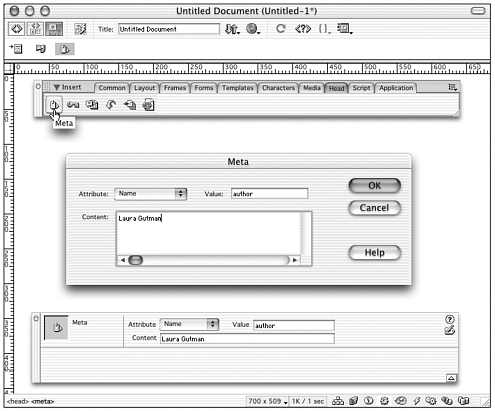
To insert a <meta> tag, follow these steps:
-
Click the Meta object (or choose Insert > Head Tags > Meta).
-
In the dialog box that appears, use the pop-up menu to choose either the name or http-equiv attribute to include. (The http-equiv attribute maps the attribute and its respective name to the HTTP response header for processing. Unless you know specifically what you want, and are sure that http-equiv is appropriate, use the name attribute.)
-
In the dialog box's Value text field, enter the value you want the name (or http-equiv) attribute to have.
-
In the dialog box's Contents text area, enter the value you want the content attribute to have.
Figure 7.4 shows how the dialog box insertion areas translate into the finished <meta> tag code. Why not use this generic object to insert all meta content? The <meta> tags that use standard keywords, those that a browser or other agent will be processing, also require standardized syntax for their content. Dreamweaver's specialized Meta objects take care of those syntax requirements for you. Dreamweaver does not include all the <meta> tags that you might want to use. Table 7.2 lists some of those <meta> tags not included with Dreamweaver.
| Syntax | Description/Purpose |
|---|---|
| <meta http-equiv="expires" content="15 Apr 2001 23:59:59 GMT"> | Specifies a date after which the browser cache for the current page will expire. This guarantees that visitors' browsers won't show an out-of-date version of the page. The date and time should be formatted as of-date version of the page (as shown). The time information is optional. |
| <meta http-equiv= "Set-Cookie" content=cookie_ name=cookie_ value; expires=1 Jan 2002 23:59:59 GMT"> | Sets a cookie with whatever name and value are specified in place of cookie_name and cookie_value (for example, favorite_ color=green). The expiration information is optional; if it's not present, the cookie expires when the browser is shut down. |
| <meta http-equiv="pragma" content="no-cache"> | Prevents the browser from caching the page. Note that Internet Explorer versions 4 and later ignore this tag. |
| <meta http-equiv= "Content-Script-Type" content=" text/language_name"> | Specifies the language to be used in all <script> tags within the document. The content string might read text/javascript or text/vbscript, for instance. |
Meta Keywords and Descriptions
Undoubtedly the most commonly used, and most generally practical, of the <meta> tags are those that help search engines locate and retrieve information about our documents. The most common of these are the "keywords" and "description" tags:
<meta name="keywords" content="Marx Brothers, humor, vaudeville, movies, Groucho, Harpo, Chico, Zeppo, Gummo"><meta name="description" content="An unofficial look at America's kings of slapstick and wise- cracking. With links and freebies.">
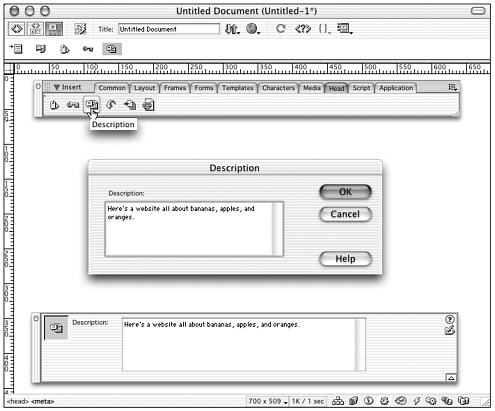
The "keywords" tag contains a comma-separated list of words that web visitors might type into a search field; these should lead them to the current document. The "description" tag contains a few sentences that can be used in a search results page to represent the current document. A Dreamweaver object represents each of these (see Figure 7.2). To insert either into your head section, click its object (or choose from the Insert > Head Tags submenu) and enter the appropriate information in the dialog box. Figures 7.5 and 7.6 show these tags being inserted (in Design and Code views).
Figure 7.5. The "keywords" <meta> tag being inserted and later inspected using the Keywords object.
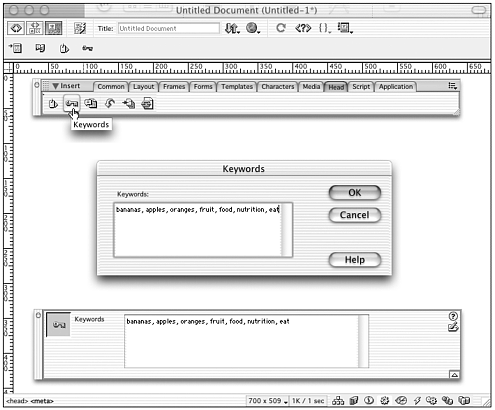
Figure 7.6. The "description" <meta> tag being inserted and later inspected using the Description object.
Maximizing Searchability
Using keywords and descriptions, and using them well, are two different things. The more you know about how search engines work, and how to take full advantage of their offerings, the better your standings in the search results will be.
Search engines work by sending out automated programs, called robots (or web crawlers, or spiders, or bots) to index web pages. Indexing consists of retrieving documents and recursively retrieving all documents referenced (that is, linked) from those documents. Robots determine which pages to start indexing by various means, including when a web page author or webmaster registers the page with the search engine. When a visitor accesses the search engine and enters one or more search words, the engine returns results based on its analysis of the documents it has retrieved. Results are based on matched keywords, but also on other factors; matched words in the description, the page title, visible document content, links, and alt text are commonly searched as well.
Note
| | There is much more to this subject than will fit in this chapter. Luckily, the web is full of wonderful resources. A great place to start is World of Design (www.globalserve.net/ ~iwb/search_engine/killer.html). This site includes articles, tutorials, and a host of useful links related to <meta> tags and search engines in general. |
Here's the code for how a sample head section is set up for maximum searchability:
<head> <title>The Web Widgets Construction Materials Home Page</title> <meta name="keywords" content="web, widgets, construction materials, building tools, web tools, snarflators, crambangers, diffusion devices, child, children, diffuse, diffusion, ....."> <meta name="description" content="The Web Widgets Construction Materials Company, home to a vast selection of snarflators, crambangers and other web tools. Visit us for daily specials and our unique how-to section."> <!--The Web Widgets Construction Materials Company, home to a vast selec tion of snarflators, crambangers and other web tools. Visit us for daily specials and our unique how-to section.--> </head>
What elements make this code so searchable?
-
Page title. The information in the <title> tag is descriptive and readable (can be searched, and might show up on some search results pages) and uses several words present in the keywords list.
-
Keywords. Keywords are case-sensitive and are in the plural where appropriate. (If the keyword is singular, and the user searches using a plural, no match will be found.) No words are repeated except where necessary. (Unnecessary repetitions will either be ignored or will be considered "spamming," and might get the entire site banned from the search engine.) The keywords list is approximately 900 characters long, which is the maximum length that will be accepted by some search engines (some engines accept as many as 1024).
-
Description. The description uses words from the keywords list. It is slightly under 200 characters long, which is the maximum acceptable length for most search engines (some accept fewer). Note that if your description or keywords are too long, they won't be considered in the search; it doesn't necessarily mean the robot will reject the page.
-
Comment. A comment is inserted, repeating the contents of the description. This is to address those few robots (most notably Excite and Magellan) that do not search <meta> tags.
Limiting Searchability
Wait a minute. Why would you want to stop robots from indexing your documents? Quite simply, you might have any number of reasons. Certain areas of a web site might contain private or secure data. If your site uses frames, you might not want framed pages to be indexed outside their framesets. Certain areas, such as ASP and CGI folders, might contain scripts that will run when accessed, with undesirable results. On a large site, the increased traffic of robots indexing every single page might be a drain on the web server.
You can limit robot traffic in two ways, one of which Dreamweaver can help with.
-
The robots.txt file. This file, which resides on the server, can specify certain folders within a site that robots should not index. Using robots.txt, you can isolate these site areas from all robots or from specific robots. The contents of the file might look something like this:
USER-AGENT: * DISALLOW: /asp/ DISALLOW: /cgi-bin/ DISALLOW: /private_folder/
The disadvantage to using robots.txt is that each web server must have only one such file, located in a folder at the root level of the server. Customizing it is therefore the province of the server administrator, not the individual web authors.
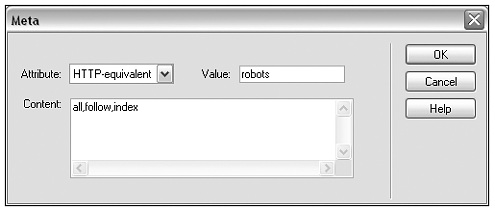
-
The "robots" <meta> tag. Less reliable than robots.txt, but more easily accessible, is adding a <meta> tag to your document with a name of "robots" and one or more of the following values, in a comma-separated list, for content: all, none, index, noindex, follow, nofollow. To explicitly allow access to all links within a page, use the following code:
<meta name="robots" content="all, follow, index">
To deny access to a page and its links, use this:
<meta name="robots" content="none, noindex, nofollow">
To allow access to the current document, but not its links, use this:
<meta name="robots" content="index, nofollow
Because Dreamweaver does not offer a specific Meta Robots object, use the generic Meta object to insert this tag. From the Head tab of the Insert bar, click the Meta object. Figure 7.7 shows a "robots" <meta> tag being added to a document, with typical settings in the dialog box.
Figure 7.7. Using the generic Meta object to insert a "robots" <meta> tag into a document.
Exercise 7.1 Making a Document Searchable
In this exercise, you set up the Walt's Web Widgets home page to take maximum advantage of search engines. The files for this exercise (and the following exercises) are on the CD that accompanies this book, in the chapter_07 folder. If you haven't done so already, copy those files to your hard drive so that you can work and save changes. Figure 7.8 shows Walt's home page.
Figure 7.8. Walt's Web Widgets home page (main.html) as it appears in a browser.
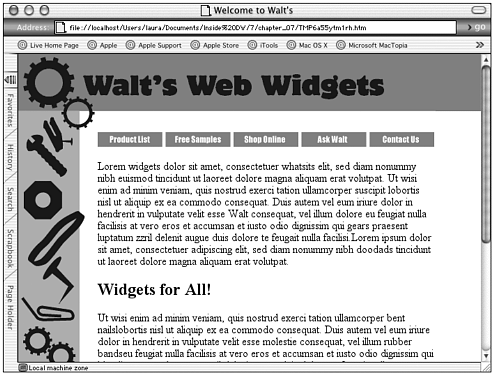
Walt's Web Widgets sells widgets also known as doodads, gewgaws, thingamajigs, and whatsits. His stock consists of, among other things, bent nails, rusty screws, anonymous keys, rubber bands; you name it, Walt's has it. When people need just the perfect little piece of junk for a very particular job, Walt wants them to find him. Keep that in mind as you're filling out the keywords and description for this page.
-
From the chapter_07 folder, open main.html. You will be setting up searchability for Walt's home page. In the Document window, show the head content (View > Head Content, or use the View Options icon in the toolbar). In the Insert bar, bring the Head tab to the front.
-
Start with keywords. Remember, you want to end up with 900 characters, if possible, to take full advantage of your allotted space in the search engine's index. From the Insert bar, click the Keywords icon to insert a "keywords" <meta> tag. In the dialog box, enter as many words related to widgets and Walt's stock in general as you can think of, separated by commas (spaces are optional). Use the following to help you get started:
widgets, doodads, thingies, thingy, thingummies, thingummy, thingamajigs, thingimajigs, whatsits, geegaws, gewgaws, odds and ends, junk, stuff, paper clips, bent screws, rusty nails, wire pieces, rubber bands, string, washers, nuts, bolts, screws, pushpins, tacks, thumbtacks
Remember to use the plural rather than the singular, and not to repeat words unnecessarily. Note that in the sample words shown here, some plurals and singulars appear (thingies, thingy). That's because the plural and singular are spelled differently; so in this case, users searching for the singular won't find it from the plural. Also note that alternative spellings (geegaws, gewgaws) are included. If you can think of a common way that people tend to misspell (or mistype) words, those variants also are good items to add to the list. That 900-character limit is higher than you might think!
Note

How fun is it to keep counting characters as you go? Not much. Unfortunately, Dreamweaver, unlike some text editors, has no tool for automatically counting words or characters. If you have a text editor that can count characters, you could use it as an external code editor (see Chapter 33, "Writing Code in Dreamweaver"). Or you could create the keyword list in a word processor that can count. Alternatively, if your JavaScripting skills are up to it, you might decide this is a dandy opportunity to create a custom Dreamweaver extension a keyword counter! (See Chapter 36 for a full discussion of this.)
-
Check the page title. Hmm, "Welcome to Walt's" might look nice in the Bookmarks list, but it doesn't contain any real information, and more important for the search engines it contains no keywords. Change the page title to something more suitable (Walt's Web Widgets; Widgets, Doodads, and Thingies).
-
Add the "description" <meta> tag. From the Insert bar, click the Description object. In the dialog box, enter a 100 200-character description of Walt's. Maybe something like this:
Visit Walt's Web Widgets for the world's largest supply of doodads, thingummies, and whatsits, all at unbelievable prices. We can find hard-to-get items.
-
Repeat the description in a comment. No, you don't have to type it in again! Just do this:
-
From the head content display bar in the Document window, select the description icon.
-
In the Description Property inspector, select the text you entered and copy it (Ctrl/Cmd+C).
-
Go to Code view, and place the insertion point just before the closing </head> tag.
-
From the Common tab of the Insert bar, click the Comment object, which will insert the opening and closing comment tags. (Or you can just type <!-- --> .)
-
Put the insertion point between the two double dashes, and paste (Ctrl/Cmd+V).
The new comment will appear in your head section, immediately following the description. You'll see the little comment icon in the head content display bar.
-
-
Finally, you will give the robots some instructions, letting them know they can search Walt's entire site. (Walt has no secrets!) In the Insert bar, click the generic meta object. Set the dialog box entries to match those shown in Figure 7.7.
Walt's Web Widgets is now ready to go public!
Meta Refresh
Another standardized and popular kind of <meta> tag is the "refresh" tag. This tag, when present, is processed by the browser, causing the page to either reload itself or load a new page after a set amount of time has elapsed. To reload the current page after 10 seconds, the syntax looks like this:
<meta http-equiv="refresh" content="10">
To load a new page after 5 seconds, the syntax looks like this:
<meta http-equiv="refresh" content="5;URL=pagetwo.html">
Refresh tags that reload the current page are often used with pages that contain dynamic data, such as breaking news, stock quotes, or the time and temperature. They're also used with web cam pages every few seconds, the page reloads and a new web cam picture is automatically loaded into place. Refresh tags that load new pages are often used with redirection pages: Our site has moved!. They're also used with splash screens that show a brief welcome message or graphic for several seconds, and then whisk viewers away to the true home page. And they can be used in tandem with plugin media for scriptless plugin detection. (See Chapter 19, "Plugins, ActiveX, and Java," for a full discussion of this.)
Dynamic Tables
| | In a live data page, it's not the table itself that's dynamic, but its contents. Table rows, and even entire tables, can be used as repeating regions to display multiple records on a page (see Figure 7.9). |
Figure 7.9. A table populated with dynamic data.
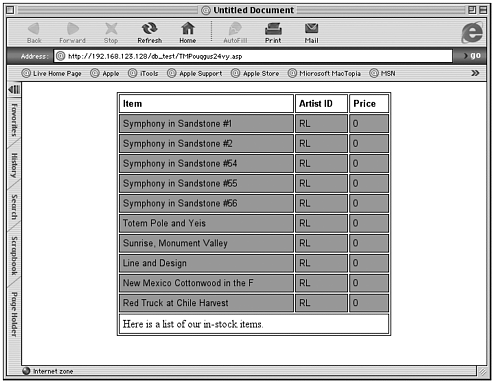
To declare a table row as a repeating region, select the entire row (use the tag selector, or drag to select all cells in the row). In the Server Behaviors panel, click the plus (+) and choose Repeat Region. Note that the repeating region doesn't need to be the only row in the table, though it can be. It also doesn't need to be the first or last row in the table.
To declare an entire table as a repeating region, select the table (it's safest to use the tag selector to do this). In the Server Behaviors panel, click the plus (+) and choose Repeat Region.
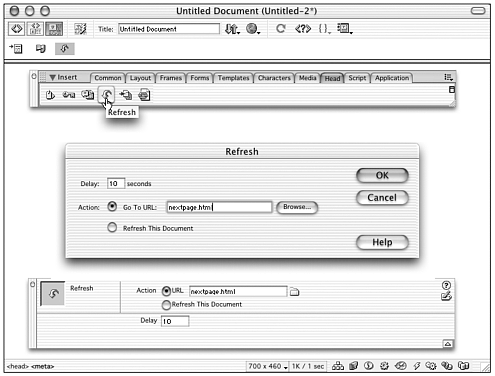
The Meta Refresh Object
In Dreamweaver, you insert refresh tags using the Refresh object, as shown in Figure 7.10. Click the object in the Insert > Head panel (or choose Insert > Head Tags > Refresh from the menus) and enter the number of seconds that should elapse before the refresh and whether to load a new page or reload the current page.
Figure 7.10. A refresh <meta> tag being inserted and later inspected, using the Refresh object.
Tips for Refreshing
Although using the tag is nice and straightforward, as with all things there are issues to consider:
-
Unfortunately, refresh tags are not only used by the good guys. They also are used for much more sleazy purposes by disreputable sites (porn sites, for instance), allowing visitors to bookmark seemingly innocuous pages, such as "Aunt Bee's Quilting Zone," that are actually automatic links to "Hot Babes R Us" or "How to Construct a Nuclear Bomb." For this reason, some search engines will not index pages that contain refresh tags.
-
Deciding how long to pause before refreshing (especially if the refresh will load a new page) requires some thought. How long is too long? If there is content on the current page (an animation, text to read), how long is long enough?
-
If the refresh will be going to a new page, you might consider including a clickable link to that new page, so impatient users don't have to wait the required number of seconds.
Exercise 7.2 Create a Refreshing Splash Page
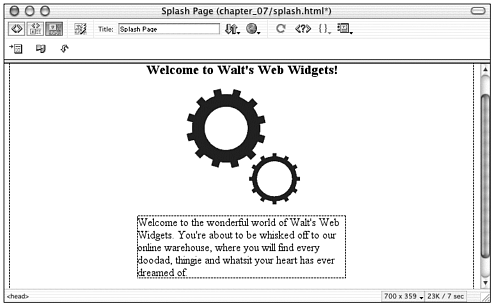
To get some experience with the refresh tag, you can use the Web Widgets files from the preceding exercise. In the chapter_07 folder, along with main.html, is splash.html, shown in Figure 7.11. Open that file now. It contains an animated logo and welcome message, and Walt wants his customers to see it for a few seconds before going on to visit the rest of the site.
Figure 7.11. The Walt's Web Widgets splash page (splash.html), as it appears in the browser.

Note
| | No matter what size the browser window, the page content of splash.html will be vertically and horizontally centered onscreen. The effect is created by placing the content in a table with a width and height of 100%, and cell alignment of center (horizontal) and middle (vertical). |
-
To begin with, add the refresh tag. In the Head tab of the Insert bar, click the Refresh icon. When the dialog box appears, choose main.html as the file to load. How long should you have visitors wait? Start by entering 10 seconds into the Delay field.
-
Before proceeding any further, try the page out in a browser. Choose File > Preview in Browser, then sit and wait until the refresh occurs. (If it doesn't occur, go back to Dreamweaver and double-check your steps!) Is 10 seconds too long? Try 5 seconds or, find your own best delay time.
-
What about the viewers who don't want to wait any time at all? For them, you will add a regular link to main.html. You can add the link to the animated logo itself, or you can add a line of text, click to enter, beneath the logo. Alternatively, you can do both, just to cover all your bases. After you've done that, try it out to make sure it works before proceeding.
-
Finally, change the scenario. What if the splash page has something on it that people might want to read? A joke, an introductory sentence or two, an interesting news tidbit. Add some lines of text to the page so that it looks like the page shown in Figure 7.12.
Figure 7.12. The final Web Widgets splash page, with its added content, ready to entertain and divert visitors.
-
Now preview the page in a browser and imagine you're a first-time visitor. Maybe you want a few more seconds to read the text? Or maybe you think the delay time you've chosen still works fine. Just remember: The more there is to absorb on the page, the longer you might want to delay.
Note
| | Why do web sites have splash pages? First, there's a psychological reason. You're "framing the picture," mentally putting visitors in the mood for the web site to come. Obviously, this goal is more appropriate for some web sites (entertainment sites, online brochures) than others (informational sites). Second, there's a technical reason. While the viewer is seeing the splash page, you can be performing a browser check, starting the download of large graphics or media files that will be needed later, checking cookies, and so forth. |
Working with Other Head Content
You'll probably spend more time using the various Dreamweaver Meta objects than either of the other Head objects, but both <link> and <base> have their uses as well.
Base Tags and the Base Object
In HTML, the purpose of the <base> tag is to provide an absolute URL and/or a link target that the browser will automatically use to resolve all links within the document. It sounds more complicated than it is.
Base Tags and Absolute URLs
When a browser encounters relative URLs in an HTML document, it constructs absolute addresses from them by accessing a "base" URL, usually that of the current document itself. If your web page address is http://www.yourcompany.com/index.html, and the page contains a link to images/spacer.gif, the browser combines those two addresses to construct an absolute URL for the image: http://www.yourcompany.com/ images/spacer.gif.
If your document head uses the <base> tag to specify an alternate URL, like this
<base href="http://www.webwidgets.com/store/">
all relative links in the document will now be calculated relative to that address.
<a href="pricelist.html">Home</a>
resolves to
http://www.webwidgets.com/store/pricelist.html <img src="../images/spacer.gif">
resolves to
http://www.webwidgets.com/images/spacer.gif
These addresses will be used even if the actual URL of your document is entirely different, like this:
http://www.homepagesRus.com/index.htm
When would you want to use the <base> tag to override your document's own URL for relative addressing? You would want to on two occasions:
-
When creating mirror sites, where sets of pages on different web servers refer to a common resource pool of images or pages, <base> makes it possible to just port the pages to the mirror server. Using <base>, the relative links can be made to point to resources that are on the original server.
-
When inserting HTML into email messages, all links must either be absolute or be relative to a specified <base>. This is because email messages have no URL for the email browser to use in constructing absolute paths. (Note that some email software, most notably Hotmail, cannot correctly construct URLs using <base>. It's safer, therefore, to just use absolute URLs throughout, and not specify a <base>.)
Base Tags and Link Targets
Targets in links determine in which browser window a linked document will appear. (See Chapter 12, "Designing Frame-Based Pages," for a full discussion of targets and target names.) Valid targets include the assigned name of any open window or frame in a frameset, or any of the generic keywords such as _blank for a new window, or _top for the main window in a frameset. The normal link syntax looks like this:
<a href="widgets.html" target="_blank">
If, however, the document head includes a base tag that points to a target, like this
<base target="_blank">
all links in the document will be opened in that target window, exactly as if the target were specified in each individual link. A link coded as
<a href="widgets.html">
will behave as though it were coded using the full targeting syntax.
Why would you want to use the <base> tag to specify targets document wide, instead of specifying them individually for each link? It results in more efficient HTML, especially if your page contains many links (a resources or bibliography page, for instance). It also makes life easier because you don't have to remember to specify every single target; it also makes editing simpler, if you change your mind about where links should be targeted. Instead of changing dozens of individual links, you need change only the <base> tag.
Note
| | If you specify a target using the <base> tag, does that mean every single link in your document absolutely must use that target? No you can override the <base> target for specific links by specifying a different target for the link itself. So if the <head> section specifies <base target="content">, but a link on the page specifies <a href="mypage.html" target="nav">, that particular link will open in the window named nav. |
Tip
| | If you're a smart Dreamweaver user, of course, you could use a tag-specific Find & Replace to quickly change all those targets, instead of using the <base> tag. Tag-specific searches are discussed in Chapter 33. |
Using the Base Tag in Dreamweaver
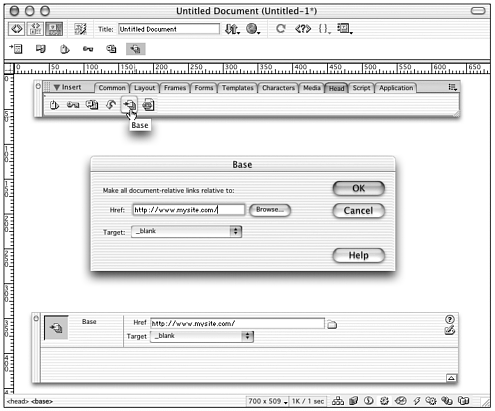
To insert a <base> tag into a Dreamweaver document, use the Base object in the Head tab of the Insert bar, as is shown in Figure 7.13. This object enables you to enter a URL and/or a target name. As with any head content, it doesn't matter where the insertion point is when the object is chosen; the <base> tag will automatically be inserted into the head.
Figure 7.13. A <base> tag being inserted and later inspected, using the Base object.
Remember the following few tips when working with the <base> tag in the Dreamweaver environment:
-
Only one <base> tag per document. Dreamweaver won't stop you from inserting multiple <base> tags in your document, but it's not legal HTML. Don't do it.
-
Remove empty href attributes. If you specify a base target and no base URL, Dreamweaver will write the code for the <base> tag like this (problem code is highlighted):
<base href=" " target="_blank">Although this is technically legal, it can cause the browser to misinterpret all the links on your page. (A link to spacer.gif is resolved to http://spacer.gif, which is a meaningless address.) Avoid the problem by going to Code view and manually deleting the empty href attribute.
Note
If you find yourself repeatedly using the <base> tag for targeting, and manually removing code, you might want to download Massimo Foti's Base Target object from the Macromedia Exchange for Dreamweaver.
-
Type in the absolute URL. Although Dreamweaver allows you to browse to choose the base URL, doing this will create a relative address. For standard use, the <base> tag requires an absolute address.
Don't forget the final slash (/). The browser will ignore any part of the URL that falls after the final slash. The following base URLs are considered equivalent:
http://www.webwidgets.com/ http://www.webwidgets.com/index.html http://www.webwidgets.com/images
-
Previewing pages with base URLs. After you have specified an absolute base URL, you won't be able to properly preview the page (in Dreamweaver or your browser) until you've uploaded all relevant files to the server. If you really want to preview the page while you're working locally, you need to substitute the address of your local site folder. This is a URL beginning with the file:// protocol. To access that information, open one of your site's documents in Dreamweaver and use Preview in Browser (F12) to view the page in any browser. Look at the URL in the browser's address field the path will end in the name of the temporary file, but it should begin with the absolute URL of your local site folder. Like this (the local folder address is shown in bold):
file:///Power%20Girl/Web%20Widgets/Local%20Site/TMP2onxb308wp.htmCopy the relevant part of the address from the browser and paste it into your <base> tag. (Be sure to include the final slash!)
<base href=" file:///Power%20Girl/Web%20Widgets/Local%20Site/">
After you've done this, you can preview locally, but not by using Dreamweaver's Preview in Browser feature. You'll need to open the page manually from the browser. And of course, don't forget to restore the proper base URL before uploading the page!
-
Don't use the Site panel to move files. After you have got a base URL in place, you're in charge of the relative links. If you rearrange your site's file structure using the Site panel's File view, Dreamweaver will try to update all relative links don't let it! It will corrupt the links and nothing will work. To be safest, do your file rearranging outside of Dreamweaver, using your operating system's file management (Windows Explorer or Macintosh Finder).
Exercise 7.3 Add a Base Target to a Page's Links
Back to Walt's Web Widgets for this exercise. Walt has decided that he wants all the subject pages on his site to open in a new browser window, so the visitor never leaves the home page. You can accomplish this quickly by adding a <base> tag specifying a target of _blank.
-
From the chapter_07 folder, open main.html. Make sure head content is showing, and that the Insert bar is showing the Head category. It doesn't matter what in the Document window, you have selected.
-
In the Insert bar, click the Base object. When the dialog box appears, leave the URL field empty. From the pop-up target menu, choose "_blank". Click OK to exit the dialog box.
-
Set the Document window to show Code and Design view. In the Head content display bar, click the Base object icon to select your newly inserted <base> tag. This action also should select the code for the <base> tag, in the Code view.
-
In Code view, delete the href attribute from the <base> tag, so the tag reads as follows:
<base target="_blank">
That's it! Preview the page in a browser and click any of the page's links. Each should open in a new window.
Link Tags and the Link Object
With the <link> tag, it's theoretically possible to specify all sorts of complex relationships between web documents. This includes specifying certain documents as next and previous in a series, linking alternative language versions of pages, page glossaries, and much more. Unfortunately, none of the major browsers support this functionality yet, although Lynx (a text-based browser) and iCab (a Macintosh browser) do to some extent. For current use, the only reliable implementation of the <link> tag is to link external style sheet documents. For a full discussion of this topic, see Chapter 13.
Summary
Did you ever think so much could be going on behind the scenes of a web document? The various head elements might not be visible in the browser, but they are capable of doing a lot. By taking advantage of them, you can make coding links easier (<base>), make your page available to search engines (<meta>), as well as perform all sorts of other nuts-and-bolts tasks.
| CONTENTS |
EAN: 2147483647
Pages: 49