Chapter 34. Customizing Dreamweaver
| CONTENTS |
| |
|

- Setting Preferences
- Modifying Keyboard Shortcuts
- Automating Tasks with Custom Commands
- Summary
Right out of the box, Dreamweaver is a great program. No matter what your working style, Dreamweaver has web-authoring tools that you will love. But using the program straight out of the box is only the beginning of the story. Back in Chapter 2, "Setting Up the Dreamweaver Workspace," you learned how to set up the Dreamweaver workspace. Throughout this book, you've learned not only how to use different Dreamweaver features, but how to customize each of them with preferences. The remaining chapters will take you, a step at a time, from the friendly world of interface customization, to customizing with extensions and the Configuration folder, to writing your own program functionality by creating extensions.
This chapter discusses how to access and work with the interface for setting preferences, customizing panels and panel groups, modifying keyboard shortcuts, and creating simple (non-scripted) commands to automate your workflow.
Setting Preferences
Preferences give you control over many Dreamweaver options and functions. It is a good idea to go through them all so that you know which options you can set.
The simplest and most ubiquitous way to customize the interface for every task you perform in Dreamweaver is to adjust its relevant preferences. Each chapter of this book has covered a little piece of the Dreamweaver preferences interface as it discussed individual preferences relevant to the chapter topic (to learn about code preferences, read Chapter 33, "Writing Code in Dreamweaver"). This integration of preferences-related topics reflects the way the preferences interface is integrated into Dreamweaver.
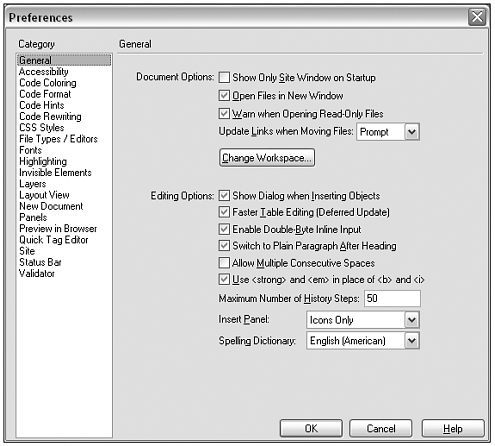
All preferences are handled by the various categories of the Preferences dialog box (see Figure 34.1). By choosing Edit > Preferences, and cycling through the various categories, you can customize any of your Dreamweaver authoring tools from one central location.
Figure 34.1. The Preferences dialog box, central interface for setting all preferences within Dreamweaver.
But the different categories of the Preferences dialog box can also be accessed from various other places within Dreamweaver:
Note
| | Mac OS X users can also access Dreamweaver preferences by choosing Dreamweaver > Preferences. (This brings Dreamweaver inline with the Apple interface guidelines for setting preferences in Mac OS X.) |
-
In the Document window status bar, click the Window Sizes pop-up menu and choose Edit Sizes to access Status Bar Preferences.
-
Choose File > Preview in Browser > Edit Browser List, or the Document toolbar's Preview/Debug in Browser > Edit Browser List to access Preview in Browser Preferences.
-
From the New Document dialog box (File > New), click the Preferences button to Access New Document Preferences.
Table 34.1 lists the various kinds of preference stored in the Preferences dialog box, and where in this book you can read more about them.
| Topic | Preferences Categories | Covered In |
|---|---|---|
| Code writing | Code-Coloring Code Format Code Hints Code Rewriting Fonts File Types/Editors Validator QuickTag Editor | Chapter 3, Chapter 32 |
| Text and layout | Layout View CSS Styles Layers | Chapter 10, Chapter 13, Chapter 14 |
| Setting up the workspace | General Panels Status Bar | Chapter 2 |
| Basic document creation and editing | General Accessibility Highlighting Fonts File Types/Editors Invisible Elements Preview in Browser New Document | Chapter 3 |
| Working with sites | Site | Chapter 22, Chapter 23 |
Modifying Keyboard Shortcuts
Keyboard shortcuts are a great way to quickly access Dreamweaver functions and commands. The default Dreamweaver setup includes a keyboard shortcut for most menu commands, as well as various shortcuts for selecting, scrolling, and editing in Design or Code view. And in case your favorite command or operation doesn't have a shortcut, or in case you just don't like the shortcuts Macromedia has chosen for you, and the shortcuts are completely customizable. You can add, subtract, and reassign shortcuts as you like. You can even create different sets of shortcuts for different purposes and switch between them at will.
The main interface for working with keyboard shortcuts is the Keyboard Shortcuts dialog box (see Figure 1.1) accessed by choosing Edit > Keyboard Shortcuts.
Working with Shortcut Sets
Most software users like their keyboard shortcuts to be consistent across programs especially between programs they tend to use together. Even if it doesn't interfere with your working style at all that Microsoft Word uses Ctrl/Cmd+I to italicize and Adobe Photoshop uses that same shortcut to invert colors, you might find that the discrepancy suddenly becomes a problem if you're switching frequently between those two programs throughout your work day. To help you out with this potential problem, Dreamweaver ships with four sets of keyboard shortcuts:
-
Macromedia Standard shortcuts. The default set, for best integration with the rest of the Macromedia MX programs (Fireworks MX, Flash MX)
-
Dreamweaver 3 shortcuts. For those upgrading users who don't want to memorize a whole new set of commands every time there's an upgrade
-
HomeSite shortcuts. Very helpful for Windows users who switch frequently between Dreamweaver and the HomeSite+ text editor
-
BBEdit shortcuts. Equally helpful for Mac users who switch between Dreamweaver and the BBEdit or BBEdit Lite text editors
To switch between one of these default sets, just choose its name from the Shortcut Set pop-up menu in the Keyboard Shortcuts dialog box. The new shortcut set will go into effect as soon as you click OK to close the dialog box. (There's no need to restart Dreamweaver!)
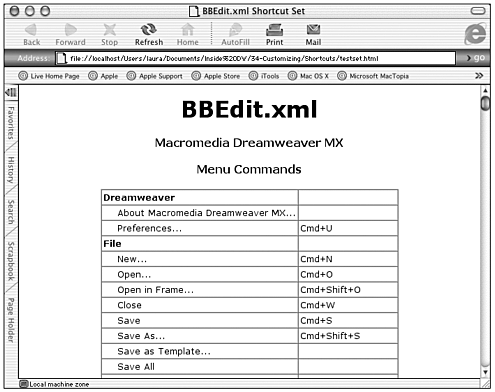
To get a nice, handy reference sheet listing all the shortcuts in a particular set, click the Export Set as HTML button. In the Save File dialog box, give your export file a name and save it anywhere you like. After the export file has been created, open it in a browser to see a nicely formatted table listing all commands and shortcuts (see Figure 34.3).
Figure 34.3. The BBEdit shortcut set exported as an HTML file and viewed in a browser.
Modifying, Adding, and Removing Shortcuts
It's quite possible that none of the default sets contains just exactly the shortcuts you need, assigned to your favorite keystrokes. Whichever of the default shortcut sets you choose to work with, you can add new shortcuts or re-assign existing shortcuts to create the perfect working environment for yourself.
Note
| | While you're free to change or remove any of the default shortcuts, you don't want to create a non-intuitive interface. In particular, don't customize the standard shortcuts for common functions such as cut (Ctrl/Cmd+X) and paste (Ctrl/Cmd+V) which are standard across the entire operating system. |
To add a keyboard shortcut to a command or operation that doesn't currently have one assigned to it, or to change a shortcut that already exists, do this:
-
Choose Edit > Keyboard Shortcuts.
-
Select the relevant command or operation from the Commands list.
-
If you're adding a new shortcut, click the Shortcuts list plus (+) button.
-
Click in the Press Key text input field to activate it. If the shortcut already exists, it will appear as selected text in this field.
-
Press the key combination you want for your shortcut. (For Dreamweaver/Windows, letter or number combinations must include Ctrl. For Dreamweaver/Mac, they must include Cmd.) Your combination will appear in the text field as Modifier+Keystroke. If the key combination you've entered has already been assigned to another command or operation, a warning message will appear in the bottom area of the dialog box. Because the same keystroke can't activate more than one command, adding the shortcut to the currently selected command will remove it from its original place.
-
To confirm this new shortcut, click the Change button. Your shortcut will now appear in the Commands list, associated with the selected command. If you don't click Change, your change will not be recorded as part of the shortcut set.
Tip
| | After you've got the Press Key input field activated, Dreamweaver interprets whatever you type as an attempt to create a shortcut. If you press the wrong key combination, you can't even hit Delete to remove it, or Ctrl/Cmd+Z to undo your typing. The only way to change an incorrectly typed key combination without having to cancel your way out of the dialog box, is to deselect the command or operation by selecting another item in the Commands list, without clicking the Change button first. |
Each item in the Commands list can have up to two keyboard shortcuts assigned to it.
To remove an existing shortcut, go to Edit > Keyboard Shortcuts, select the relevant command or operation from the Commands list, and click the Shortcuts minus (-) button.
Any changes you make to a shortcut set are not saved until you switch to another shortcut set (at which time you'll be given a prompt to save changes to the previous set) or click OK to close the Keyboard Shortcuts dialog box
Creating New Shortcut Sets
Instead of altering and possibly goofing up the default Dreamweaver shortcut sets, you can create new sets to populate with your own personalized collection of timesaving shortcuts. The buttons at the upper-right of the Keyboard Shortcuts dialog box are for creating and managing shortcut sets (see Figure 34.2).
Figure 34.2. The Keyboard Shortcuts dialog box.
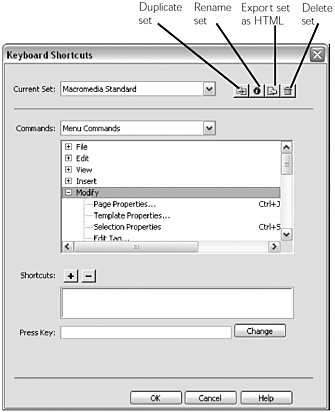
You create a new shortcut set by duplicating an existing set and modifying it. Activate the set you want to copy and click the Duplicate Set button. When the Save as HTML dialog box appears, enter a new name for your new duplicate set and click OK to close it.
To rename an existing set, activate the set you want to rename and click the Rename Set button.
To delete an existing set, activate the target set, and click the Delete Set button.
Exercise 34.1 Creating Custom Keyboard Shortcuts
In this exercise, you'll create a copy of the Macromedia Standard shortcuts set and add a few custom shortcuts. If you like customizing shortcuts, this can be your starting point for changing as many shortcuts as you like.
-
Open the Keyboard Shortcuts dialog box (Edit > Keyboard Shortcuts).
-
For Current Set, make sure that Macromedia Standard is chosen.
-
Press the Duplicate Set button (see Figure 34.2). When the Duplicate Set dialog box appears, name your new set My Shortcuts, and then click OK to close the dialog box. Your new set will now be the current set, ready for editing.
-
Which custom shortcuts would you like to add? Chances are, if you've been working with Dreamweaver MX for even a short time, you already know which commands you frequently have to go to the menus for, or which shortcuts you never can remember because they're not intuitive for you. For this exercise, you'll add one new shortcut and modify another.
-
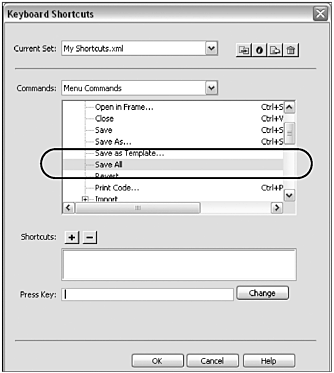
If you work with multiple documents open at a time, and especially if you work with frameset documents, you might get frustrated having to choose File > Save All whenever you want to save all open documents. It's time to add a keyboard shortcut for this command! Though you can choose any shortcut you like, it's good to choose something logical that you'll remember something involving S (for save) seems like a pretty good choice.
Start by finding and selecting this command in the Commands list. Make sure the Commands pop-up menu is set to Menu Commands; then expand the File menu category and select Save All (see Figure 34.4). You'll see that this command currently has no shortcut assigned to it.
Figure 34.4. The Keyboard Shortcuts dialog box adding a new shortcut for File > Save All.
To add the new shortcut, click on the plus (+) button on the Shortcut list. Then click inside the text input field below this list.
Press the key combination Ctrl+Alt+S (Windows) or Cmd+Opt+S (Mac). This combination now appears in the text input field. But a warning message also appears, indicating that this shortcut is already assigned to the Split Cell command. At this point, if you click Change, the shortcut will be removed from Split Cell and added to Save All. But maybe you don't want this to happen! So, instead, enter the new combination Ctrl+Alt+Shift+S (Windows) or Cmd+Opt+Shift+S (Mac). The text input field shows your altered entry, with Shift added, and the warning disappears.
When you've got the right combination of keys chosen, click Change. You've added a new shortcut!
-
If you've spent years working with the Adobe graphics programs, you've probably got the Ctrl/Cmd+; command for showing and hiding rulers burned into your synapses. The Macromedia Standard shortcut for this is Ctrl+Alt+R (Cmd+Opt+R). How about changing this shortcut so you can happily move between your programs without brain-blockage?
Start by finding and selecting the Show Rulers command in the Commands list. Just like it is in the Dreamweaver menus, this command is found under View > Rulers > Show (see Figure 34.5).
Figure 34.5. Adding a second keyboard shortcut to the Show Rulers command.

You'll see that the Ctrl+Alt+R (Cmd+Opt+R) shortcut is already assigned. Because each command can have up to two shortcuts assigned to it, you have two choices: replace the original, or add to it. For this exercise, you'll start by adding it.
In the Shortcuts menu, click the plus (+) button to add a new shortcut. Click inside the text input field to activate it. Type Ctrl+Alt+; (Windows) or Cmd+Opt+; (Mac). No warning message appears, which means no other command is currently using this shortcut.
Click Change. In the Commands list, he Show Rulers command now appears with two shortcuts defined.
If you never use other Macromedia graphics programs, you don't need both shortcuts. In the Shortcuts list, you can select the original shortcut and click the minus (-) button to remove it. If, on the other hand, you're an eclectic sort who loves working with Macromedia and Adobe programs, you'll want to leave both shortcuts enabled to suit your every working whim.
-
When you've made your changes, click OK to close the Keyboard Shortcuts dialog box. Open a document (or a frameset) and try out your new shortcuts. What other shortcuts would you like to add/modify/subtract in your custom set? Take a moment to make whatever changes you like. When you're finished, close the dialog box and check out your changes.
-
Optional: Would you like a handy record of your custom shortcut set? Choose File > Keyboard Shortcuts one more time, and in the dialog box click the Export Set as HTML button. Save your shortcut set as My Shortcuts.html. Open it in your favorite browser and print!
Automating Tasks with Custom Commands
If you're one of those ultra-efficient workers who likes saving steps whenever possible, you've probably already used macros in other programs. Macros let you record all the steps involved in performing a certain task and save them to be played back later, usually triggered by a keyboard shortcut or menu command. In Dreamweaver, instead of macros you create and deploy custom commands. Custom commands include temporary recorded commands, permanent commands saved using the History panel, and more complex commands that must be programmed (written as scripts). The following sections look at the first two kinds of custom commands; the more complex scripted commands are discussed in Chapter 36, "Creating Extensions."
Working with Recorded Commands (Temporary)
If you've ever performed the same tedious series of steps over and over during a work session, you'll love recorded commands. A recorded command is a series of steps that you tell Dreamweaver to record, and then tell it to play back as many times as you need those steps performed.
Recording a Command
To record a command, follow these steps:
-
Plan out the steps that you're going to record, and if necessary set up the conditions for the recording. (For instance, if you want to record formatting a table in a certain way, you'll need to open a document and create a table before you can start recording the formatting steps.)
-
Choose Commands > Start Recording.
-
Perform whatever steps you want to record. To format a table, for instance, you'll use the Property inspector to apply background color, cell padding or spacing, border width and color, and any other table properties. Dreamweaver can't record steps like changing the selection or changing the active document; if you perform any of those steps while recording, they'll be ignored. But you can choose from the Property inspector, enter type, and choose from the menu commands as part of your recorded steps.
-
When you're done recording, choose Commands > Stop Recording.
The command that you've recorded will stay in memory, ready to be played back, until you record over it or until you quit Dreamweaver.
Playing Back Recorded Commands
To play back a recorded command, follow these steps:
-
Set up whatever conditions need to be in place before the command can be executed. (To replay a recorded command that formats a table, for instance, you must first select a table.)
-
Choose Commands > Play Recorded Command. The individual steps that you recorded will be executed.
-
Repeat this procedure as many times as you want, to execute the command as many times as needed.
Limitations of Recorded Commands
As you can see, recorded commands are pretty wonderful. But they do have their limitations. They're meant to be quick, temporary aids in performing certain repetitive tasks. They can't do anything more complex or long-term than that, including
-
Dreamweaver can only store one recorded command at a time in memory. As soon as you record a new command, whatever command was previous being remembered will be overwritten.
-
Recorded commands don't include dialog boxes, and so can't be customized according to user input. Each command will always perform exactly the same set of steps, with exactly the same parameters.
-
Not all actions can be recorded. If you try to record a set of steps that includes changing a selection, for instance, that step won't be recorded. When the command is played back, this might lead to undesired results.
-
There is no error checking. If, for instance, you haven't made the appropriate selection before replaying a recorded command, the command simply won't work. You won't get a nice friendly alert message telling you nicely what went wrong.
Automating Tasks with the History Panel
If you like the idea of recording and replaying your actions, but want more control and flexibility, the History panel offers two alternatives to recorded commands. Its Replay Steps and Save As Commands features enable you to save and reproduce sets of consecutive or non-consecutive steps temporarily or permanently. Repeated steps are intended for use when you want to perform a set of actions and then immediately repeat those actions one or more times. Saved commands are for when you want to save your set of actions as a permanent item in the Dreamweaver interface, ready for replaying at any time in the future.
Replaying Steps (Temporary) and Saving Commands (Permanent)
The procedure for repeating steps and saving steps as commands is basically the same. Just follow these steps:
-
Plan out the steps that you want to save, and if necessary set up the conditions for them (create a table to format, for instance).
-
Open the History panel by choosing Windows > Others > History, so you'll be ready to work with it. To make sure you're starting with a clean History panel and can capture as many steps as possible, choose Clear History from the Panel Options menu.
-
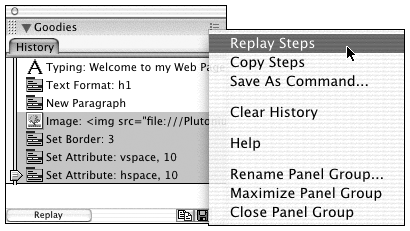
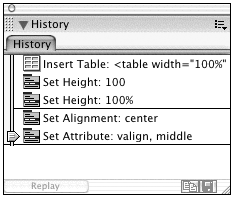
Perform whatever set of actions you want to repeat. Each action will show up as a step in the History panel (see Figure 34.6). As with recorded commands, repeated or saved History steps cannot include certain kinds of actions (such as changing the selection or moving the mouse). If your actions include any of these, they'll appear in the History panel as a horizontal red line or black mouse-movement indicator line.
Figure 34.6. Repeating steps from the History panel.
-
When you're finished performing your procedure, and are ready to repeat it, select all the steps in the History panel that you want to repeat.
-
To select contiguous steps, Shift-click on each.
-
To select non-contiguous steps (for instance, to skip over a mouse movement), Ctrl-click (Windows) or Cmd-click (Mac) on each.
-
-
If you want to repeat these steps without saving them permanently, from the History panel's options menu choose Replay Steps. Each selected step will be performed again (unless it's a mouse movement or other unrepeatable action), and the History panel will show a new step called Replay Steps. Choose Replay Steps as many times as you need to; each replay will generate a new Replay Steps step in the panel.
-
If you want to save these steps as a permanent part of the Dreamweaver interface, from the History panel's options menu choose Save As Command. (If your steps include any that can't be captured, Dreamweaver will warn you of this and give you the opportunity to cancel the operation.) You'll be prompted to give your new command a name. After you've done this and clicked OK to close the dialog box, your new saved command will appear in the bottom portion of the Commands menu.
Note
| | For a refresher on how the History panel works, see Chapter 2. |
Managing Saved Commands
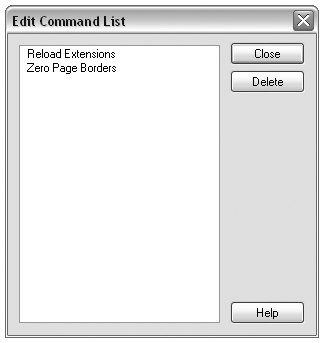
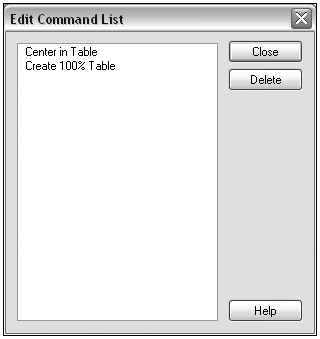
After you've saved a set of History steps as a command, you can replay those steps any time by choosing your command from the Commands menu. Unlike the recorded commands described earlier, your saved command will stay saved until you get rid of it. So if you like saving commands, you'll likely end up with a variety of them. To rename or delete a saved command, choose Commands > Edit Command List (see Figure 34.7).
Figure 34.7. The Edit Command List dialog box for working with saved commands.
Exercise 34.2 Saving History Steps as a Custom Command
Are you already dreaming of all the commands you'd like to create? Before you get too excited, remember that mouse actions (such as selecting and drawing) can't be captured, so your commands can't include them. This limits the kinds of procedures that can be turned into saved commands. In this exercise, you'll try to create a command that inserts a centering table (a table with one row and one column, set to 100% width and height, with its one cell set to horizontally and vertically center any contents). Along the way, you'll see the limitations of saved commands and how to work within those limitations.
-
Start by creating a new HTML document to contain your table.
-
Open the History panel (Window > Others > History). Because you've just created this document, the panel should be empty; but if it's not, choose Clear History from the History panel options menu.
-
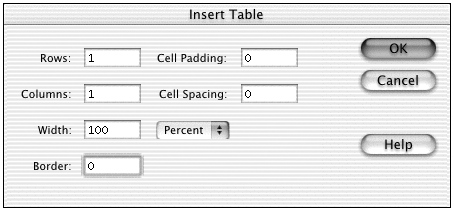
From the Insert bar's Common tab, click the Insert Table button to insert a table. In the Insert Table dialog box, set the options to match those shown in Figure 34.8 and click OK.
Figure 34.8. The Insert Table dialog box ready to insert a centering table.
-
One table attribute that can't be set in the dialog box is height. After the table is inserted, use the Property inspector to set the table height to 100%. Note that your actions are appearing in the History panel as steps.
-
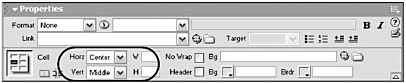
To make this a centering table, it must center its contents created from cell attributes, not table attributes. To access cell properties, click inside the table. Then set the cell properties as shown in Figure 34.9). There's your centering table!
Figure 34.9. The Table Cell Property inspector set to center all cell contents.
-
Now it's time to turn those steps into a command. Examine the History panel, and you'll see that the steps for creating the table are separated from the steps for aligning contents by a black line (see Figure 34.10). That line tells you that an uncapturable mouse event occurred between those two sets of steps. (That mouse action was clicking inside the table to access cell properties.)
Figure 34.10. The History panel showing the steps involved in creating a centered table.
-
Try saving a command that uses all of these steps. In the History panel, Shift-click on each step until they're all selected. From the History panel's options menu, choose Save As Command. Dreamweaver will warn you that the command contains illegal actions that won't translate properly into a command. That's not good! Click No to close the warning dialog box.
-
Try again. This time, select only the steps for creating the table itself up to the black line but not crossing it. Choose Save As Command from the History panel's options menu. When the dialog box appears, name your command Create 100% Table and click OK.
Now select the steps for determining cell properties those after the black line. Choose Save As Command, and name your command Center in Table.
-
Check the Commands menu and see your new commands in place (see Figure 34.11). You've overcome the limitations of saving commands by saving your procedure as two commands instead of one. Not a perfect solution, but still more efficient than not having a saved command at all.
Figure 34.11. The Create 100% Table and Center in Table saved commands as they appear in the Commands menu.
-
Try your command out. Create a new document. Choose Commands > 100% Table to insert the table. Then click inside the table (the mouse action that Dreamweaver couldn't record) to select its cell. Then choose Commands > Center Cell Contents. There's your command in action!
-
If you like your new commands, leave them in place. Otherwise, finish the exercise by going to Commands > Edit Command List. In the dialog box that appears, select each command in turn and click Delete. When you're finished, click Close to exit the dialog box.
Summary
Customizing Dreamweaver is a great way to maximize your working efficiency and enjoyment. Setting preferences is the first step to making Dreamweaver yours. In this chapter, you also learned all abut customizing the panel layout, modifying keyboard shortcuts, and automating tasks by creating temporary or permanent commands. All of these customizations give you a great deal of power, and they can all be handled entirely within the Dreamweaver interface. The next two chapters cover more extensive configuration changes you can make to Dreamweaver by using the Extension Manager and Configuration folder.
| CONTENTS |
EAN: 2147483647
Pages: 49
- The Second Wave ERP Market: An Australian Viewpoint
- The Effects of an Enterprise Resource Planning System (ERP) Implementation on Job Characteristics – A Study using the Hackman and Oldham Job Characteristics Model
- Context Management of ERP Processes in Virtual Communities
- Distributed Data Warehouse for Geo-spatial Services
- A Hybrid Clustering Technique to Improve Patient Data Quality