| Ready for some hands-on work with menu commands? In this practice session, we'll explore menus .xml and create samples of the three menu command functions just described. Task 1: Create a custom folder to hold your menu commands Menu commands should be stored inside the Configuration/Menus folder, within a folder you create. So, to start, find the Menus folder and create a new folder. Call it Development . (If you're working in a multiuser environment, you can create this folder within the main Configuration folder or within your user -specific Configuration folder.) Task 2 : Set up a development submenu to hold your test commands We'll start by adding a Development submenu at the bottom of the Modify menu, to hold our practice exercises. -
Quit Dreamweaver if it's running. -
Open menus.xml in your text editor. Find the part of the file that controls the bottom of the Modify menu. You want to add your new submenu at the bottom of this menu, so find the </menu> tag that closes the Modify menu and add a new blank line immediately preceding that tag. The relevant section of menus.xml should now look like this (with a comment in place of the blank line you have added): <menuitem name="Add _Timeline" enabled="dw.getFocus() etc /> <menuitem name="Remove Time_line" enabled="dw.getFocus() etc /> <menuitem name="Rename T_imeline..." enabled="dw.getFocus() etc /> </menu> <!your new menu code will go here > </menu> -
You want to add a new submenu, which is created by adding a pair of <menu> tags inside the Modify menu. Add the following code to your new blank line (shown in bold): </menu> <!your new menu code will go here > <separator/> <menu name="Development1" id="DWMenu_Modify_Development1"> <menuitem /> </menu> </menu> The <separator/> tag creates a horizontal line that nicely separates your play area from the business areas of this menu. The <menu> tag creates a new submenu identified by the name Development1. For the moment, your menu has one (empty) menu item, indicated by the empty <menuitem/> tag. Filling it is the next task! note Leave the menus file open as you go through the next task; otherwise , you'll have to find this part of the file again when you reopen it later.
Task 3: Use setMenuText() to create a dynamically named menu item The goal for this task is to create a menu entry that says "Edit [whatever kind of text the user has selected]," determined dynamically. To do this, you'll work back and forth between the menus.xml file and your command file. -
In your text editor, create a new HTML document. (Remember that you shouldn't use Dreamweaver for this and keep the menus.xml file open at the same time.) Save this file in your custom Menus/Development folder as Set_Menu_Test.htm . Enter the basic code for a command file in it: <html> <head> <title>My Dynamic Command</title> <script language="JavaScript"> function myCommand() { //command statements go here } </script> </head> <body onLoad="myCommand()"> </body> </html> -
To dynamically generate the text for this command's menu item, add the following setMenuText() function to the <script> tag: function setMenuText() { return "This name will show"; } This function must return the string to be inserted in the menu, remember. For now, you are just giving it a simple string to return. Remember, also, that you don't have to call setMenuText() ; Dreamweaver calls it automatically when preparing to display the menu that contains this command. -
Now add a very simple statement to the myCommand() function, so this menu command will have something to do (new code is in bold): function myCommand() { //command statements go here window.alert("This is my command."); } When it's chosen from the menu, this command will cause an alert window to open up, with the message This is my command showing in it. -
Go back to menus.xml and find the code for the Development submenu that you created in the previous task. It's time to add your command to the Dreamweaver menus by creating a <menuitem/> element for it. Do it by adding the following code (new code is in bold): <menu name="Development1" id="DWMenu_Modify_Development1"> <menuitem name="(this name won't show") file="Menus/Development/Set_Menu_Test.htm" id="Development_SetMenu" /> </menu> When you have this code in place, save and close the menu and your command file. -
Launch Dreamweaver and check out your command. The Modify menu should look like the one shown in Figure 5.29. Congratulations! There's your first dynamic menu item. Figure 5.29. The Modify menu with its Development1 submenu and dynamically set menu item. 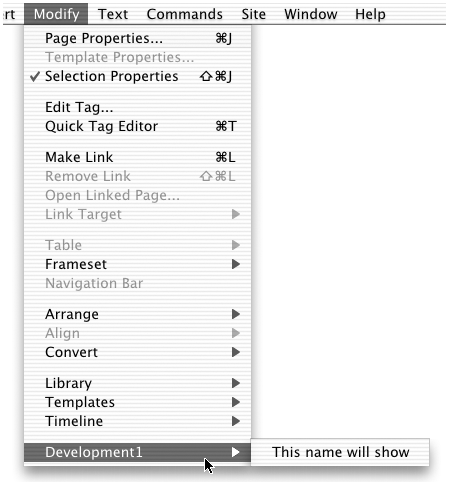 -
Next, revise the function so that it returns one string if text is selected, and another if the selection isn't text. Do this by opening the command file and rewriting the setMenuText() function like this (new code is in bold): function setMenuText() { var myDOM = dw.getDocumentDOM(); var myObject = myDOM.getSelectedNode(); if (myObject.nodeType == 3) { return "Edit Text"; } else { return "(no text selected)"; } } Can you see what this code is doing? Line 2 gains access to the DOM of the user's document. Line 3 accesses the selected object. Starting in line 4, a conditional statement tests to see whether the selected object is of node type 3, which is a text node. If the test is true, the words Edit Text are returned; otherwise, the words (no text selected) are returned. Try this out in Dreamweaverin a document with text and some other page elements. Select different elements, and choose the command to see how it changes. If you have, say, a table, image, or even a formatting tag such as <h1> selected, you should see the (no text selected) menu entry. -
Finally, make the function respond differently depending on the formatting tag the user might have selected: <h1> , <p> , <b> , and so on. To accomplish this, rewrite the setMenuText() function like this (new code is in bold): function setMenuText() { var myDOM = dw.getDocumentDOM(); var myObject = myDOM.getSelectedNode(); if (myObject.nodeType == 3) { return "Edit Text"; } else { myTag = myObject.tagName; if (myTag == "P") { myTag = "Paragraph"; } else if (myTag == "IMG") { myTag = "Image"; } else if (myTag=="H1" myTag=="H2" myTag=="H3" myTag=="H4" myTag=="H5") { myTag = "Heading"; } return "Edit " + myTag; } } Can you see what this new code is doing? If the selected object is a text node, the function still returns "Edit Text." But if the selected object is a <p> , <img> , or <h1><h6> tag, the function will return the word Edit plus Paragraph , Image , or Heading , as appropriate. So if you have an <h1> tag selected, the menu item for this command will read Edit Heading . This code is still pretty crudeit accounts for only a few of the possible tags that might be selected in a document. But this is only a practice session, right? If you feel the urge to be more thorough than this, go do it! -
When you have it all coded, try it out on a document with a choice of tags that might be selected. Depending on your selection, you should see a menu displaying Edit Text , Edit Paragraph , Edit Image , or Edit Heading . Figure 5.30 shows the practice command at work. Figure 5.30. Possible menu entries resulting from the practice setMenuText() function 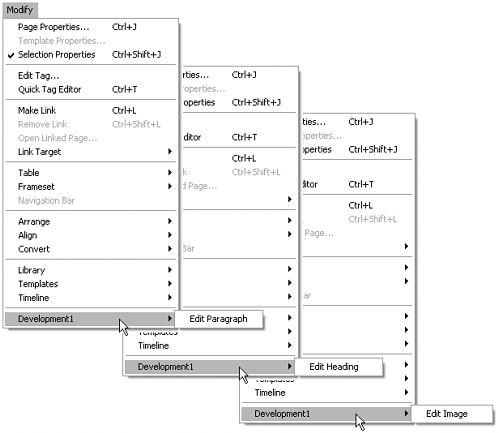 Task 4: Use isCommandChecked() to create a command with a checkmark toggle There are two different ways to use checkmarks in menus. You can have the checkmark report whether a certain condition is on or off. (Are floating panels showing or hidden? Is the current document a frameset or not?) Or, you can have a series of several menu items that function as alternate choices, only one of which can have a checkmark at any given time (the choices in the Type > Size submenu, for example). In this task, you create a simple on/off menu display. -
Start by creating the menu entry. Quit Dreamweaver, if it's running, and open menus.xml in your text editor. Find the development submenu you created earlier, and add the following new <menuitem/> (new code is highlighted): <menu name="Development1" id="DWMenu_Modify_Development1"> <menuitem name="(this name won't show") file = "Menus/Development/Set_Menu_Test.htm"  id="Development_SetMenu" /> <menuitem name="Check Me" file="Menus/Development/Toggle_Check.htm" id="DWMenu_CommandChecked_Test" /> </menu> id="Development_SetMenu" /> <menuitem name="Check Me" file="Menus/Development/Toggle_Check.htm" id="DWMenu_CommandChecked_Test" /> </menu> -
Now create a new HTML file to hold this. Save it in the Menus/Development folder as Toggle_Check.htm . Enter the basic HTML framework for a command file, like this: <html> <head> <title>Toggle Check Command</title> <script language="JavaScript"> function myCommand() { //command statements go here } </script> </head> <body onLoad="myCommand()"> </body> </html> -
Now add the following isCommandChecked() function to the <script> tag in your command document's <head> : function isCommandChecked() { return true; } This code simply returns a value of true , which will cause Dreamweaver to display the menu item for this command with a checkmark next to its name. -
Save and close your menu and command files, and try them out by launching Dreamweaver and accessing the Modify > Development submenu. Your submenu should display a new menu item called Check Me, which should appear with a checkmark next to its name. -
Now you'll revise your menu command to display a checkmark if the user's selection is text, and not to display a checkmark if it is not. Do it by revising your isCommandChecked() function to look like this (new code is in bold): function isCommandChecked() { var myDOM = dw.getDocumentDOM(); var myObject = myDOM.getSelectedNode(); if (myObject.nodeType == 3) { return true; } else { return false; } } In lines 2 and 3, the command accesses the DOM and the selected object. A conditional statement then determines whether the selected object is of node type 3 (the text node), and returns true only if it is. -
Try this command out. In Dreamweaver, reload extensions. Then open or create a test file that contains text and non-text items. Select some of the text in your document and examine the Modify > Development submenuthe Check Me command should have a checkmark next to its name. Select a non-text element and examine the submenu againthe Check Me command should appear with no checkmark. Task 5 : Use isCommandChecked() to create an options submenu To see what this task is all about, examine the Text menu's Font, Size, and Align submenus. Each of these menus presents a series of alternatives as menu items, with a checkmark indicating the currently active option (currently chosen font group , size, or alignment). For this task, you'll create a submenu of three choices, one of which should be checked, depending on which of three images the user has selected when the menu is displayed. -
Start by creating the menu items for your new command. Open menus.xml and find the code controlling your Development submenu. Add the following code (new code is in bold): <menu name="Development1" id="DWMenu_Modify_Development1"> <menuitem name="(this name won't show") file="Menus/Development/SetMenu_Test.htm" id="Development_SetMenu" /> <menuitem name="Check Me" file="Menus/Development/Toggle_Check.htm" id="Development_CommandChecked_Test" /> </menu> <menu name="Development2" id="DWMenu_Modify_Development2"> <menuitem name="First" file="Menus/Development/Select_Check.htm" arguments="'one'" id="Development2_Check_One" /> <menuitem name="Second" file="Menus/Development/Select_Check.htm" arguments="'two'" id="Development2_Check_Two" /> <menuitem name="Third" file="Menus/Development/Select_Check.htm" arguments="'three'" id="Development2_Check_Three" /> </menu> With this code, you're creating a new <menu> that will appear in the Modify menu as Development2. All three <menuitem/> elements in this submenu call your Select_Check.htm command file, each time passing a different argument ( 'one' , 'two' and 'three' ). What you want to have happen is this: Assuming a user has a document containing three images, if he has one of the images selected, the relevant menu item ( First , Second , or Third ) should have a checkmark by its name. If no images are selected, no checkmarks are present. (Remember that isCommandChecked() accepts arguments just like receiveArguments() so you don't have to use the latter function to explicitly collect the arguments specified in the menus file.) -
Now create the command file. Save it in the Menus/Development folder as Select_Check.htm and add the basic HTML framework for a command. Like this: <html> <head> <title>My Dynamic Command</title> <script language="JavaScript"> function myCommand() { //command statements go here } </script> </head> <body onLoad="myCommand()"> </body> </html> Launch Dreamweaver and try the command right now. You should see a menu set up like that shown in Figure 5.31. Figure 5.31. The Development2 submenu. 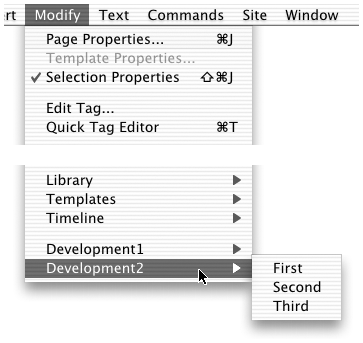 -
Now it's time to write the isCommandChecked() function. The function itself isn't hardjust a conditional statement or two returning true or false . But the logic behind its use in this situation might be a little puzzling. Here's the idea: When Dreamweaver is ready to display the First command with an argument of 'one' , you want to test whether the current selection includes the first image in the document. So, if arguments[0] == 'one' , return the answer to the following question: Is the currently selected object the first image on the page? When Dreamweaver is ready to display the Second command, this function is called again, but this time with an argument of 'two' . So, if arguments[0] == 'two' , return the answer to the following question: Is the currently selected object the second image on the page? And so on. To do this, open the Select_Check.htm command file and add the following function to your <script> tag: function isCommandChecked() { what = arguments[0]; myDOM = dw.getDocumentDOM(); myObject = myDOM.getSelectedNode(); if (myObject.nodeType == 1 && myObject.tagName == "IMG") { if (what == "one") return (myObject == myDOM.images[0]); if (what == "two") return (myObject == myDOM.images[1]); if (what == "three") return (myObject == myDOM.images[2]); else return false; } else { return false; } } The function starts by collecting the arguments and gaining access to the selected object (node). The first if statement, in line 5, determines whether the selection is an image. If the selection is an image, then each possible argument gets its own if statement. If the selection is not one of the first three images on the page, or if the selection isn't an image, the function returns false for all three options, and no checkmarks show. -
Try it out and see! In Dreamweaver, reload extensions. Then open a document that contains at least three images. Try examining the Modify > Development2 submenu with nothing selected and with one of the first three images selected. Your results should look like the situation shown in Figure 5.32. This exercise demonstrates the power not only of isCommandChecked() , but also the power of passing arguments from the menus file. Figure 5.32. Testing the Development2 submenu, with its three submenu commands. 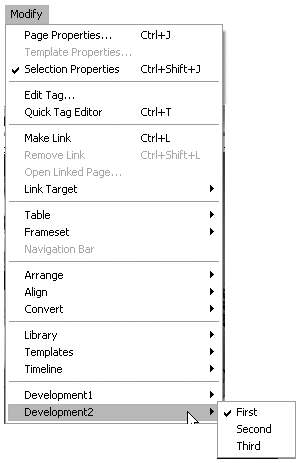 Task 6: Use getDynamicContent() to dynamically create a submenu For this practice session, you'll create a dynamically generated submenu at the bottom of the Modify menu. All entries in the submenu will be determined by code in a command file's getDynamicContent() function. -
As in previous tasks , start by creating the menu item Quit Dreamweaver. In menus.xml, find the code for your Development submenus and add the following code immediately below it: <menu name="Development3" id="DWMenu_Modify_Development3"> <menuitem dynamic name="(nope, this won't show)" file="Menus/Development/ Dynamic_Test.htm" id="Development_DynamicTest" /> </menu> Note that the <menuitem/> tag includes a dynamic name attribute in place of the name attribute. -
Now create a command file. Save it in your Menus/Development folder as Dynamic_Test.htm and add the HTML framework for a basic command, like this: <html> <head> <title>Another Dynamic Command</title> <script language="JavaScript"> function myCommand() { //command statements go here; } </script> </head> <body onLoad="myCommand()"> </body> </html> -
In the command file, you now need to define the getDynamicContent() function. This function can be tricky because it must return a very specific kind of array. The array must consist of strings, each of which is made up of a menu item name, a semicolon, and a menu item ID. To get used to the syntax required here, start with a hard-coded array used for the return statement. Add a new function to your <script> tag, with the following code: function getDynamicContent(itemID) { var testList = new Array(); testList[0] = new String("Item 1;id='Development_Dynamic_1'"); testList[1] = new String("Item 2;id='Development_Dynamic_2'"); return testList; } First, note that the function accepts a parameter called itemID . Dreamweaver automatically passes the correct ID from the <menuitem/> element that calls the command. (For this exercise, Dreamweaver passes Development_DynamicTest as a string.) Next, notice the syntax of each item in the return array. The item as a whole will automatically be returned surrounded by quotes, because it's a string. Within this main set of quotes, the menu name ( Item 1 or Item 2 for the array elements shown here) is not in quotation marks, but the ID name is. A semicolon separates the two parts of the string, with no spaces on either side. -
With this code in place, launch Dreamweaver and try out the menu command. If you coded correctly, the Dreamweaver Modify menu should contain a Development3 submenu that looks like the one shown in Figure 5.33. Figure 5.33. The Modify menu, showing a dynamic submenu generated by the getDynamicContent() function in the command file. 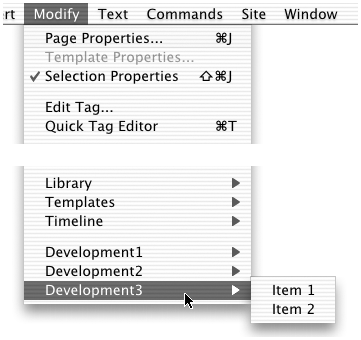 -
Remember, if getDynamicContent() returns null , the dynamic menu items aren't generated, and the default menuitem name specified in the menus file appears instead. Revise your getDynamicContent() function to make that happen, by commenting out the current statements and adding a new statement, like this (new code is in bold): function getDynamicContent(itemID) { // var testList = new Array(); // testList[0] = new String("Item 1;id='Development_Dynamic_1'"); // testList[1] = new String("Item 2;id='Development_Dynamic_2'"); return null; } Now reload extensions in Dreamweaver and examine the Modify menu again. The resulting Dynamic submenu should look like the one shown in Figure 5.34. Figure 5.34. The Modify menu, showing the dynamically generated Development3 submenu when the getDynamicContent() returns null. 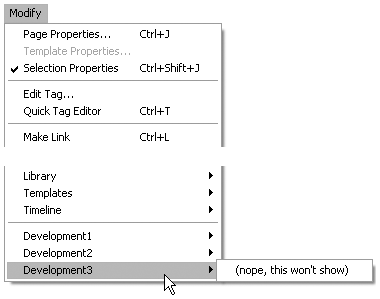 -
Now revise the function so that it returns a value only if the document contains images. Do it by un-commenting your original code statements and adding a new conditional statement framework. Like this (new code is highlighted): function getDynamicContent(itemID) { myDOM = dw.getDocumentDOM(); if (myDOM.images[0]) { var testList = new Array(); testList[0] = new String("Item 1;id='Development_Dynamic_1'"); testList[1] = new String("Item 2;id='Development_Dynamic_2'"); return testList; } else { return null; } } Try this out! In Dreamweaver, open a document that contains no images and access the Modify > Dynamic submenu to view the items there. Your menu should look like the one shown in Figure 5.33. Then open a document that contains images and access the submenu. It should look like the one shown in Figure 5.34. -
The dynamically generated menu items automatically have one argument, which for each item is the same as its unique ID. To test this out, try a little experiment. In your command file, add a global variable and the receiveArguments() function to your <script> tag, like this: var gWhat; function receiveArguments() { gWhat = arguments[0]; } Then add a new statement to the main command function (new code is in bold): function myCommand() { //command statements go here window.alert(gWhat); } What does this code do? The receiveArguments() function collects the argument for the menu item that has activated this command file, storing that argument in the global variable gWhat . Then the command's main function, which is called onLoad and which will execute when the user chooses the menu item, opens an alert window displaying the gWhat variable. This code enables you to see exactly what argument is being passed to each command in the Modify > Dynamic submenu. In Dreamweaver, reload extensions and try it out. Open a Dreamweaver document that contains images and access Modify > Development3. From the submenu, choose either of the two menu items that appear ( Item 1 or Item 2 ). Figure 5.35 shows what should happen. Figure 5.35. Choosing a dynamically generated menu item, and receiving its argument in a popup window. 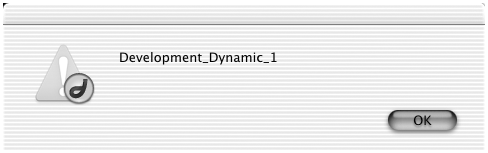 -
You most commonly see dynamically generated menu items in submenus, but they don't need to live there. They can exist in a main menu as well. To see this, open menus.xml (be sure to quit Dreamweaver first) and change the code for your Development3 submenu so that the dynamic menu item sits directly in the Modify menu like this (deleted code is shown in bold with strikethrough ): <menu name="Dynamic" id="DWMenu_Modify_DynamicTestMenu"> <menuitem dynamic name="(nope, this won't show)" file="Menus/MyStuff/Dynamic_Test. html" id="MyStuff_DynamicTest" /> </menu> This change deletes the submenu and makes the <menuitem/> element a child of the Modify menu's <menu> tag. Launch Dreamweaver and examine the Modify menu now. It should look like the one shown in Figure 5.36. The dynamic menu item should behave exactly as it behaved when there was a submenu. Figure 5.36. Dynamically generated menu items showing in the Modify menu itself, rather than in a submenu. 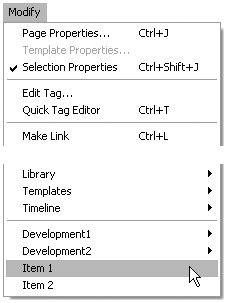 |