| At the heart of Windows Vista are the filesystem and the files in it; without files, there's no reason to use a computer, after all. When Windows Vista was first announced, Microsoft had big plans for a completely redone filesystem, along with powerful search tools, all built on top of a new filesystem database. Reality intruded, and those plans had to be curtailed. Still, despite that, the ways to navigate your hard disk and find files have been dramatically upgraded compared to previous versions of Windows. Windows Explorer has gotten a face-lift, along with new capabilities for filtering and viewing files. And the new Search is one of Windows Vista's best new features. Not only is it available almost everywhere, but it's also lightning fast and includes considerable new ways to search, including the ability to save searches for future use. This chapter covers that, along with all other aspects of the filesystem, Windows Explorer, and Search. Here is an alphabetical reference of entries in this chapter: Explorer | Folder and Search Options | OpenFiles | File Compare (comp) | Folder Properties | Search | File Compare (fc) | Indexing Options | Shadow Copies | File Expansion Utility | Label | Subst | File Properties | NTFS Compression Utility | Windows Explorer |
Explorer See "Windows Explorer," later in this chapter. |
File Compare (comp): \windows\system32\comp.exe Compare the contents of two files (or sets of files) byte by byte and display the differences between them. To open Command Prompt  comp comp Usage comp [file1] [file2] [/n=number] [/c] [/offline] [/d] [/a] [/l]
Description File Compare (comp.exe) compares two files (or more, using wildcards) and reports whether the files are identical. If the files are identical, comp.exe will report Files compare OK. If the files are the same size but have different contents, comp.exe displays the differences, character by character, by reporting Compare Error at OFFSET n (where n is the byte offset, or the location of the difference, in characters, from the beginning of the file). If the files are different sizes, comp.exe reports Files are different sizes, and the comparison stops there. Here are the options for comp.exe:
file1, file2 Specify the filenames of the files to compare. For any files that aren't in the current directory, you'll need to include the full path. If file1 includes a wildcard, all matching files are compared to file2. Likewise, if file2 includes a wildcard, each matching file is compared to file1. If one or both of these parameters are omitted, comp.exe will prompt you for the files to be compared.
/n= number Include the /n option to compare only the first specified number of lines in the files, or omit it to compare the files in their entirety. For example, specify /n=5 to check on the first five lines in each file.
/c Disregard the case of ASCII characters; upper- and lowercase letters are treated as identical.
/offline comp.exe normally skips files marked as "offline." Specify /offline (or just /off) to include offline files as well. (See "Sync Center," in Chapter 7, for more information on offline files.)
/d Display differences in decimal format.
/a Display differences in ASCII characters. The /a option is the default, so specifying it has no effect.
/l Include line numbers in any output. Notes Windows Vista actually comes with two file comparison utilities: comp.exe (this one) and fc.exe (discussed in the next section). comp.exe performs a character-by-character comparison, but displays differences only if the files are exactly the same size. fc.exe performs a line-by-line comparison and works regardless of the file sizes. For most users, fc.exe will be the tool of choice, as it displays the differences between the files and doesn't have any prompts, so you can use it from a WSH script or batch file. You can also use File Compare in interactive mode, without first typing filenames. Type comp at the command prompt, and you'll be asked for the names of files to compare, along with any options for comparing. Regardless of the outcome of the comparison, comp.exe will ask whether you want to perform another comparison. Although there's no way to disable this prompt, you can use the following workaround to bypass it: echo n | comp file1 file2
|
File Compare (fc): \windows\system32\fc.exe Compare the contents of two files (or sets of files) line by line and display the differences between them. To open Command Prompt fc Usage fc file1 file2 [/a] [/c] [/lbn] [/n] [/t] [/w] [/offline] [/nnn] [/l] fc /b filename1 filename2
Description File Compare (fc.exe) compares the contents of two files (or more, using wildcards) and displays the differences (if any). If the files are identical, fc.exe will report FC: no differences encountered. If the files are different, fc.exe lists the differing lines. Here's an example of how to use fc.exe. Start with an ordinary text filesay, Bill.txt. Open it in Notepad, change one line, and save it into a new filenamesay, Marty.txt. Then open a Command Prompt window, make sure you're in the same directory as the two files, and type the following: fc bill.txt marty.txt
The output will look something like this: Comparing files Bill.txt and Marty.txt ***** Bill.txt Way down Louisiana close to New Orleans Way back up in the woods among the evergreens There stood a log cabin made of earth and wood ***** Marty.txt Way down Louisiana close to New Orleans Way back up in the woods among the antihistamines There stood a log cabin made of earth and wood *****
For each line or sequence of lines that differs in the two files, fc.exe prints out a pair of excerpts from each file. The first and last lines in each excerpt are what the two files have in common and are included for context. The lines in between (only a single line in this example) show the differences. The report will include one pair of excerpts for each difference found; if there are three nonconsecutive differing lines, there will be six excerpts. Here are the options for fc.exe:
file1, file2 Specify the filenames of the files to compare. For any files that aren't in the current directory, you'll need to include the full path. If file1 includes a wildcard, all matching files are compared to file2. Likewise, if file2 includes a wildcard, each matching file is compared to file1. Both parameters are required.
/a Display only the first and last lines for each set of differences, as opposed to the default of every different line. This option is applicable only if a single sequence of differing lines (resulting in a single excerpt pair) is three lines or longer; otherwise, /a has no effect.
/c Disregard the case of ASCII characters; upper- and lowercase letters are treated as identical.
/lb n Specify the maximum consecutive mismatches; /lb17 will list only the first 17 differing lines. If omitted, the default is 100 maximum mismatches.
/n Include line numbers in the report.
/t Preserve any tabs in the files being compared. By default, tabs are treated as spaces, with one tab equal to eight spaces.
/w Compress whitespace (tabs and spaces) to a single space for comparison. This is possibly useful when comparing .html files, as web browsers will eliminate redundant tabs in spaces as well.
/offline fc.exe normally skips files marked as "offline." Specify /offline (or simply /off) to include offline files as well. (See "Sync Center," in Chapter 7, for more information on offline files.)
/ nnn Specify the number of consecutive lines that must match after a mismatch. For example, if you specify /4, a mismatched line followed by three matching lines, followed by one or more mismatched lines, is treated as though it were a single sequence of mismatched lines in the report.
/l Treat the files as ASCII (plain text). Because /l is the default, it has no effect.
/u Treat the files as Unicode text.
/b Treat the files as binary and perform the comparison on a byte-by-byte basis (similar to comp.exe, the other file comparison utility). Differing bytes are displayed in parallel columns, instead of in the pairs of excerpts explained earlier. A binary comparison is typically appropriate only for files of the same sizes, but unlike comp.exe, the comparison will still be performed if they are different sizes. You can't use the /b option in conjunction with any of the other options. Notes Windows Vista actually comes with two file comparison utilities: comp.exe (discussed in the preceding section) and fc.exe (this one). comp.exe performs a character-by-character comparison, but displays differences only if the files are exactly the same size. fc.exe performs a line-by-line comparison and works regardless of the file sizes. For most users, fc.exe will be the tool of choice, as it displays the differences between the files and doesn't have any prompts, so you can use it from a WSH script or batch file. fc.exe is most useful when comparing two different but similar text files. For example, you can compare two Registry patches (because .reg files are plain-text files) made at two different times to see what changes have been made. See Chapter 13 for more information on Registry patches. Although fc.exe can compare two binary files, if you try to compare two word processor documents (.doc and .wpd files are binary files), the results won't be terribly helpful. Try converting the documents to an ASCII-based format, such as .rtf or .html, and then perform an ASCII comparison. Naturally, most modern word processors have their own document comparison tools, but they can often be limited; although word processors may miss subtle formatting changes, fc.exe will catch every single difference. If you just want to see whether two files are different, you can redirect the differences to the nul: device and use the fact that fc.exe sets an ERRORLEVEL of 1 when the files differ: fc file1 file2 > nul: if ERRORLEVEL 1 (echo Different) ELSE (echo Same)
This will also let you compare two binary files without your command prompt beeping at you while you press Ctrl-C in a desperate attempt to halt the stream of non-ASCII characters flooding your screen.
|
File Expansion Utility: \windows\system32\expand.exe Extract one or more compressed files from a cabinet (.cab) file. To open Command Prompt expand Usage expand -d source.cab [-f:files] expand [-r] source.cab [destination] expand source.cab -f:files destination
Description A cabinet file is a compressed archive commonly used to package application installation files. You use the File Expansion Utility to extract files embedded in these cabinet files. The utility takes the following options:
source.cab The name of the cabinet (.cab) file from which to extract the files.
destination The name of the folder in which to place the extracted files, a new filename to use for the extracted files, or a combination of the two. If using the -f option, destination is mandatory and must include a filename (with or without wildcards).
-d Display (list) the contents of the specified cabinet file.
-r Specify -r (recursive) without destination to extract all the files contained in the specified cabinet file. For example: expand -r package.cab
Specify -r along with destination to rename the files according to the file specification included in destination. For example, the following extracts all the files in package.cab and renames their file extensions to .txt: expand -r package.cab *.txt
-f: files Use the -f option to specify one or more files to extract; use this if you don't want to extract all the files from the cabinet file. For example, the following extracts the file uno.txt from package.cab: expand package.cab -f:uno.txt uno.txt
Note that the destination parameter is mandatory when using the -f option and is used to specify the target filename. In this example, as well as most times this program will be used, files and destination will be the same. Notes See also "Cabinet (CAB) Maker," in Chapter 10 |
File Properties View and change the properties of files. To open Right-click a file Properties Click a file Organize Properties Description The File Properties window has four tabs:
General This tab (Figure 4-1) displays basic information about the file, including its location, type, size, and size on disk; the date it was created, modified, and last accessed; and its attributes. You can change the program that opens it by clicking the Change button, and you can change the file attributes by selecting Read-only or Hidden. The Advanced button lets you compress and/or encrypt the file, add or take away the file from the index for searching, and add or take away the Archive bit (for use in backups).  | Why are there two listings for file sizeone for size, and one for size on disk? There are two cases where the file size and size on disk are different: The cluster size of your NTFS filesystem dictates the size of the chunks that are set aside for files. On an NTFS filesystem with 4 KB clusters, a 1 KB file would use up 4 KB of disk space, and a 5 KB file would use up 8 KB. If a file has been compressed, the size listing shows its uncompressed size, and the size on disk shows its actual size on your hard disk.
|
|
Figure 4-1. The General tab, which shows you basic information about the file 
Security This tab (Figure 4-2) shows you who has access to read and modify the file and its attributes, and lets you change those permissions. Click each group and username and you'll be shown the rights that person or group has to the filewhether they can read the file, modify the file, and so on. You can modify the permissions for each person or group, add new groups or people and set their permissions, and delete people or groups, which means they would have no access to the file. | The various file permission options and their meanings are quite complex, and beyond the scope of this book. However, if you want more details about the available options, go to the Microsoft Knowledge Base article at http://support.microsoft.com/kb/308419/en-us. |
|
Figure 4-2. The Security tab, which lets you see what rights different people and groups have to the fileand lets you alter them 
Details This tab (Figure 4-3) displays the metatags associated with the file, as well as a wide variety of other information, including the basic file information shown in the General tab. It also has a great deal of program-specific information. For example, a Word document will display what template was used to create the file, the number of pages in the file, the word count, the character count, the line count, the paragraph count, the total length of time during which the file has been edited, and so on. You can also remove metatags and properties from the file by clicking the Remove Properties and Personal Information link. The details for each file type are quite different from one another. Graphics files, for example, include resolution, bit depth, width and height, and other similar information, as well as a quality rating that users can apply to the file. Figure 4-3. The Details tab, which displays metatags and other useful information about the file 
Previous Versions This tab (Figure 4-4) lets you view, save, or restore a previous version of a file, if such a version is available. Two types of previous versions may be available: those from a backup and those from what Windows Vista calls shadow copies. A shadow copy is a copy of a file made when Windows creates a restore point. (See "System Protection and System Restore," in Chapter 11, for details.) Different files and types of folders have differing options for how you handle previous versions, but in general, you'll be able to open and save the previous version of a file to a different location, or restore it over the existing files. Figure 4-4. The Previous Versions tab, which lets you restore previous versions of the file 
Microsoft Office files may have another tab in addition to the standard four:
Custom This tab (Figure 4-5) displays custom information about Microsoft Office files. You can add new values, and modify and delete existing values. Figure 4-5. The Custom tab, which is for Microsoft Office files 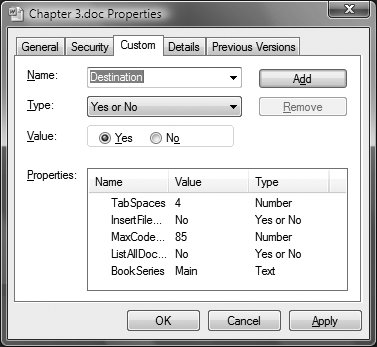 Notes To restore a previous version of a file without using the File Properties screen, right-click the file in Windows Explorer and select "Restore previous versions." You'll receive a warning before you overwrite the existing folder with the previous one. Some file types may have other tabs in addition to the ones mentioned here, depending on whether the program that created it created those additional tabs. Music files include a great deal of detailed information, including the artist, album, year of release, genre, bit rate, and so on.
See also "Folder Properties," discussed next, "System Protection and System Restore," in Chapter 11, and "Sharing Resources and Files," in Chapter 7 |
Folder Properties View and change the properties of folders. To open Right-click a folder Properties Click a folder Organize Properties Description The Folder Properties window has five tabs:
General This tab (Figure 4-6) displays basic information about the folder, including its parent folder, size, size on disk, date and time created, and number of files and subfolders contained within. The Advanced button lets you compress and/or encrypt the folder, add or take away the folder from the index for searching, and add or take away the Archive bit (for use in backups). | Why are there two listings for folder sizeone for size, and one for size on disk? If a folder has been compressed, the size listing shows its uncompressed size, and the size on disk shows its actual size on your hard disk. |
|
Figure 4-6. The General tab, which shows you basic information about the folder 
Sharing This tab (Figure 4-7) lets you set sharing options for the folder. Click Share to share the folder, or change sharing options if the folder is already shared. Click Advanced Sharing if you want to give it a shared name in addition to its existing folder name. You would do this if you wanted to make it easier for someone to find the folder. Figure 4-7. The Sharing tab, which lets you set sharing options for the folder 
Security This tab (Figure 4-8) shows you who has access to read and modify the folder and its attributes, and lets you change those permissions. Click each group and username and you'll be shown the rights that person or group has to the folderwhether they can read it, modify it, and so on. You can modify the permissions for each person or group, add new groups or people and set their permissions, and delete people or groups, which means they would have no access to the folder. The Advanced button gives you additional ways to edit permissions, as well as a way to change who has ownership of the folder. | The various file permission options and their meanings are quite complex, and beyond the scope of this book. However, if you want more details about the available options, go to the Microsoft Knowledge Base article at http://support.microsoft.com/kb/308419/en-us. |
|
Figure 4-8. The Security tab, which lets you see what rights different people and groups have to the folderand lets you alter them 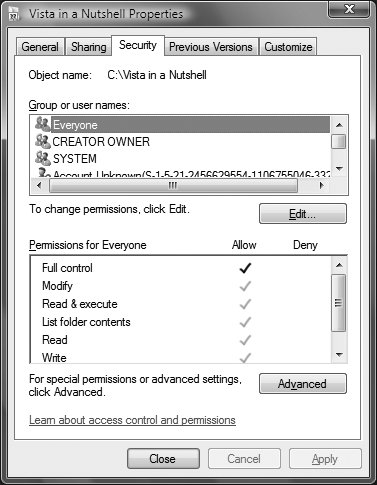
Previous Versions This tab (Figure 4-9) lets you view, save, or restore a previous version of a folder, if such a version is available. Two types of previous versions may be available: those from a backup and those from what Windows Vista calls shadow copies. As explained earlier, a shadow copy of a folder is a copy of a file made when Windows creates a restore point. (See "System Protection and System Restore," in Chapter 11, for details.) Different files and types of folders have differing options for how you handle previous versions, but in general, you'll be able to open and save the previous version of the folder to a different location, or restore it over the existing folder. Figure 4-9. The Previous Versions tab, which lets you restore previous versions of the folder 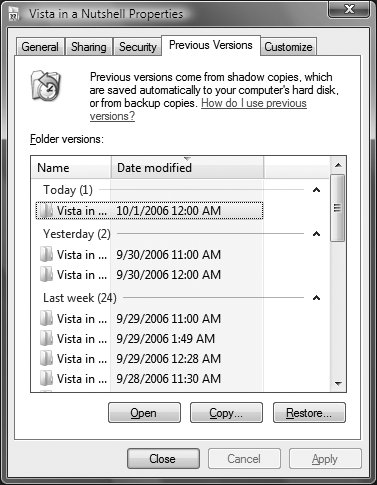
Customize This tab (Figure 4-10) lets you customize how the folder looks and acts. You can choose the kind of folder it is (All Items, Documents, Pictures and Videos, Music Details, or Music Icons). Based on what type of folder it is, the documents in it will be displayed differently, and different features will be available. For example, if a folder is a Pictures and Videos folder, the details it will display about each file include the date taken, tags, size, and rating, and the folder toolbar will include a Slide Show button so that you can display a slide show of the files in the folder. If the folder is a Documents folder, the details it will display are the date modified, type, size, and tags, but no Slide Show button will appear on the toolbar. Figure 4-10. The Customize tab, which lets you change how the folder looks and acts  The tab also lets you choose a file that will be displayed on the folder's icon in Windows Explorer, and lets you choose a different icon than the default. Notes See also "File Properties," earlier in this chapter, "Sharing Resources and Files," in Chapter 7, and "System Protection and System Restore," in Chapter 11 |
Folder and Search Options Control the way folders appear in Explorer and configure Search. To open Control Panel [Appearance and Personalization] Folder Options Windows Explorer Organize Folder and Search Options Command Prompt control folders Description The Folder Options window has three tabs (General, View, and Search):
General Of the three settings on this page, the one people find most confusing is the Tasks section (see Figure 4-11). If you select "Show preview and filters," the Details and Preview panes will appear in all folders. In Windows classic folders, your other choice, the Details and Preview panes, will not be displayed. It will give you more room to display files because those panes are missing, but you'll see less information about each file. Figure 4-11. The General tab, which lets you turn off the Details and Preview panes in folder windows, among other options 
View After you've selected all your preferences in the General and View tabs, click Apply to Folders to make your settings the default. Otherwise, all your settings will be lost as soon as you switch to a different folder. The Advanced settings in the View tab (Figure 4-12) here are quite important, and they give you a great deal of control over the way you work with Windows. Some of the default settings, in fact, can make Windows more difficult to use. Many of these settings are self-explanatory; some of the more interesting and useful ones follow: Figure 4-12. The Folder Options' View tab, which contains many settings that affect the display of folders and files 
Always show icons, never thumbnails A thumbnail is a visual representation of a file's actual contents (for example, you'll see a thumbnail-size picture of a graphics file), and an icon is a generic, static representation of a file type. Thumbnails are more useful, but if previews slow down your system or Windows Explorer, choose this setting so that only icons will be used.
Always show menus Windows Vista has done away with menus in Windows Explorersort of. In fact, the classic Windows menus are still there, waiting to be sprung into action. Press the Alt key and they'll be visible just above the toolbar. If you'd like them to be visible all the time, choose this setting.
Display simple folder view in Navigation pane This rather oddly named option simply shows or hides the dotted lines in the collapsible folder tree (see "Trees," in Chapter 3) in Windows Explorer. The default is on, but if you turn it off, the tree appears more like it did in earlier versions of Windows. In my opinion, the lines make the tree a little clearer and easier to use, so I recommend turning this option off.
Hidden files and folders By default, Windows doesn't show hidden files in Explorer. Change this option if you need to access them. As a general rule, if you do any kind of system customization or troubleshooting, you should show hidden files and folders.
Hide extensions for known file types In one of Microsoft's biggest blunders, this option has been turned on, by default, since Windows 95. By hiding file extensions, Microsoft hoped to make Windows easier to usea plan that backfired for several reasons. Because only the extensions of registered files are hidden, the extensions of files that aren't yet in the File Types database are still shown. What's even more confusing is that when an application finally claims a certain file type, it can appear to the inexperienced user as though all of the old files of that type have been renamed. It also creates a "knowledge gap" between those who understand file types and those who don't. (Try telling someone whose computer still has hidden extensions to find Readme.txt in a directory full of files.) Other problems have arisen, such as trying to differentiate Excel.exe and Excel.xls in Explorer when the extensions are hidden; one file is an application and the other is a document, but they may have the same icon. The upshot is that it's not a good idea to hide extensions for known file types.  | There's another reason you should not hide file extensions: doing so can be a security hazard. Windows allows you to create files with several file extensionsfor example, you can create an executable file named kittenpictures.jpg.exe. When you hide file extensions, only the last extension is hidden. So if you hide file extensions and you are sent the file kittenpictures.jpg.exe in an email, the file will appear as kittenpictures.jpg. You would assume that the file contains pictures of kittens, but in fact it is an executable fileone that could be a Trojan or a virus. If you didn't hide file extensions, you would see the entire filename, kittenpictures.jpg.exe, and you would know that it was a potentially dangerous executable file, not a picture. |
|
Hide protected operating system files By default, this option is checked. It is another attempt by Microsoft to protect you against yourself so that you don't accidentally delete or harm important Windows Vista files. But hiding these files makes troubleshooting and customizing much more difficult, so consider unhiding them.
Launch folder windows in a separate process Turn on this option to start a new instance of the Windows Explorer application every time you open a new folder window.
Remember each folder's view settings If this option is enabled and you use Explorer's View menu to alter the display of a particular folder, those settings will be saved with that folder for the next time it's opened. If you're looking for a way to save your View settings as the default for all folders, this option won't do it; instead, use the Apply to Folders button.
Restore previous folder windows at logon If you select this option, when you start your computer this will open the folders you were using the last time you shut down Windows.
Show encrypted or compressed NTFS files in color If you've encrypted or compressed NTFS files, this will show them in a color to distinguish them from files that haven't been encrypted or compressed.
Show preview handlers in preview pane Good luck translating this option into English. Here's what it means, though: if you deselect it, the contents of your files will never be shown in the Preview pane. Why use this option if displaying previews slows down your system?
Use check boxes to select items Normally, in Windows, you can select several files at once by holding down the Ctrl key while you click the files. If you'd instead prefer that checkboxes show up next to files so that you can select them that way, use this option.
Use Sharing Wizard Windows Vista includes a new wizard to help you share files with others on your PC. If you prefer to walk through the file-sharing process manually, uncheck this selection.
Search This tab (Figure 4-13) controls the basic features of Search. (For more details, see "Search," later in this chapter.) It includes these sections: Figure 4-13. The Search tab, where you can customize many Search functions 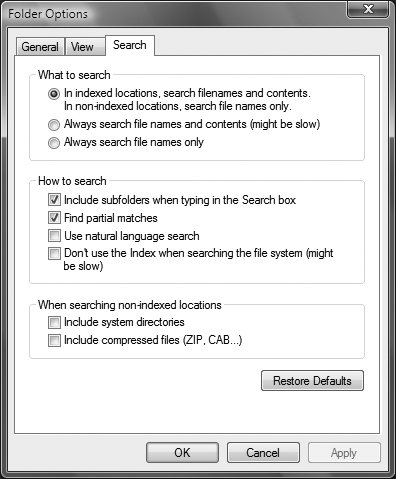
What to search This section controls how Search handles filenames and file contents. In some circumstances it searches through the actual names of files, and in other circumstances it searches through the names of files as well as through their contents. By default, it searches filenames and contents in indexed locations, and filenames only in nonindexed locations. This section, however, lets you change that behavior. Keep in mind that if you choose to always search through filenames and contents of nonindexed files, it may slow your search considerably, because searching nonindexed files can be sluggish.
How to search This controls a variety of search behavior. You can include or not include subfolders when typing in the Search box, find or not find partial matches, and choose not to use the index when searching (doing this will slow down the search process considerably, but it casts a wider net). In addition, it lets you use what is called natural language search. Windows Vista's Search is an extremely powerful tool, but it can be confusing to use because it often requires very strict and specific syntax in order to work. If you'd prefer to use plain English commands (music by Gluck and Salieri) rather than kind: music artist: (Gluck AND Salieri), turn on natural language search. See "Search," later in this chapter, for more details about natural language search.
When searching non-indexed locations You can choose to include or not include system directories and compressed files when searching through nonindexed areas. Including them will slow down search performance but will result in a broader search. Notes Windows XP had another useful tab, File Types, but it has been taken away in Windows Vista. The File Types tab let you create and change file associations, and customize various actions associated with files. For example, in Windows XP, you could set multiple associations for files, as well as customize precisely what actions a program should take when it opens a file. You could, for example, set one program to play a file type by default, but a different program to edit the file by default. In Windows Vista, you can change file associations, but nothing else. To change file associations, you choose Start  Default Programs Associate a file type or protocol with a program. See "Default Programs Control Panel," in Chapter 10, for details. Default Programs Associate a file type or protocol with a program. See "Default Programs Control Panel," in Chapter 10, for details.
See also "Search" and "Windows Explorer," later in this chapter, and "Default Programs Control Panel," in Chapter 10 |
Indexing Options Configure and customize the index for searching. To open Control Panel System and Maintenance] Indexing Options Windows Explorer Search Tools Modify Index Locations (the Search Tools icon appears when you type text into the Search box, but it is otherwise invisible) Description The Indexing Options screen (Figure 4-14) shows you what folders are included in your index and lets you add or remove folders. The index is used to speed up searches in Windows Vista. Figure 4-14. The Indexing Options screen, where you set your indexing options 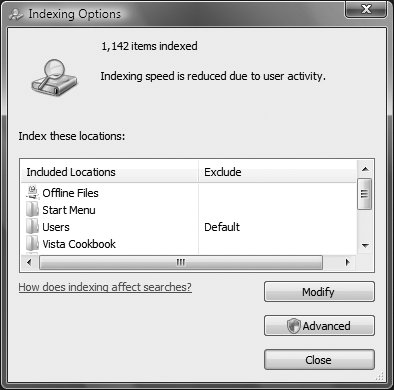
The Advanced button leads to two tabs: Index Settings and File Types. The Index Settings tab (Figure 4-15) lets you index encrypted files, control how accented characters are treated, rebuild the index, and change the location of the index. It also lets you tell the index how to handle two words that are otherwise identical, except that one has an accent mark (known as a diacritic) and the other doesn't. You can tell the index to treat them as separate words or as the same word (the default). The File Types button lets you set which file types should be indexed, and choose for each file type whether the contents and properties of the file should be indexed, or just the properties. Figure 4-15. The Advanced button, where you set advanced indexing options 
To remove existing folders or to add new folders, from the Indexing Options screen choose Modify Show all locations. Then expand the drives you see. Folders with checkboxes are included in the index; those without checkboxes are not included. Check or uncheck the checkboxes as appropriate. Notes File properties include not only filenames, but also tags, such as date created, date modified, and so on. If you discover that when you search, you're not finding files that you know are in your index, the index may have been damaged. To solve the problem you'll need to rebuild the index. Select Advanced Index Settings Rebuild.
See also "Search" |
Label: \windows\system32\label.exe Change the label of any hard disk, floppy disk, or removable media. To open Command Prompt label Usage label [drive:] [label]
Description Every disk has a labelthe name shown in Explorer next to the drive letter (Explorer doesn't show the label for floppies). To change the label for any disk, right-click on its icon in Explorer (or the My Computer window), select Properties, and type a new name in the unlabeled field at the top of the Properties window. The Label tool duplicates this functionality from the command line. For example, to change the label of drive c: to "shoebox," type: label c: shoebox
If you omit label, you will be prompted to enter a new label. If you omit drive, label will use the current drive. Notes A disk's label has no effect on the operation of the disk; for hard disks, it's purely decorative. For CDs and other removable media, it's used to quickly identify what's in the drive. You can also set a label for a drive using the Disk and Volume Properties dialog. For details, see "Disk and Volume Properties," in Chapter 9.
|
NTFS Compression Utility: \windows\system32\compact.exe View or configure the automatic file compression on NTFS drives. To open Command Prompt compact Usage compact [/c | /u] [/s[:dir]] [/a] [/i] [/f] [/q] [filename]
Description One of the features of the NTFS filesystem (see "FAT to NTFS Conversion Utility," in Chapter 11) is its support for automatic compression of individual files; older files can be optionally compressed to take up less disk space at the expense of speed to access them. Right-click on any file or folder, select Properties, and then click the Advanced button. The "Compress contents to save disk space" option is used to instruct Windows to compress the selected item. If a folder is selected, all of its contents will be compressed (you'll be prompted about any subfolders); furthermore, any files added to that folder will be automatically compressed as well. The NTFS Compression Utility is the command-line equivalent of this setting, useful for automating the compression or decompression of several files with the help of a WSH script or batch file. The NTFS Compression Utility takes the following options:
filename Specifies a file, folder, or group of files (using wildcards) to compress or uncompress.
/c Compresses the specified file(s). If a folder is specified for filename, the folder will be marked so that subsequent files added to the folder will be compressed automatically. Include the /s parameter to compress files already in the folder.
/u Uncompresses the specified file(s). If a folder is specified for filename, the folder will be marked so that subsequent files added to it will not be compressed automatically. Include the /s parameter to uncompress files already in the folder.
/s If a folder is specified for filename, the /c and /u parameters will act only on new files added to the folder. Include the /s parameter as well to compress or uncompress files already in the folder. If filename is omitted, use the /s option to act on all files in the current folder.
/a Includes files with hidden or system attributes set; otherwise, ignored by compact.exe.
/i Ignores errors; otherwise, compact.exe will stop when the first errors are encountered.
/f Forces compression on all specified files; otherwise, files that are already compressed will be skipped.
/q Quiet mode; use this option to report only the most essential information. If you run the NTFS Compression Utility without any options, it will display the compression settings for the current directory and all of its contents. Notes This type of file compression is supported on NTFS drives only. Go to Windows Explorer Organize Folder and Search Options View tab and turn on the "Show encrypted or compressed NTFS files in color option to visually differentiate such files from unencrypted, uncompressed files. For tangible proof that a given folder or file is actually compressed, right-click on it in Explorer and select Properties. If the "Size on disk" value is less than the "Size" value, the item is compressed.
See also "FAT to NTFS Conversion Utility," in Chapter 11 |
OpenFiles: \windows\system32\openfiles.exe List all currently open files, either shared and accessed by other users on a network or (optionally) opened locally. To open Start type command into the Search field right-click on Command Prompt Run as Administrator Usage openfiles /local [ on | off ] openfiles /query [/s system [/u user [/p [pass]]]] [/fo format] [/nh] [/v] openfiles /disconnect [/s system [/u user [/p [pass]]]] {[/id id] [/a accessedby] [/o openmode]} [/op openfile]
Description The OpenFiles tool lets you view a list of all the shared files that are currently open across the network and, optionally, files that are opened locally. You can use this to avoid deleting or changing a document that a remote user is working on. Type openfiles without any options to display a report such as this: Files Opened Remotely via local share points: --------------------------------------------- ID Accessed By Type Open File (Path\executable) ===== ============= ========== ====================================== 98 LOU Windows C:\Stuff to Eat\frittatas.txt 101 EDDIE Windows C:\Stuff to Drink\milkshakes.txt 107 CLANCY Windows C:\Stuff to Eat\pork chops.txt
OpenFiles accepts one of three primary commands, each of which has a range of parameters:
/local [ parameters] Turn on or off the inclusion of local files in reports. Type: openfiles /local on
to turn on the "maintain objects list" global flag; this setting is turned off by default and requires Windows to be restarted when changed. Note that turning on this setting may slightly reduce performance.
/query [ parameters] Display a list of opened files and folders; specify /query for more flexibility than using openfiles without any options, such as the ability to connect to a different machine. Type openfiles /query /? for more information on the available parameters.
/disconnect [ parameters] Selectively disconnect files and folders that have been opened remotely. When viewing the list of open files, each entry has an ID; you can use that ID to close open files. Type openfiles /disconnect /? for more information on the available parameters. Notes See also "Net," in Chapter 7 |
Search Search for files. To open Start Search Start Enter text in Start Search Enter text in Search box in Windows Explorer. Description Search has been embedded so deeply into Windows Vista and Windows Explorer that at first it can be difficult to know where to begin. Should you use the Search box inside Windows Explorer? The one inside Internet Explorer? The Start Search box that appears when you click the Start button? How about choosing Start Search to go straight to the Search Folder and Advanced Search screen? Table 4-1 shows the major ways you can perform a search in Windows Vista and recommendations on when to use which. Table 4-1. Different ways to searchSearch method | When to use it |
|---|
Search box in Windows Explorer | Best for searching inside individual folders and subfolders, because it searches only the current folder and subfolders. Also best for searching on filenames. | Start Search (leads to Search folder and Advanced Search) | Best for performing complex searches across multiple folders and for when you want to save a search for future use. | Start Search box on the Start menu | Best for quick searches across multiple folders or for searching the Internet. Not good for searching for filenames. | Search box in Internet Explorer | Best for searching the Internet. |
Windows Vista performs a search while you type your search term into a Search box. So as you type the letters vis, for example, it will display all files that have vis in them and will narrow the search as you type more letters into the box. Understanding searching and the index When you search for a file on your computer, you aren't actually searching your entire hard disk. Instead, you're searching the Windows Vista index, which makes searching lightning fast. | Sometimes you will search outside the index. For example, when you perform a search inside a folder, you also search the filenames inside the folder, not just the index. And, as explained later, you can also expand your search to nonindexed locations when you want. |
|
Although the index makes searching lightning fast, it can cause some confusion, as well. By default, your entire PC is not indexed, because doing that would defeat the purpose of the indexit would get so large that it would slow down your search. By default, the following are indexed: Your user folder (\Users\username), which contains your Documents, Music, Pictures, and Videos folders, as well as Contacts, Favorites, and the hidden AppData folder, which contains your Windows Mail messages. Offline files, which are files stored on a server or network drive that you have configured to be available offline. For details, see "Offline Files," in Chapter 7. The contents of your Start menu.
That's well and good, but what happens if you don't store files and folders underneath your user folder? What if you store them in other places on your hard disk? Then you won't find them when you perform a search, unless you specifically search for them outside the index, which of course defeats the purpose of the index. There is a solution, however. You can add any folders you want to the index (and take them away, as well). For details, see "Indexing Options," earlier in this chapter. A simple way to get to the Indexing Options screen is from Windows Explorer, by choosing Search Tools Modify Index Locations. (The Search Tools icon appears only after you type text into the Search box.) The Windows Explorer Search box The Search box in Windows Explorer searches only within the current folder and subfolders beneath it. It searches the index and the names of files in the folder and subfolders, and displays results directly in Windows Explorer, as you can see in Figure 4-16. Figure 4-16. Results when searching from a folder in Windows Explorer 
You can sort, filter, group, and stack the results, as you can normally with Windows Explorer. (For details, see "Windows Explorer," later in this chapter.) At the bottom of your results, you'll see a "Did you find what you were searching for?" heading. Beneath that, you will see an Advanced Search link, which will launch an advanced search when clicked. (See the next section, "The Search Pane and Advanced Search," for details.) If the folder you've searched through hasn't been indexed, you'll also see a link to "Search in File Contents," which will search the actual contents of the files in the folder, rather than just the filenames. The Search Pane and Advanced Search To make it easier to search in a folder, you can turn on the Search Pane (Figure 4-17), by selecting Organize Layout Search Pane. Figure 4-17. The Search Pane in Windows Explorer, which makes it easy to search for specific file types 
| The Search Pane is not normally available as an option from Organize Layout. However, as soon as you type text into the Search box, the option will be available. Delete the search or move your cursor out of the box, and the Search Pane will no longer be available. However, the option is always available from the Computer and Desktop folders. |
|
The Search Pane makes it easy to search for different file types; click the file type for which you want to search, and then perform your search. The Search Pane also displays an Advanced Search button at the far right of the screen. Click it, and Advanced Search appears (Figure 4-18). Use of Advanced Search is self-explanatory and needs no further clarification. If you want to search outside the index, check the box next to "Include non-indexed, hidden, and system files," although as Windows Vista warns you, this may slow down your search considerably. Figure 4-18. Advanced Search, which lets you fine-tune your searches 
The Location field can be extremely useful if you're on a network, because you can add network drives and folders to your search. Select "Choose search locations" from the Location field, then browse to the network PCs, folders, and devices you want to search (Figure 4-19) and include them in the search. Figure 4-19. Adding network locations to your search 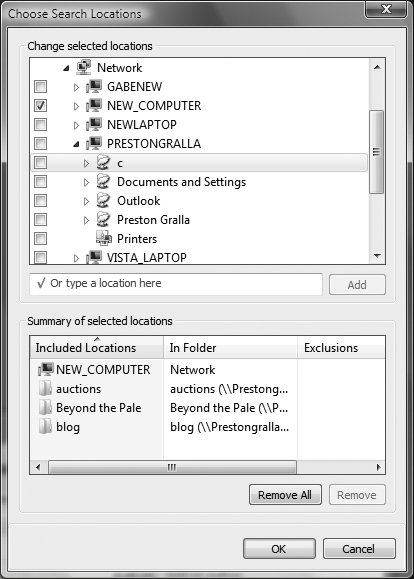
The Start Search box The Start Search box on the Start menu works much like the Search box in Windows Explorer, with some differences. It searches your entire PC, not just within an individual folder and subfolders. As you type, it shows you these results, grouped according to the types listed here (and shown in Figure 4-20): Programs (includes utilities and Control Panel applets as well as programs) Favorites and History (from the Internet) Files (includes folders and shortcuts) Communications (email and chat transcripts)
Figure 4-20. Searching from the Start menu 
Click any result to view it, open it, or launch it. To see all results in Windows Explorer, click "See all results." To search the Internet using your default search engine, click "Search the Internet," and a search will be launched using your default browser. The Search folder and saving searches When you choose Start Search, youre sent to the Search Results folder (Users\username\Search Results), which starts as a blank Windows Explorer screen, with the Search Pane turned on. You can do a basic Windows Explorer search from here, or turn on Advanced Search in the usual way. Even starting in the Users\username\Search Results folder, though, you'll do a search of your entire PC, not just the individual folder. To save a search, click Save Search. From the screen that appears (Figure 4-21), give the search a name. File extensions for searches are .search-ms, and by default, they are saved in the \Users\username\Searches folder, but you can save them to any folder. Figure 4-21. Saving a search so that you can later return to it 
There are many ways to return to a saved search. You can navigate to the .search-ms file and double-click it. There's a faster way, though: in the Navigation Pane, click More under Favorite Links, and choose Searches. You'll be sent to the \Users\username\Searches folder, and a list of all saved searches will appearnot just those that you've created, but also those that Windows Vista has already created for you, including searches for all recent documents, recent email, recent music, and more. Note that you can save searches not only when you use Start Search, but also when youre inside any folder in Windows Explorer. Your searches will be saved by default to your Search folder, no matter where you start your search. Using Search Properties and syntax The Windows Explorer Search box (and other search boxes also) lets you search using file properties, as well as a specialized syntax that makes finding files easier. You can search on any metadata associated with any files as a quick way to find what you want. Table 4-2 shows you some of the more common properties you can search on and how to search using them. Table 4-2. Search propertiesProperty | Property description | How to search for it |
|---|
Filename | The name of the file. | Type part or all of the filename. To find a file named budget.xls, you could type budg or .xls. | Kind of file | A description of the file, such as Document, Picture, Video, or Music. | Type the kind of filefor example, Music for any music files. | File extension | The file extension, such as .xls, .doc, .jpg, and so on. | Type the filename extension. You can also use wildcardsfor example, *.mp3. | Tags | Words or phrases you or others added to the files to describe them. | Type a tag to see a list of files that have the matching tag. | Author | The person who created the file. | Type the name of the author. |
Use properties with the proper syntax to narrow the search. For example, to search for files that have the name "budget" in them, you would type this: Name:budget
To search for files with the tag of "budget" you would type: Tag:budget
To find files modified on November 7, 2006, you would type: Modified:11/07/2006
You can also use the Boolean filters AND, NOT, and OR; the comparison operators > and <; and grouping syntax, such as " " and ( ). Furthermore, you can combine them with searching for file properties. If you want to forgo complex searches and having to remember search syntax, you can also use natural language search, which, as explained earlier, is the ability to search for files using plain English rather than complex syntax. For example, instead of typing: Kind:music artist:(Gluck or Salieri)
you could type: Music by Gluck or Salieri
If you want to do that, you'll have to turn on natural language search, using the Search tab of the Folder Options window. See "Folder and Search Options," earlier in this chapter, for details. Notes When using Boolean filters, you have to capitalize AND, NOT, and OR. To modify how and where to searchfor example, whether to include subfolders in searches, when and how to use the index, and so onuse the Search tab of the Folder Options screen. For details, see "Folder and Search Options."
See also "Windows Explorer," "Folder and Search Options," and "Indexing Options" |
Shadow Copies Shadow copies are made every time Windows Vista creates a restore point, and they can be used to restore previous versions of files. See "System Protection and System Restore," in Chapter 11, and "File Properties," in this chapter, for details. |
Subst: \windows\system32\subst.exe Create a new drive letter that is linked to a folder on your hard disk. To open Command Prompt subst Usage subst [drive:] [path | /d ]
Description Subst is a neat little utility that creates a new drive letter and actively links it to an existing folder on your hard disk. For example, type: subst z: c:\opera\Cecilia Bartoli
to create a new drive letter, z:, and link it to the folder c:\opera\Cecilia Bartoli. When you open drive z: in Explorer, you'll see the contents of the linked folder. This is very useful if you access a particular folder frequently but find Windows shortcuts too limiting. For example, a drive created with Subst allows you to access a file in the folder, like this: z:\ Se mai senti.mp3. To disconnect a Subst'd drive, type: subst z: /d
Notes |
Windows Explorer: \windows\explorer.exe The default Windows interface, including the Start menu, the Desktop, the Taskbar, the Search tool, the Windows Explorer window, and all folder windows. To open Start All Programs Accessories Windows Explorer Command Prompt explorer Double-click any folder icon on the Desktop or in any folder window. Windows Key-E Usage explorer.exe [/n] [,/root,object] [[/select],subobject]
Description The Explorer is the default Windows shell (see Figure 4-22). When run without any command-line parameters, it opens a two-paned window (commonly referred to simply as Explorer) in which you can navigate through all of the files, folders, and other resources on your computer. Figure 4-22. Windows Explorer, the primary means of file and folder management in Windows Vista 
See Chapter 2 for basic navigation and file management principles, and Chapter 3 for discussions of the visual elements. Explorer accepts the following command-line options (note the mandatory commas):
/n Forces Explorer to open a new window (even if the specified folder is already open somewhere).
/select], subobject Include subobject to specify the file or folder to be initially highlighted or expanded when the folder is opened. If subobject is a folder, it will be expanded in the tree. If you also include the /select parameter (not valid without subobject), the parent of the specified folder is highlighted on the tree, no branches are initially expanded, and subobject will be highlighted in the right pane.
,/root,o bject By default, Explorer opens with the Desktop as the root folder. Use ,/root,object to specify a different root. The object parameter can be a folder name or a class ID. For example, if you want Explorer to open to the Computer folder so that no drive branches are initially expanded (which is handy if you have several drives), type the following: explorer.exe /n, /select, c:\
To open an Explorer window rooted at the Documents folder, type: explorer.exe /root,c:\Documents and Settings\username\Documents
where username is the username of the owner of the Documents folder. The Windows Explorer Toolbar Depending on the type of folder you're viewing, the Windows Explorer Toolbar changes to offer context-sensitive buttons, although it always has the basic Organize and Views buttons. For example, when viewing the Computer folder (Figure 4-23), there are icons for viewing file and object properties, viewing system properties, uninstalling or changing a program, mapping a network drive, and opening the Control Panel. Figure 4-23. The Windows Explorer Toolbar for the Computer folder 
If the folder you're viewing is filled with music, a different toolbar appears and includes buttons for playing music and burning a CD. A folder with pictures and videos, meanwhile, would include buttons for playing a slide show and burning a CD. You can customize your view of folders using the Customize tab of the Folder Options dialog box. (See "Folder and Search Options," earlier in this chapter.) If the folder has pictures in it, you can play a slide show that displays the pictures one by one, using the Slide Show button. For details, see "Slide show," in Chapter 12. Windows Explorer views The Views button on Windows Explorer pops up a menu (Figure 4-24) that lets you choose among seven different folder views: Extra Large Icons Large Icons Medium Icons Small Icons List Details Tiles
Figure 4-24. The Views menu in Windows Explorer 
The four icon views are self-explanatory. Windows Explorer folder icons are "live"that is, they will display live thumbnails of the contents within them so that you can see thumbnails of pictures contained in the folder. The larger the icon, the easier it is to see these live thumbnails. The List view does what it saysprovides only a list of the files. The Details view lists the files and displays information about each, such as file size, date created, and so on. The information displayed about each will vary according to the folder type. The Tiles view is a combination of an icon view and a List view; it shows thumbnails of each file but also displays information about them. | To see basic information about any file, in any view, hover your mouse over it. A balloon will appear displaying the file type, file size, and other information that changes according to the type of file. |
|
If the folder has pictures in it, you can play a slide show that displays the pictures one by one, using the Slide Show button. For details, see "Slide show," in Chapter 12. Windows Explorer panes Windows Explorer has four main panes that you can turn on and off by choosing Organize Layout:
Search Pane Displays the Search toolbar (see "Search," earlier in this chapter, for details) | The Search Pane option appears only when you type text into the Search box. If you delete the text, the Search Pane will no longer be available as an option. However, it is available as an option from the Desktop and Computer folders. |
|
Details Pane Shows, at the bottom of the screen, information about the object currently highlighted
Preview Pane Shows, on the righthand side, a preview of the file currently highlighted
Navigation Pane Shows folders and objects on the lefthand side of the screen in tree-style view for navigating Figure 4-25 shows Windows Explorer with the panes labeled. Figure 4-25. The four panes in Windows Explorer 
Stacking and sorting Windows Vista introduces new ways to filter and display files in Windows Explorer by grouping and stacking files based on their metadata. In Windows Explorer, if you click in the right side of any property header (Name, Size, Rating, and so on), a down arrow appears, along with a drop-down list that includes buttons labeled Sort, Group, and Stack. The Sort button is the default for Windows Explorer. The Group button displays files in separate groups, according to the value of the propertyfor example, by rating, as shown in Figure 4-26. Figure 4-26. Stacking files based on rating metadata 
You can collapse and expand any group by double-clicking the group titlefor example, 3 Stars. In addition, you can display only some groups and not others. In the example in Figure 4-26, if you selected 3 Stars instead of Group, you would display only files that were rated three stars. If you instead chose Stack, it would organize the files into what look like subfoldersin our example, by three stars, four stars, and five stars. To see the files in any stack, double-click the stack. Modifying file tags and properties Every file on your system has tags and properties associated with it, and these are displayed in several places in Windows Exploreron the righthand side of the screen when using Details or Tiles views, when hovering a mouse over the file, and in the Details Pane. They're also shown inside many applications. And when you do a search for files, those tags and properties are searched through as well. You often can modify tags and properties using the program that created the file, but you can also use Windows Explorer to modify them. Turn on the Details Pane, then highlight the file whose property you want to change. In the Details Pane, click the property you want to change, edit what's there or add new text, and click Save. To add tags, type them directly into the Tags field; separate multiple tags with semicolons, as shown in Figure 4-27. Figure 4-27. Adding tags to a file using the Details Pane 
| Certain properties that are inherent to the file itself can't be changed, such as file size and dimensions. |
|
Windows Explorer Address Bar The Address Bar is covered in some detail in Chapter 3, so there is no need to go into detail about it here. However, there is one unique, often overlooked aspect of Windows Explorer's Address Barthe menu that appears when you right-click it (Figure 4-28). Figure 4-28. The little-known Address Bar menu 
You can use it to copy the address to the Clipboard. The Edit Address choice turns the Address Bar into a text menu that lets you type in text. Figure 4-29 shows you how the Address Bar changes when you edit it as text. Figure 4-29. Using text in the Address Bar 
Using ZIP archives in Windows Explorer Using Windows Explorer, you can compress files and put them into packages using the .zip format, or simply compress individual files. In addition, Windows Explorer lets you look inside .zip archives and uncompress them. In Windows Explorer, select the file or files that you want to compress, right-click them, and choose Send to Compressed (zip) folder. A ZIP file will be created in the current folder, with the name of the file or the first file in the group, and ending in the You can view files inside .zip archives just as you can any other folder. But if you double-click a file in the folder, you'll open a read-only copy. To make changes to the file, choose File Save As and save it on your hard drive. You can instead extract the files from the archive, and then work with them after theyve been extracted. Right-click the .zip file, select "Extract all," and then extract the files to any location. CD burning You can "burn" data directly to a CD or DVD using Windows Explorer. Click the Burn button and follow the directions. But keep in mind that this burns only a data discthat is, it merely copies files from your PC to the disc. You won't be able to play it in a CD player that plays only music CDs. To burn a music CD, you need to use Windows Media Player. See "Windows Media Player," in Chapter 12, for details. Notes Some folders in Windows Vista are junctions, which means that they don't actually exist and are only pointers to another folder. These junctions are used to preserve holdovers from earlier versions of Windows, and they are there so that programs written for earlier versions of Windows can continue to function properly. For example, the Documents and Settings folder is a junction, and if you try to access it in Windows Explorer, you will get the error message "Documents and Settings is not available." If you look at the Documents and Settings folder, you'll see that it's actually a shortcut; it has the shortcut icon on the folder itself. It points to the \Users folder, which has replaced it. If you turn on the Search Pane in a folder and use it to do a search, you will search only in that folder, not across your entire computer.
See also "Folder Properties," "File Properties," and "Search," in this chapter, and "Internet Explorer," in Chapter 5 |
|